多线程
线程和进程的概念
什么是进程?
进程是程序的一次执行过程,是系统运行程序的基本单位。系统运行一个程序即是一个创建进程的过程。
进程是资源(CPU、内存等)分配的基本单位,它是程序执行时的一个实例。
什么是线程?
线程是比进程更小的执行单位,线程是程序执行时的最小单位,它是进程的一个执行流,是CPU调度和分派的基本单位,一个进程可以由很多个线程组成,线程间共享进程的所有资源,每个线程有自己的堆栈和局部变量。
线程和进程的区别
- 一个程序执行时会至少会启动一个进程,但一个进程内会启动一个或多个线程
- 各个进程之间是相互独立的,拥有独立的运行空间、内存,但是线程不能够独立运行,多个线程依赖、共享进程中的资源。
- 线程相比于进程是更小的执行单位,但没有独立资源,所以在运行时线v程切换的开销小,但不利于资源的管理和保护;而进程正相反。
线程的生命周期
线程生命周期
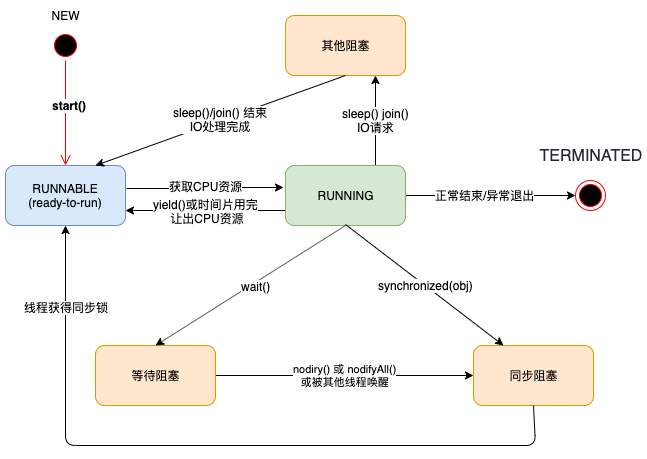
上图展示了线程从创建到结束的整个生命周期,下面从状态和控制两个方面分解图中的内容
线程状态
线程具有5中基本的状态:
NEW(新建状态): 创建线程,还未启动
RUNNABLE(就绪状态): 可运行状态,但还未获得时间片,等待执行
RUNNING(执行状态): 运行状态,在就绪状态获得了时间片,进入运行状态
BLOCKED(阻塞状态):当某些情况下,线程被阻止运行,进入阻塞状态,阻塞的状态可分为三种:
- 第一种为执行了wait()后会进入放入线程等待队列中,这种情况叫等待阻塞.
- 第二种为等待获取synchronized()同步锁时,会讲线程放入同步锁队列中,等待前一个线程执行完synchronized中的内容,这种情况叫同步阻塞.
- 第三种为执行了sleep()或join()时,和wait()不同,它不会释放对象锁.
- 第一种为执行了wait()后会进入放入线程等待队列中,这种情况叫等待阻塞.
TERMINATED(终止状态):当线程正常结束或异常退出时,会到达终止状态
线程方法
- run/start 需要并行处理的代码放在run()方法中,start()方法启动线程将自动调用 run() 方法,这是由Java的内存机制规定的。并且run()方法必须是public访问权限,返回值类型为void。
- wait 当前线程暂停执行并释放对象锁标志,让其他线程可以进入synchronized数据块,当前线程被放入对象等待池中
- nodify/nodifyAll 唤醒等待(wait)的线程
- sleep 休眠一段时间后,会自动唤醒。但它并不释放对象锁。也就是如果有 synchronized同步块,其他线程仍然不能访问共享数据。注意该方法要捕获异常
- join 当前线程停下来等待,直至另一个调用join方法的线程终止,线程在被激活后不一定马上就运行,而是进入到可运行线程的队列中
- yield 停止当前线程,让同等优先权的线程运行。如果没有同等优先权的线程,那么yield()方法将不会起作用
线程同步
synchronized关键字
前面讲过Synchronized关键字总结以及使用synchronized实现单例中的 double-check 实例。
- 锁定方式,使用sync锁定的是对象,而锁定对象带来的是其他线程无法获取对象锁,而无法执行synchronized下面的代码。而不是锁定代码!!
- 使用synchronized修饰静态方法,锁定的是
.class对象 - 使用synchronized修饰普通方法,锁定的是
this实例对象 - 使用synchronized(obj),锁定特定obj对象
- 使用synchronized修饰静态方法,锁定的是
- 使用sync的方法和非sync方法的调用时互不影响
- 因为synchronized是可重入的,所以两个sync方法可相互调用,不会产生死锁。
- 在sync中的代码出现异常时,锁会自动被释放,其他线程可拿到对象锁。
- synchronized锁升级,在早起的java中,使用sync相当于向操作系统申请锁,这个锁是重量级锁,而在1.5之后,出现了锁升级的概念:
- 偏向锁,当使用sync时,会将对象中的头部信息中的markword中记录当前锁定线程的线程id。
- 自旋锁,如果多线程争用锁,则升级为自旋锁,占用CPU,通过线程自旋等待获取对象锁。
- 重量级锁,当自旋次数超过一定次数(10次),升级为重量级锁。
volatile
vaolaile关键字具有两个特性:
- 保证线程可见性
多个线程读取写入对象时在非同步进行的时候是如图中的步骤一样
- 从内存中读取对象o,读取到线程2本地
- 然后在线程2中修改了o的值,再写回内存。
- 线程1从内存读取对象,得到最新的对象o。

上面的步骤是正常,sync的情况下的情况下。然而在很多情况下,线程之间是同步进行的,在第一步线程2读取到内容,线程1也读取到了内容,线程2再写回内容,此时如果线程1再次修改和写回是,内容就出现了覆盖。
这种方式就是将对象使用volatile修饰。此时,保证了对象在所有线程间的可见性。
在这种情况下,最直接的方式就是在这个对象o被修改、写入到内存时,其他线程立刻能知道这个对象已经被修改了,进行再次获取最新的内容来保证最终的一致。
- 禁止指令重排序
一个new语句可以创建一个对象,而创建这个对象虚拟机会分为多条指令让CPU进行处理,而处理的过程会发生指令的重新排序。
volatile关键字对于基本类型的修改可以在随后对多个线程的读保持一致,但是对于引用类型如数组,实体bean,仅仅保证引用的可见性,但并不保证引用内容的可见性。
CAS(Compare and Swap)
因为类似count++这种操作时非原子性的,所以每次在需要同步使用时必须要在count++处添加synchronized,保证此处只能有一个线程操作。
此时出现了Atomicxxx类,该类中的所有操作都是原子性的,从此区别于使用sync包裹count++,而是使用CAS乐观锁的方式。
在Atomic类中,实现”原子“这一性质的根源为UnSafe类中的CompareAndSwap相关方法,这些方法就是Java实现的CAS。
- CAS分析
1 | public static void main(String[] args) { |
在incrementAndGet中使用了CAS操作,每次从内存中读取数据然后将此数据和+1后的结果进行CAS操作,如果成功就返回结果,否则重试直到成功为止。
整个compareAndSwapInt是一个原子的操作,在含义上可以理解为:
1 | compareAndSwapInt(this, valueOffset, expect, update){ |
- ABA问题
因为CAS需要在操作值的时候检查下值有没有发生变化,如果没有发生变化则更新,但是如果一个值原来是A,变成了B,又变成了A,那么使用CAS进行检查时会发现它的值没有发生变化,但是实际上却变化了。
对于一个基本数据类型如Integer等,不会出现ABA问题,只要保证最终的一致就可以了。
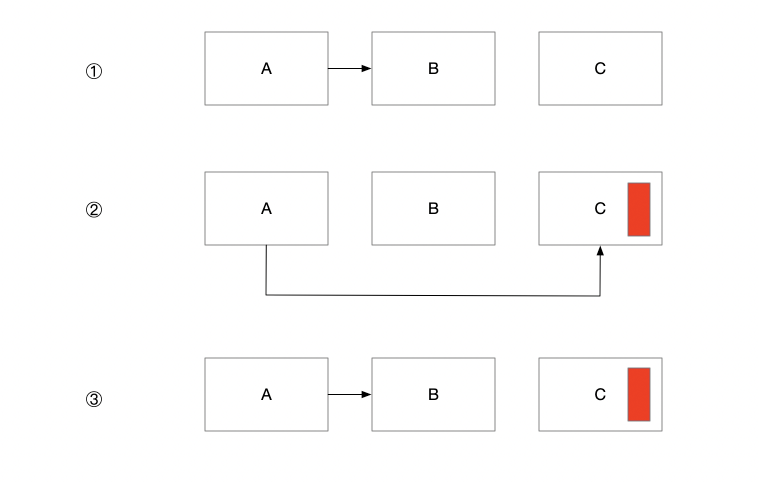
但是对于一个普通对象,ABA问题的影响就体现出来了。如右图中。在第2步中,已经将c的内容进行了变更,然而在CAS判断的时候,会判断B有没有变。
了解即可。。。
相关同步类
ReentrantLock
由名字就可以得知这个 ReentrantLock 是可重入的锁,对比同样可重入的synchronized,它有什么优势有什么劣势呢?
- 使用lock()和unlock()方法加锁
- 使用tryLock() 尝试获得锁,能够限制获得锁的时间,更灵活
- 设置公平锁,各线程公平竞争
CountDownLatch
latch是门闩的意思,所以countDownLatch的意思大致就为,每次线程运行后将count-1,直至减为0后,打开门闩,执行后面的程序。
1 | private void useCountDownLatch(){ |
上面代码中,建立了10个线程,每个线程几乎同时开始,并且sleep1秒钟。输出的结果为:
1 | Task Start! |
可以看到,只有当所有线程执行完成后,才会执行后面的程序,否则所有线程就一直block在countDownLatch.await();方法处。
CyclicBarrier
多个线程互相等待,直到到达同一个同步点,再继续一起执行。
CyclicBarrier 和 CountDownLatch 不一样的地方在于
- 发展的方向不同:前者是递增发展,而后者为递减
- 使用次数不同:CountDownLatch只能使用一次,而CyclicBarrier可以多次使用
- 最重要的是概念、用法不同:CountDownLatch为一个或者多个线程,等待其他多个线程完成某件事情之后才能执行。而CyclicBarrier则为多个线程互相等待,直到到达同一个同步点,再继续一起执行。
ReadWriteLock
如名字一样,是读写锁,在ReadWriteLock中通过readLock()获取读锁,通过 writeLock() 获取写锁。
为什么要将写锁和读锁进行分离?这就好考虑应用场景。读写锁的应用场景通常是需要特别考虑效率的地方,并且读多写少的情况。
读的时候使用共享锁:在多线程读的时候,没有必要将方法锁住,多线程一块读效率更高。
写的时候使用排他锁:写的时候,其他线程不能同时读和写,以防止产生脏读的现象。
也就是说,读的时候是多线程并行读,写的时候只能单线程写。下面简单举个读写的例子。
1 | public class JUC03_ReadWriteLock { |
这时,如果使用synchronized将read和write都上锁的话,那么每次读的时候都需要经过一秒的等待时间,所以总共需要等待11秒。但是,如果使用读写锁,总的读的时间可能也就一秒,总共也就3秒。
所以,在读多写少的情况下,使用读写锁,效率会非常高。
Semaphore
信号量,通过使用这个同步工具类,可以限制执行线程的数量。当特定数量的线程执行完,其他线程才可以执行。
类似买汽车票时去窗口排队一样,一共四个窗口,100个人,同时进行买票的只能是在四个窗口排队的那四个人。
1 | public class JUC03_Semaphore { |
上面声明了3个线程,设置的限号量的permit数量为2,也就是说能够同时运行2个线程,每次线程运行时会acquire,也就是拿走一个信号量,执行完再放回。
所以结果也可想而知,t1和t2几乎同时被打印,t3过了两秒才被打印出来。
所以,如果需要对执行的线程数量需要控制,使用Semaphore,起到限流的作用。
线程通信
线程间通信,也就是线程a 通知到线程 b,可以有很多种方式,
- wait/notify /nodifyAll
- Lock/Condition
- countDownLatch
- LockSupport
根据实例代码来了解过程。
一、线程 b 监听线程 a 的工作过程
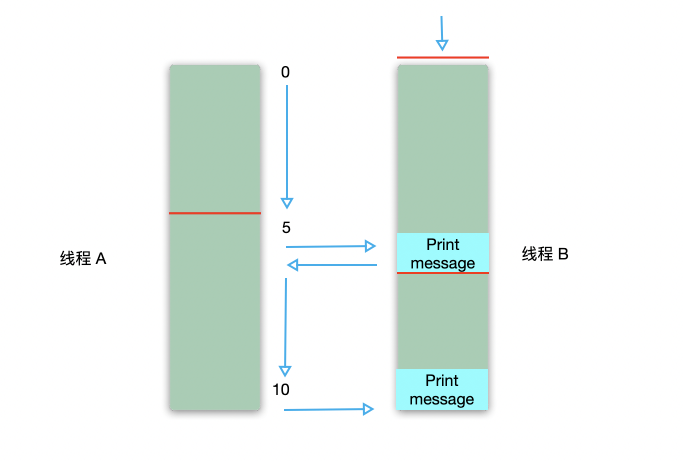
使用 wait 和 notify 实现
- 线程 b 先运行,进行等待
- 线程a 随后运行,当打印到 5 的时候,唤醒线程 b
- 唤醒线程 b 后,打印信息后,立刻唤醒线程a
- 线程 a 被唤醒后,继续打印
实现如图中的所显示的一样:当出现红色条时,证明当前线程为阻塞的。
1 | public class JUC04_StopOtherThread01 { |
使用ReentrantLock和Condition实现
与 wait/notify 的结构相同
1 | public class JUC04_StopOtherThread02 { |
CountDownLatch
1 | public class JUC04_StopOtherThread03 { |
LockSupport
1 | public class JUC04_StopOtherThread04 { |
除了监听,实现打断线程输出的这个例子,还有一个非常经典的就是生产者消费者的问题。
二、多线程中的生产者消费者问题
使用 wait 和 nodify 实现
1 | public class JUC04_CustomerAndProducer01 { |
使用 nodifyAll 会全部叫醒所有线程,如何实现单独叫醒某些线程?可以使用 ReentrantLock 来实现
使用ReentrantLock实现
ReentrantLock 通过使用多个 newCondition 来实现对不同类的线程单独唤醒。
1 | public class JUC04_CustomerAndProducer02 { |