NanYin的博客

记录生活点滴


  • Home

  • About

  • Tags

  • Categories

  • Archives

  • Search

Junit的使用和源码分析

Posted on 2018-10-28
Words count in article: 2.3k | Reading time ≈ 11

Junit的使用和源码分析

Junit是一个编写可重复测试的Java测试框架,代码编写非常有技巧性,值得反复阅读。

跟着官方文档学习Junit

官方文档往往是学习最好的资料。

简单测试例子

1
2
3
4
5
6
7
8
9
10
11
12
13
14
15
16
17
18
19
20
21
22
23
public class FirstTest {

public int add(int a, int b) {
return a + b;
}

@Test
public void testAdd(){
FirstTest firstTest = new FirstTest();
int result = firstTest.add(1,2);
// assertEquals(4,result);
assertEquals(3,result);
}

<!--
- 如果判断不相等的时候,后台报错信息
- java.lang.AssertionError:
- Expected :4
- Actual :3
- <Click to see difference>
-->

}

这只是简单的例子,实际上的单元测试要比这个复杂的多,在实际应用上单元测试十分有必要,编写后台代码时能够尽快检验代码的正确性。

Assertions 断言

Junit提供了所有基本数据类型,Object类和数组的断言,参数是 预期值后面是实际值,可选项,第一个参数可以是断言失败时输出的内容,与其他断言稍有不同的是,AssertThat的参数是 失败输出的内容,实际值和一个Matcher
Object。

1
2
3
4
5
6
7
8
9
10
11
12
13
14
15
16
17
18
19
20
21
22
23
24
25
26
27
28
29
30
31
32
33
34
35
36
37
38
39
40
41
42
43
44
45
46
47
48
49
50
51
52
53
54
55
56
57
58
59
60
61
62
63
64
65
66
67
68
69
70
public class AssertTests {
@Test
public void testAssertArrayEquals() {
byte[] expected = "trial".getBytes();
byte[] actual = "trial".getBytes();
assertArrayEquals("failure - byte arrays not same", expected, actual);
}

@Test
public void testAssertEquals() {
assertEquals("failure - strings are not equal", "text", "text");
}

@Test
public void testAssertFalse() {
assertFalse("failure - should be false", false);
}

@Test
public void testAssertNotNull() {
assertNotNull("should not be null", new Object());
}

@Test
public void testAssertNotSame() {
assertNotSame("should not be same Object", new Object(), new Object());
}

@Test
public void testAssertNull() {
assertNull("should be null", null);
}

@Test
public void testAssertSame() {
Integer aNumber = Integer.valueOf(768);
assertSame("should be same", aNumber, aNumber);
}

// JUnit Matchers assertThat
@Test
public void testAssertThatBothContainsString() {
assertThat("albumen", both(containsString("a")).and(containsString("b")));
}

@Test
public void testAssertThatHasItems() {
assertThat(Arrays.asList("one", "two", "three"), hasItems("one", "three"));
}

@Test
public void testAssertThatEveryItemContainsString() {
assertThat(Arrays.asList(new String[] { "fun", "ban", "net" }), everyItem(containsString("n")));
}

// Core Hamcrest Matchers with assertThat
@Test
public void testAssertThatHamcrestCoreMatchers() {
assertThat("good", allOf(equalTo("good"), startsWith("good")));
assertThat("good", not(allOf(equalTo("bad"), equalTo("good"))));
assertThat("good", anyOf(equalTo("bad"), equalTo("good")));
assertThat(7, not(CombinableMatcher.<Integer> either(equalTo(3)).or(equalTo(4))));
assertThat(new Object(), not(sameInstance(new Object())));
}

@Test
public void testAssertTrue() {
assertTrue("failure - should be true", true);
}
}

异常测试

下面分为两种方式来完成对异常的测试

期待的异常

如何检测程序是否如期的抛出异常,junit可以使用注解的参数来实现。

1
2
3
4
@Test(expected = IndexOutOfBoundsException.class)
public void testException(){
new ArrayList<Integer>().get(0);
}

深入的异常

上述方法对于简单的情况很有用,但它有其局限性。例如,您无法在异常中测试消息的值,也无法在抛出异常后测试域对象的状态

  • try/catch 语句
1
2
3
4
5
6
7
8
9
@Test
public void testTryCatch(){
try {
new ArrayList<Integer>().get(0);
fail("失败信息");
}catch (IndexOutOfBoundsException indexOutOfBoundsExecption){
assertThat(indexOutOfBoundsExecption.getMessage(), is("Index: 0, Size: 0"));
}
}
  • rule 规则
1
2
3
4
5
6
7
8
9
10
@Rule
public ExpectedException thrown = ExpectedException.none();

@Test
public void testExpectException(){
List<Object> list = new ArrayList<Object>();
thrown.expect(IndexOutOfBoundsException.class);
thrown.expectMessage("Index: 0, Size: 0");
list.get(0); // execution will never get past this line
}

Matchers and assertThat [ 匹配器和assertThat ]

新加入了assertThat断言机制 assertThat([value], [matcher statement]);

1
2
3
4
assertThat(x, is(3));
assertThat(x, is(not(4)));
assertThat(responseString, either(containsString("color")).or(containsString("colour")));
assertThat(myList, hasItem("3"));

assertThat 更具有可读性和可输入性,并且有组合性,就像 is(not(4)) 任何Machers都可以组合起来使用

以前的assertEquals等也是可以用的,assertThat 在使用Matchers的时候需要使用 import static org.hamcrest.CoreMatchers.*;来引用。里面的方法非常多。。

junit源码跟读

使用junit流程

使用继承自TestCase类

下面通过运行junit的自带的test,源程序为:

1
2
3
4
5
6
7
8
9
10
11
12
13
14
15
16
17
18
19
20
21
22
23
24
25
26
27
28
29
30
31
32
33
34
35
36
37
38
39
40
41
42
43
44
45
46
47
48
49
50
51
52
53
54
55
56
57
58
59
60
61
62
63
64
65
66
/**
* Some simple tests.
*/
public class SimpleTest extends TestCase {
protected int fValue1;
protected int fValue2;

@Override
protected void setUp() {
fValue1 = 2;
fValue2 = 3;
}

public static Test suite() {

/*
* the type safe way
*
TestSuite suite= new TestSuite();
suite.addTest(
new SimpleTest("add") {
protected void runTest() { testAdd(); }
}
);

suite.addTest(
new SimpleTest("testDivideByZero") {
protected void runTest() { testDivideByZero(); }
}
);
return suite;
*/

/*
* the dynamic way
*/
return new TestSuite(SimpleTest.class);
}

public void testAdd() {
double result = fValue1 + fValue2;
// forced failure result == 5
assertTrue(result == 6);
}

public int unused;

public void testDivideByZero() {
int zero = 0;
int result = 8 / zero;
unused = result; // avoid warning for not using result
}

public void testEquals() {
assertEquals(12, 12);
assertEquals(12L, 12L);
assertEquals(new Long(12), new Long(12));

assertEquals("Size", 12, 13);
assertEquals("Capacity", 12.0, 11.99, 0.0);
}

public static void main(String[] args) {
junit.textui.TestRunner.run(suite());
}
}

来看main方法,使用 junit.textui.TestRunner.run(suite()); 使用TestRunner运行test。首先先来看suite方法,有两种方法

  1. 静态的,需要手动在testSuite中添加test。
  2. 动态的,静态需要实现TestCase的runTest方法。而动态的只需要返回 TestSuite(SimpleTest.class);,下面来看这个TestSuite类

testSuite实际上就是运行test的集合,使用vector来存储test,其中这里使用到的TestSuite构造方法是:

1
2
3
4
5
6
7
8
9
10
11
12
13
14
15
16
17
18
19
20
21
22
23
24
25
26
27
28
29
30
31
32
33
public TestSuite(final Class<?> theClass) {
addTestsFromTestCase(theClass);
}
private void addTestsFromTestCase(final Class<?> theClass) {
fName = theClass.getName();
try {
getTestConstructor(theClass); // Avoid generating multiple error messages
} catch (NoSuchMethodException e) {
addTest(warning("Class " + theClass.getName() + " has no public constructor TestCase(String name) or TestCase()"));
return;

}
// 这个类是否是public的 如果不是 发出warning ,并且fail(message)
if (!Modifier.isPublic(theClass.getModifiers())) {
addTest(warning("Class " + theClass.getName() + " is not public"));
return;
}

Class<?> superClass = theClass;
List<String> names = new ArrayList<String>();
// 这句话说明的是如果这个类是superClass的超类,或者接口就返回true,否则返回false
while (Test.class.isAssignableFrom(superClass)) {
// 如果是true 有顺序的返回声明的方法
for (Method each : MethodSorter.getDeclaredMethods(superClass)) {
addTestMethod(each, names, theClass);
}
// 获得superclass类,递归的查找test方法
superClass = superClass.getSuperclass();
}
if (fTests.size() == 0) {
addTest(warning("No tests found in " + theClass.getName()));
}
}

最后提到的 fTests.size() == 0 这里会发生warning 然后fail。这个fTests 已经再前面声明
了,声明方法是:private Vector<Test> fTests = new Vector<Test>(10);

在对每个声明的方法循环的时候,使用到 addTestMethod 方法,来对每个方法进行处理。

1
2
3
4
5
6
7
8
9
10
11
12
13
14
15
16
17
18
19
20
private void addTestMethod(Method m, List<String> names, Class<?> theClass) {
// 获得方法名如果list数组中已经包含这个方法名,就直接退出
String name = m.getName();
if (names.contains(name)) {
return;
}
if (!isPublicTestMethod(m)) {
if (isTestMethod(m)) {
addTest(warning("Test method isn't public: " + m.getName() + "(" + theClass.getCanonicalName() + ")"));
}
return;
}
// 把这个方法名加入到names List中
names.add(name);
addTest(createTest(theClass, name));
}
//再来看外层的addTest方法 把拥有的test方法放到fTests中。
public void addTest(Test test) {
fTests.add(test);
}

使用createTest来针对test方法创建一个Test类

1
2
3
4
5
6
7
8
9
10
11
12
13
14
15
16
17
18
19
20
21
22
23
24
25
26
27
static public Test createTest(Class<?> theClass, String name) {
Constructor<?> constructor;
try {
constructor = getTestConstructor(theClass);
} catch (NoSuchMethodException e) {
return warning("Class " + theClass.getName() + " has no public constructor TestCase(String name) or TestCase()");
}
Object test;
// 通过反射方式获得方法的test实例
try {
if (constructor.getParameterTypes().length == 0) {
test = constructor.newInstance(new Object[0]);
if (test instanceof TestCase) {
((TestCase) test).setName(name);//如果继承TestCase
}
} else {
test = constructor.newInstance(new Object[]{name});
}
} catch (InstantiationException e) {
return (warning("Cannot instantiate test case: " + name + " (" + Throwables.getStacktrace(e) + ")"));
} catch (InvocationTargetException e) {
return (warning("Exception in constructor: " + name + " (" + Throwables.getStacktrace(e.getTargetException()) + ")"));
} catch (IllegalAccessException e) {
return (warning("Cannot access test case: " + name + " (" + Throwables.getStacktrace(e) + ")"));
}
return (Test) test;
}

经过以上的步骤获得了这个类中及其父类中的所有方法的Test。

使用testRunner.run运行test

1
2
3
4
5
6
7
8
9
10
11
12
13
14
15
16
17
18
19
20
21
22
23
24
25
26
public static void main(String[] args) {
junit.textui.TestRunner.run(suite());
}
// 使用TestRunner的run的静态方法 返回一个TestResult用来返回结果。
static public TestResult run(Test test) {
TestRunner runner = new TestRunner();
return runner.doRun(test);
}
// 调用runner的doRun方法
public TestResult doRun(Test test) {
return doRun(test, false);
}
public TestResult doRun(Test suite, boolean wait) {
// 用来返回结果的TestResult
TestResult result = createTestResult();
// 注册一个TestListener
result.addListener(fPrinter);
long startTime = System.currentTimeMillis();
// test.run方法
suite.run(result);
long endTime = System.currentTimeMillis();
long runTime = endTime - startTime;
fPrinter.print(result, runTime);
pause(wait);
return result;
}

运行Test的核心方法 返回TestResult返回结果。

1
2
3
4
5
6
7
8
9
10
11
12
13
14
15
16
17
18
19
20
21
22
23
24
25
26
27
28
29
30
31
32
33
34
35
36
37
38
39
40
41
42
43
44
45
46
47
48
/**
* Creates the TestResult to be used for the test run.
*/
protected TestResult createTestResult() {
return new TestResult();
}

public synchronized void addListener(TestListener listener) {
// protected List<TestListener> fListeners;
fListeners.add(listener);
}
// suite.run() fTests中的每一个test
public void run(TestResult result) {
for (Test each : fTests) {
if (result.shouldStop()) {
break;
}
runTest(each, result);
}
}
/**
* Runs the test case and collects the results in TestResult.
* 调用testResult的run方法
*/
public void run(TestResult result) {
result.run(this);
}
// 运行test
protected void run(final TestCase test) {
startTest(test);
Protectable p = new Protectable() {
public void protect() throws Throwable {
test.runBare();//执行runBare方法执行test用例
}
};
runProtected(test, p);

endTest(test);
}
public void startTest(Test test) {
final int count = test.countTestCases();
synchronized (this) {
fRunTests += count;
}
for (TestListener each : cloneListeners()) {
each.startTest(test);
}
}

在resultPriter中使用继承TestListener中的startTest方法。

1
2
3
4
5
6
7
8
9
10
11
12
13
14
15
16
17
18
19
20
21
22
23
24
25
26
27
28
29
30
31
32
33
34
35
36
37
38
39
40
41
42
43
44
45
46
47
48
public void startTest(Test test) {
getWriter().print(".");//运行一个则加一个点
if (fColumn++ >= 40) {
getWriter().println();
fColumn = 0;
}
}

// 运行一个空的测试序列
public void runBare() throws Throwable {
Throwable exception = null;
// 设置装置。比如打开网络连接等,在执行测试之前调用方法。
setUp();
try {
// 看下面的runTest方法
runTest();//执行test
} catch (Throwable running) {
exception = running;
} finally {
try {
tearDown();
} catch (Throwable tearingDown) {
if (exception == null) exception = tearingDown;
}
}
if (exception != null) throw exception;
}

protected void runTest() throws Throwable {
assertNotNull("TestCase.fName cannot be null", fName); // Some VMs crash when calling getMethod(null,null);
Method runMethod = null;
try {
runMethod = getClass().getMethod(fName, (Class[]) null);
} catch (NoSuchMethodException e) {
fail("Method \"" + fName + "\" not found");
}
// .......... runMethod.invoke(this); 执行方法
try {
runMethod.invoke(this);
} catch (InvocationTargetException e) {
// 如果方法执行错误,会触发这个异常 会连续被上层捕捉到
e.fillInStackTrace();
throw e.getTargetException();
} catch (IllegalAccessException e) {
e.fillInStackTrace();
throw e;
}
}

如果测试失败,则最终将被runProtected中的try/catch捕捉到后输出错误信息。

1
2
3
4
5
6
7
8
9
10
11
12
public void runProtected(final Test test, Protectable p) {
try {
p.protect();
} catch (AssertionFailedError e) {
// 验证失败,添加一条失败信息
addFailure(test, e);
} catch (ThreadDeath e) { // don't catch ThreadDeath by accident
throw e;
} catch (Throwable e) {
addError(test, e);
}
}

经过以上的步骤执行完一个test。

Java中Deque和ArrayDeque

Posted on 2018-10-25 | In Java
Words count in article: 871 | Reading time ≈ 3

Java中Deque和ArrayDeque

Deque类

一个线性的可在双端插入、删除节点的结构。他名字时Deque,实际上时“double ended queue”的简写;

ArrayDeque类

对于ArrayDeque中的数组,它是一个逻辑上的循环数组,所谓循环是指元素到数组尾之后可以接着从数组头开始,数组的长度、第一个和最后一个元素都与head和tail这两个变量有关

构造方法

ArrayDeque就像他的名字一样,使用Array数组来实现Deque结构。构造方法和以前提到的ArrayList相似。

1
2
3
4
5
6
7
8
9
10
11
12
13
14
public ArrayDeque() {
// 初始化的数组大小是16
elements = new Object[16];
}

public ArrayDeque(int numElements) {
allocateElements(numElements);
}

public ArrayDeque(Collection<? extends E> c) {
allocateElements(c.size());
// addAll方法就是为c 进行for循环添加
addAll(c);
}

添加和移除方法

  • add方法
1
2
3
4
5
6
7
8
9
10
11
12
13
14
15
16
17
18
19
20
21
22
23
// 在前面添加元素,也就是在数组的第一个位置上加元素
public void addFirst(E e) {
if (e == null)
throw new NullPointerException();
// 在前面添加的时候,head-1 的位置上插入 e
elements[head = (head - 1) & (elements.length - 1)] = e;
if (head == tail)
doubleCapacity();
}

public void addLast(E e) {
if (e == null)
throw new NullPointerException();
添加到下一个位置
elements[tail] = e;
/*
* 如果当前添加位置的下一个位置 与上 长度-1
*(因为长度都是2的倍数,所以-1之后,2进制后几位都是1,保证负数的时候也能够找到正确的索引)
* 如果tail和head相等说明数组满了,需要扩容
*/
if ( (tail = (tail + 1) & (elements.length - 1)) == head)
doubleCapacity();
}

有了这两种方法,队列或者栈的方法都可以轻松实现了。

在进行增加元素的时候涉及到 doubleCapacity 这个方法,这个方法主要用来扩充数组的容量。

1
2
3
4
5
6
7
8
9
10
11
12
13
14
15
private void doubleCapacity() {
assert head == tail;
int p = head;
int n = elements.length;
int r = n - p; // head右边元素的个数
int newCapacity = n << 1; // 扩充为原来的2倍
if (newCapacity < 0)
throw new IllegalStateException("Sorry, deque too big");
Object[] a = new Object[newCapacity]; //创建新数组
Systkkem.arraycopy(elements, p, a, 0, r);
System.arraycopy(elements, 0, a, r, p);// 两部copy数组相当于从 head -> tail 重新排序了
elements = a;
head = 0;
tail = n;
}
  • remove方法
1
2
3
4
5
6
7
8
9
10
11
12
13
14
15
16
17
18
19
20
21
22
23
public E remove() {
return removeFirst();
}

public E removeFirst() {
E x = pollFirst();
if (x == null)
throw new NoSuchElementException();
return x;
}

public E pollFirst() {
int h = head;
@SuppressWarnings("unchecked")
E result = (E) elements[h];
// Element is null if deque empty
if (result == null)
return null;
elements[h] = null; // Must null out slot
// 把element的头部位置置空后,将head向前移
head = (h + 1) & (elements.length - 1);
return result;
}
  • toArray方法

toArray方法主要是方便输出。用来真正的按照逻辑顺序,进行物理重排,实现方法和doubleCapacity实现相同。

1
2
3
4
5
6
7
8
9
10
11
12
13
14
15
16
public Object[] toArray() {
return copyElements(new Object[size()]);
}

private <T> T[] copyElements(T[] a) {
if (head < tail) {
// 如果顺序正常
System.arraycopy(elements, head, a, 0, size());
} else if (head > tail) {
// 否则将head右侧的先copy到数组中,在copy剩下的
int headPortionLen = elements.length - head;
System.arraycopy(elements, head, a, 0, headPortionLen);
System.arraycopy(elements, 0, a, headPortionLen, tail);
}
return a;
}
  • size方法

和很多数据结构类不同的是,他的size并不是依靠本身的变量字段进行维护,而是通过size方法计算而来。

1
2
3
public int size() {
return (tail - head) & (elements.length - 1);
}

总结一下,ArrayDeque实现了双端队列的特点,能够完成栈和队列的功能,效率比同样继承Deque的LinkedList效率高,因为在ArrayDeque中的计算大部分为位运算。ArrayDeque逻辑上循环的数组,但实际上并不是。

Java中的栈和队列

Posted on 2018-10-17 | In Java
Words count in article: 438 | Reading time ≈ 1
  • java中的栈和队列
    • Stack 栈
      • push方法和pop方法
      • peek方法
    • Queue 队列
      • offer 方法和 pull方法
      • add方法和remove方法

java中的栈和队列

Stack 栈

栈是一个后进先出的数据结构,有这样的数据结构功能的还有Dequ类,推荐使用Dequ

push方法和pop方法

push方法是向栈顶放值

1
2
3
4
5
6
7
8
9
10
11
12
public E push(E item) {
// 这里调用父类Vector的addElement方法
addElement(item);

return item;
}
// addElement方法是加锁的方法 调用element实际上就是数组长度加一并且在该问之上付值
public synchronized void addElement(E obj) {
modCount++;
ensureCapacityHelper(elementCount + 1);
elementData[elementCount++] = obj;
}

pop方法是在将栈顶的值出栈

1
2
3
4
5
6
7
8
9
10
// 同样加锁的方法 调用方法 移除在数组最后位置的元素
public synchronized E pop() {
E obj;
int len = size();

obj = peek();
removeElementAt(len - 1);

return obj;
}

peek方法

peek方法是看一下栈顶元素的值,但不做任何操作

1
2
3
4
5
6
7
public synchronized E peek() {
int len = size();

if (len == 0)
throw new EmptyStackException();
return elementAt(len - 1);
}

这几个方法和linkedList类中的对应的方法非常像,所以其实LindedList也可以当作栈用。

Queue 队列

队列和栈相反,是一个先进后出的数据结构,想成现实中的排队再明白不过了。

offer 方法和 pull方法

offer方法可以将元素放入队列当中,pull可以将元素从头部移除。

add方法和remove方法

add和remove方法分别调用offer和pull方法,不同的是,如果队列满了,add方法会抛出异常,而offer方法会返回null。如果队列空了,remove方法会抛出异常,而pull方法会返回null。

以后会提及队列的实现类以及Dequ相关类。

Enum枚举类分析和相关拓展

Posted on 2018-10-15 | In Java
Words count in article: 484 | Reading time ≈ 2

Enum枚举类分析和相关拓展

其实我认为使用枚举类就是对使用常量的扩充,例如类中使用类型,分类相同的类变量的时候,可以考虑使用枚举类来替换掉。

参考了网上的文章,大致有两个好处,第一是确定传入的参数类型。而不是形参是int类型,随便一个int类型就能够满足。第二是对比static静态变量更能够确定变量的意义。下面举一个例子来看。

Enum类实例

1
2
3
4
5
6
7
8
9
10
11
12
13
14
15
16
17
18
19
20
21
/* 列举简单的行驶工具 */
public enum trafficTool {
BIKE,CAR,BUS,TRAIN,AIRPLANE
}

public class TrafficToolTest {

public void chooseTool(TrafficTool trafficTool){
switch (trafficTool){
case BIKE:
System.out.println("自行车");break;
case CAR:
System.out.println("汽车");break;
}
}

public static void main(String[] args) {
TrafficToolTest trafficToolTest = new TrafficToolTest();
trafficToolTest.chooseTool(TrafficTool.BIKE);
}
}

和普通的类一样,同样也可以添加构造方法

1
2
3
4
5
6
7
8
9
10
SPRING("春天"),SUMMER("夏天"),FALL("秋天"),WINTER("冬天");

private final String name;

SeasonEnum(String name){
this.name = name;
}
String getName(){
return name;
}

也可以继承

1
2
3
4
5
6
7
8
9
10
11
12
13
14
15
16
17
18
19
20
21
22
23
24
25
26
27
28
29
30
31
32
33
public enum SeasonEnum {
SPRING("春天") {
@Override
public String comm() {
return "这是春天";
}
},SUMMER("夏天") {
@Override
public String comm() {
return "这是夏天";
}
},FALL("秋天") {
@Override
public String comm() {
return "这是冬天";
}
},WINTER("冬天") {
@Override
public String comm() {
return "这是冬天";
}
};

private final String name;

SeasonEnum(String name){
this.name = name;
}
String getName(){
return name;
}
public abstract String comm();
}

以上是枚举类的基本使用。

EnumMap 和 EnumSet

public class EnumMap<K extends Enum<K>, V> extends AbstractMap<K, V> 这是关于EnumMap的继承关系。
可以发现这是key为枚举类的一个Map。

1
2
3
4
5
/* 简单创建,以后就可以实现枚举类的多种复用 */
EnumMap<SeasonEnum,Integer> enumIntegerEnumMap = new EnumMap<SeasonEnum, Integer>(SeasonEnum.class);
Set<SeasonEnum> set = enumIntegerEnumMap.keySet();
enumIntegerEnumMap.put(SeasonEnum.SPRING,1);
System.out.println(enumIntegerEnumMap.get(SeasonEnum.SPRING));

EnumSet 相对于 EnumMap 等同于 hashSet 相对于 HashMap 的存在,很好理解。

HashSet和HashTable的的源码分析

Posted on 2018-10-15 | In Java
Words count in article: 786 | Reading time ≈ 3
  • HashSet和HashTable的的源码分析
    • HashSet
      • HashSet结构源码
      • HashSet的基本方法
      • HashSet的Iterator和contains方法
    • HashTable

HashSet和HashTable的的源码分析

HashSet

HashSet其实就是使用HashMap来实现的,方法都是依靠Hash Map的方法。如hashSet构造,hashSet的添加等操作。这样能够实现hashset去重。因为hashMap的key不能重复。这样就能看上篇,当hashMap遇到key值重复的处理。

HashSet结构源码

HashSet的结构就相当于HashMap只将key值put进去,但是Value值却为空的new Object。可以看作为只有key的HashMap.

1
2
3
4
5
6
7
8
9
10
11
12
13
14
15
16
17
18
19
20
21
22
/* 可以看到hashSet的这几个构造方法和HashMap息息相关 */
private transient HashMap<E,Object> map;
public HashSet() {
map = new HashMap<>();
}

public HashSet(Collection<? extends E> c) {
map = new HashMap<>(Math.max((int) (c.size()/.75f) + 1, 16));
addAll(c);
}

public HashSet(int initialCapacity, float loadFactor) {
map = new HashMap<>(initialCapacity, loadFactor);
}

public HashSet(int initialCapacity) {
map = new HashMap<>(initialCapacity);
}

HashSet(int initialCapacity, float loadFactor, boolean dummy) {
map = new LinkedHashMap<>(initialCapacity, loadFactor);
}

HashSet的基本方法

add和remove和size等基本方法都是调用HashMap的

如add方法:

1
2
3
4
public boolean add(E e) {
/* 这里的PRESENT等于new Object() */
return map.put(e, PRESENT)==null;
}

HashSet的Iterator和contains方法

同样的也是调用的HashMap的基本方法,但是需要先得到Map的keySet集合

1
2
3
4
5
6
7
public Iterator<E> iterator() {
return map.keySet().iterator();
}

public boolean contains(Object o) {
return map.containsKey(o);
}

HashTable

首先HashTable和HashMap的结构类似。但是有最重要的区别就是HashTable是synchronized的,也就是线程安全的。在他的基本方法前都有synchronized锁所限制。

结构就不看了,只看一个Put方法

1
2
3
4
5
6
7
8
9
10
11
12
13
14
15
16
17
18
19
20
21
22
23
24
25
26
27
28
29
30
31
32
33
34
35
36
37
38
39
40
41
42
43
44
45
46
47

/* 其实大致和HashMap是类似的也是使用Entry作为基本结构 */
public synchronized V put(K key, V value) {
// Make sure the value is not null
if (value == null) {
throw new NullPointerException();
}
// Makes sure the key is not already in the hashtable.
Entry<?,?> tab[] = table;
int hash = key.hashCode();
/* 这里的0x7FFFFFFF 是32-bit的int的最大值 */
int index = (hash & 0x7FFFFFFF) % tab.length;
@SuppressWarnings("unchecked")
Entry<K,V> entry = (Entry<K,V>)tab[index];
/* 如果这个entry存在,也就是键值重复 */
for(; entry != null ; entry = entry.next) {
if ((entry.hash == hash) && entry.key.equals(key)) {
V old = entry.value;
entry.value = value;
return old;
}
}
/* 否则添加Entry节点 */
addEntry(hash, key, value, index);
return null;
}

private void addEntry(int hash, K key, V value, int index) {
modCount++;

Entry<?,?> tab[] = table;
if (count >= threshold) {
/* 如果当前count大于阈值的大小 重新生成table size和hash值 */
// Rehash the table if the threshold is exceeded
rehash();

tab = table;
hash = key.hashCode();
index = (hash & 0x7FFFFFFF) % tab.length;
}

// Creates the new entry.
@SuppressWarnings("unchecked")
Entry<K,V> e = (Entry<K,V>) tab[index];
tab[index] = new Entry<>(hash, key, value, e);
count++;
}

通过上面的代码可以看出HashTable和HashMap的结构还是有差异的,HashMap是纵向的列表当出现相同的hash值的时候,扩展出横向列表,当横向的列表到达一定的长度的时候,这个横向的链表就会自动整理成红黑树的形式,而hashTable不存在横向的这种结构的,当count>=阈值的时候就会把Hash重置,使之不会出现hash值重复的情况。可以说hashTable比较hashMap的结构更简单,但是效率会比HashMap的低。

HashMap的源码查看

Posted on 2018-10-10 | In Java
Words count in article: 2.5k | Reading time ≈ 12

HashMap的源码查看

HashMap是常见的,以K-V存储的数据结构.

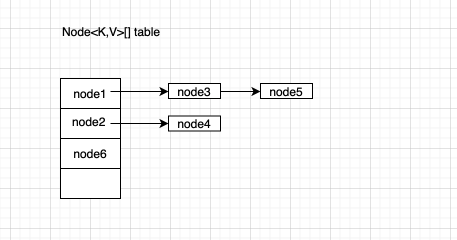
在看源码之前,先需要了解HashMap的结构情况,前面的代码中也可以看到主体数据是由Node<K,V>组成的数组构成,而Node还有指向下一节点的指针,参考下图:

图1

Node节点

首先看到hashmap中的node类继承了map.Entry<k,v>结构,有类型为K的key和类型为V的value;其次node是一个单链表结构。

1
2
3
4
5
6
7
8
9
10
11
12
13
14
15
16
17
18
19
20
21
22
23
24
25
26
27
28
29
30
31
32
33
34
35
36
37
38
39
static class Node<K,V> implements Map.Entry<K,V> {
final int hash;
final K key;
V value;
// 指向下一节点的指针
Node<K,V> next;
Node(int hash, K key, V value, Node<K,V> next) {
this.hash = hash;
this.key = key;
this.value = value;
this.next = next;
}

public final K getKey() { return key; }
public final V getValue() { return value; }
public final String toString() { return key + "=" + value; }

public final int hashCode() {
return Objects.hashCode(key) ^ Objects.hashCode(value);
}

public final V setValue(V newValue) {
V oldValue = value;
value = newValue;
return oldValue;
}

public final boolean equals(Object o) {
if (o == this)
return true;
if (o instanceof Map.Entry) {
Map.Entry<?,?> e = (Map.Entry<?,?>)o;
if (Objects.equals(key, e.getKey()) &&
Objects.equals(value, e.getValue()))
return true;
}
return false;
}
}

HashMap源码

基本属性

1
2
3
4
5
6
7
8
9
10
11
12
13
14
15
16
17
18
19
20
21
22
23
24
/* 实际上结构就是一个类型为Node的数组,使用transient 防止对整个table全部序列化 */
transient Node<K,V>[] table;

/**
* Holds cached entrySet(). Note that AbstractMap fields are used
* for keySet() and values().
* 得到entryset
*/
transient Set<Map.Entry<K,V>> entrySet;

/**
* The number of key-value mappings contained in this map.
map的大小
*/
transient int size;

/* 操作次数 */
transient int modCount;

/* 阈值,如果超过临界值就会自动扩充数组 */
int threshold;

/* 加载因子 */
final float loadFactor;

hashMap的三个构造方法

1
2
3
4
5
6
7
8
9
10
11
12
13
14
15
16
17
18
19
20
21
22
23
24
25
26
27
28
/* 第一个参数 是默认的初始化阈值大小,第二个是加载因子大小 */
public HashMap(int initialCapacity, float loadFactor) {
if (initialCapacity < 0)
/* 如果制定的初始化阈值小于0 */
throw new IllegalArgumentException("Illegal initial capacity: " +
initialCapacity);
if (initialCapacity > MAXIMUM_CAPACITY)
initialCapacity = MAXIMUM_CAPACITY;
if (loadFactor <= 0 || Float.isNaN(loadFactor))
throw new IllegalArgumentException("Illegal load factor: " +
loadFactor);
this.loadFactor = loadFactor;
this.threshold = tableSizeFor(initialCapacity);
}

/* 使用this调用上面的方法 */
public HashMap(int initialCapacity) {
this(initialCapacity, DEFAULT_LOAD_FACTOR);
}

/**
* 使用默认的阈值和因子,大小分别为16和0.75
* Constructs an empty <tt>HashMap</tt> with the default initial capacity
* (16) and the default load factor (0.75).
*/
public HashMap() {
this.loadFactor = DEFAULT_LOAD_FACTOR; // all other fields defaulted
}

hashMap的方法源码

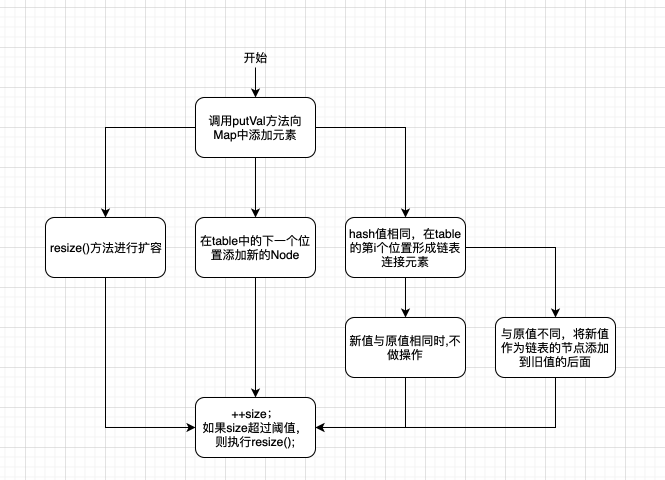
在大致了解完HashMap的结构后,通过查看put方法,来分析元素是如何放到这种结构中的。大致步骤可以参考下图:

图2

put方法

1
2
3
4
5
6
7
8
9
10
11
12
13
14
15
16
17
18
19
20
21
22
23
24
25
26
27
28
29
30
31
32
33
34
35
36
37
38
39
40
41
42
43
44
45
46
47
48
49
50
51
52
53
54
55
56
57
58
59
60
61
62
63
64
65
66
67
68
public V put(K key, V value) {
/* 调用putVal方法 */
return putVal(hash(key), key, value, false, true);
}
/**
* Implements Map.put and related methods
*
* @param hash hash for key key的hash码
* @param key the key key值
* @param value the value to put value值
* @param onlyIfAbsent if true, don't change existing value 如果是true 不改变当前值
* @param evict if false, the table is in creation mode. 如果是false,那么table就属于创建模式 (?)
* @return previous value, or null if none
*/
final V putVal(int hash, K key, V value, boolean onlyIfAbsent,
boolean evict) {
Node<K,V>[] tab; Node<K,V> p; int n, i;
/* 当Map为空的时候 这时候tab为16也就是n为16*/
/* 这是当map中的内容为空的时候
* newCap = DEFAULT_INITIAL_CAPACITY;
* newThr = (int)(DEFAULT_LOAD_FACTOR * DEFAULT_INITIAL_CAPACITY);
*/
if ((tab = table) == null || (n = tab.length) == 0)
n = (tab = resize()).length;
/* 如果当前tab的length&hash值再tab列表中不重复 */
if ((p = tab[i = (n - 1) & hash]) == null)
/* 新建一个noede 再tab[i]的位置上 */
tab[i] = newNode(hash, key, value, null);
else {
Node<K,V> e; K k;
/* 当添加重复的key的时候 这时候hash和key的值都相等,就相当于不添加 */
if (p.hash == hash &&
((k = p.key) == key || (key != null && key.equals(k))))
e = p;
else if (p instanceof TreeNode)
/* 如果e是treeNode的时候 */
e = ((TreeNode<K,V>)p).putTreeVal(this, tab, hash, key, value);
else {
for (int binCount = 0; ; ++binCount) {
if ((e = p.next) == null) {
// 将新值添加到p的后面
p.next = newNode(hash, key, value, null);
if (binCount >= TREEIFY_THRESHOLD - 1) // -1 for 1st
/* 如果当前列表中的长度大于等于 8-1 的时候,把这个列表整理成树形结构 */
treeifyBin(tab, hash);
break;
}
if (e.hash == hash &&
((k = e.key) == key || (key != null && key.equals(k))))
break;
p = e;
}
}
if (e != null) { // existing mapping for key
V oldValue = e.value;
if (!onlyIfAbsent || oldValue == null)
e.value = value;
afterNodeAccess(e);
return oldValue;
}
}
++modCount;
/* 如果当前size大于threshold的时候扩充table */
if (++size > threshold)
resize();
afterNodeInsertion(evict);
return null;
}

在看get方法之前先看和put方法息息相关的resize方法

如果 hash&length-1 的值重复的话,说明位置冲突,首先会添加在这个位置元素后面,如果大小超过 TREEIFY_THRESHOLD - 1 的时候自动为这列整理成树形状。这样就会变为数组和横向列表或树的组合结构。

在未重复hash的前提下,如果table的大小超过设置的 threshold 的大小的时候,就会触发 resize 方法。在resize时会将HashMap中的所有元素进行重新排列,以便与防治分布不均匀的情况发生。下面就来看看resize方法的代码结构。

1
2
3
4
5
6
7
8
9
10
11
12
13
14
15
16
17
18
19
20
21
22
23
24
25
26
27
28
29
30
31
32
33
34
35
36
37
38
39
40
41
42
43
44
45
46
47
48
49
50
51
52
53
54
55
56
57
58
59
60
61
62
63
64
65
66
67
68
69
70
71
72
73
74
final Node<K,V>[] resize() {
Node<K,V>[] oldTab = table;
int oldCap = (oldTab == null) ? 0 : oldTab.length;
int oldThr = threshold;
int newCap, newThr = 0;
if (oldCap > 0) {
if (oldCap >= MAXIMUM_CAPACITY) {
threshold = Integer.MAX_VALUE;
return oldTab;
} //newcap是oldcap的2倍
else if ((newCap = oldCap << 1) < MAXIMUM_CAPACITY &&
oldCap >= DEFAULT_INITIAL_CAPACITY)
newThr = oldThr << 1; // double threshold
}
else if (oldThr > 0) // initial capacity was placed in threshold
newCap = oldThr;
else { // zero initial threshold signifies using defaults
newCap = DEFAULT_INITIAL_CAPACITY;
newThr = (int)(DEFAULT_LOAD_FACTOR * DEFAULT_INITIAL_CAPACITY);
}
if (newThr == 0) {
float ft = (float)newCap * loadFactor;
newThr = (newCap < MAXIMUM_CAPACITY && ft < (float)MAXIMUM_CAPACITY ?
(int)ft : Integer.MAX_VALUE);
}
threshold = newThr;
@SuppressWarnings({"rawtypes","unchecked"})
Node<K,V>[] newTab = (Node<K,V>[])new Node[newCap];
table = newTab;
if (oldTab != null) {
//循环原table数组 ?因为在扩容后 hash & (size-1) 的位置发生了变化 ,所以应当进行重排
for (int j = 0; j < oldCap; ++j) {
Node<K,V> e;
if ((e = oldTab[j]) != null) {
oldTab[j] = null;
if (e.next == null)//说明e不存在hash冲突
newTab[e.hash & (newCap - 1)] = e;
else if (e instanceof TreeNode)
((TreeNode<K,V>)e).split(this, newTab, j, oldCap);
else { // preserve order
Node<K,V> loHead = null, loTail = null;
Node<K,V> hiHead = null, hiTail = null;
Node<K,V> next;
do { //再去循环bin
next = e.next;
if ((e.hash & oldCap) == 0) { //如果在低位 (老)数组中也就是元素hast和就数组取模为0时,说明重排后仍在老数组内
if (loTail == null)
loHead = e;
else
loTail.next = e;
loTail = e;//递归向下继续排
}
else {//否则在高位数组中 ,也就是在扩容出来的数组中
if (hiTail == null)
hiHead = e;
else
hiTail.next = e;
hiTail = e;
}
} while ((e = next) != null);
if (loTail != null) {
loTail.next = null;
newTab[j] = loHead; //低位数组还是在原来的位置上
}
if (hiTail != null) {
hiTail.next = null;
newTab[j + oldCap] = hiHead; //高位数组在旧数组+j的位置上
}
}
}
}
}
return newTab;
}

get方法

get方法是根据hash和key值进行查找,同理containKey方法也是调用getNode方法进行判断。

1
2
3
4
5
6
7
8
9
10
11
12
13
14
15
16
17
18
19
20
21
22
23
24
25
public V get(Object key) {
Node<K,V> e;
return (e = getNode(hash(key), key)) == null ? null : e.value;
}

final Node<K,V> getNode(int hash, Object key) {
Node<K,V>[] tab; Node<K,V> first, e; int n; K k;
if ((tab = table) != null && (n = tab.length) > 0 &&
(first = tab[(n - 1) & hash]) != null) {
if (first.hash == hash && // 先回检查第一个节点
((k = first.key) == key || (key != null && key.equals(k))))
return first;
if ((e = first.next) != null) {
if (first instanceof TreeNode)
return ((TreeNode<K,V>)first).getTreeNode(hash, key);
do {
/* 从第二个节点开始循环 查找hash和key分别相同 */
if (e.hash == hash &&
((k = e.key) == key || (key != null && key.equals(k))))
return e;
} while ((e = e.next) != null);
}
}
return null;
}

remove方法

使用remove方法根据key移除节点

1
2
3
4
5
6
7
8
9
10
11
12
13
14
15
16
17
18
19
20
21
22
23
24
25
26
27
28
29
30
31
32
33
34
35
36
37
38
39
40
41
42
43
44
45
46
47
48
49
50
51
52
53
public V remove(Object key) {
Node<K,V> e;
return (e = removeNode(hash(key), key, null, false, true)) == null ?
null : e.value;
}
/**
* Implements Map.remove and related methods
*
* @param hash key的hash值
* @param key 键值
* @param value 如果想匹配的话就是value,否则空
* @param matchValue 如果是ture那么就移除和value equal的
* @param movable 如果是false的话,移除这个节点不要移动其他节点
* @return the node, or null if none
*/
final Node<K,V> removeNode(int hash, Object key, Object value,
boolean matchValue, boolean movable) {
Node<K,V>[] tab; Node<K,V> p; int n, index;
/* 确定节点 */
if ((tab = table) != null && (n = tab.length) > 0 &&
(p = tab[index = (n - 1) & hash]) != null) {
Node<K,V> node = null, e; K k; V v;
/* 如果hash值相同 key值也相同 说明就是这个节点 */
if (p.hash == hash &&
((k = p.key) == key || (key != null && key.equals(k))))
node = p;
else if ((e = p.next) != null) {
/* 否则横向查找下一个节点 */
if (p instanceof TreeNode)
node = ((TreeNode<K,V>)p).getTreeNode(hash, key);
else {
do {
/* 省略-------- */
} while ((e = e.next) != null);
}
}
if (node != null && (!matchValue || (v = node.value) == value ||
(value != null && value.equals(v)))) {
if (node instanceof TreeNode)
((TreeNode<K,V>)node).removeTreeNode(this, tab, movable);
/* 接下来把tab中对应的index remove掉 */
else if (node == p)
tab[index] = node.next;
else
p.next = node.next;
++modCount;
--size;
afterNodeRemoval(node);
return node;
}
}
return null;
}

keySet方法

ketSet方法也是经常用到的方法,keySet方法实际上就是返回新建的keyset结构。具体结构可以看如下代码,可以看到只有使用forEach和Iterator方法的时候才会循环tab来找key的set数据。数据结构中都是调用外部方法的方法。

1
2
3
4
5
6
7
8
9
10
11
12
13
14
15
16
17
18
19
20
21
22
23
24
25
26
27
final class KeySet extends AbstractSet<K> {
public final int size() { return size; } //返回当前size
public final void clear() { HashMap.this.clear(); } //直接调用hashMap的clear方法
public final Iterator<K> iterator() { return new KeyIterator(); }
public final boolean contains(Object o) { return containsKey(o); }
public final boolean remove(Object key) {
return removeNode(hash(key), key, null, false, true) != null;
}
public final Spliterator<K> spliterator() {
return new KeySpliterator<>(HashMap.this, 0, -1, 0, 0);
}
public final void forEach(Consumer<? super K> action) {
Node<K,V>[] tab;
if (action == null)
throw new NullPointerException();
if (size > 0 && (tab = table) != null) {
int mc = modCount;
/* 把当前操作数记下来 */
for (int i = 0; i < tab.length; ++i) {
for (Node<K,V> e = tab[i]; e != null; e = e.next)
action.accept(e.key);
}
if (modCount != mc)
throw new ConcurrentModificationException();
}
}
}

这是几个非常常用的hashMap的方法和基本的数据结构源码的分析查看。就当做笔记记录一下。

LinkedList的源码查看

Posted on 2018-10-08 | In Java
Words count in article: 1.8k | Reading time ≈ 8

LinkedList的源码查看

结构源码

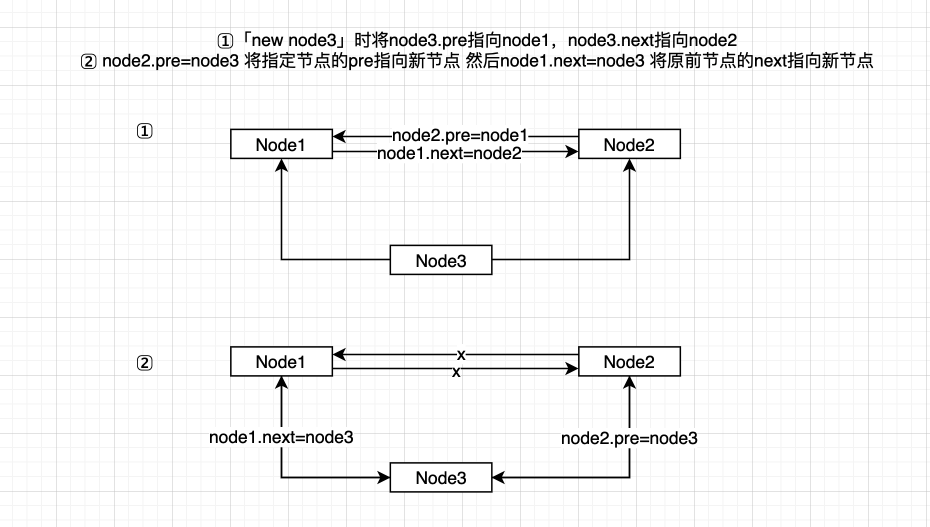
LinkedList是一个双向链表,因为它具有next和prev的前后引用。所以每次添加元素,移除元素时,需要考虑两个指针的引用情况,保证对前一个元素的完全断开和新元素的完全引用,如果在指定位置上连接元素的过程和结构可以参考下图:

LinkedList结构参考

依赖结构

1
2
3
4
5
6
7
8
9
10
11
12
13
14
15
16
17
18
19
20
21
22
23
24
25
26
27
28
/* LinkedList的内部变量 可以看出LinkedList其实就是一个链表 */
transient int size = 0;

/**
* 指向首节点
* Invariant: (first == null && last == null) ||
* (first.prev == null && first.item != null)
*/
transient Node<E> first;

/**
* 指向尾节点
* Invariant: (first == null && last == null) ||
* (last.next == null && last.item != null)
*/
transient Node<E> last;

/* 内部node实现 */
E item;
Node<E> next;
Node<E> prev;
/* 双向链表 */
Node(Node<E> prev, E element, Node<E> next) {
this.item = element;
this.next = next;
this.prev = prev;
}
}

LinkedList构造函数

1
2
3
4
5
6
7
8
9
10
11
12
13
14
15
16
17
18
19
20
21
22
23
24
25
26
27
28
29
30
31
32
33
34
35
36
37
38
39
40
41
42
43
44
45
46
47
48
49
50
51
52
53
54
55
56
57
58
59
60
61
62
/* 空构造函数 比较常用 */
public LinkedList() {
}

/* 有collection参数的构造函数 */
public LinkedList(Collection<? extends E> c) {
this();
addAll(c);
}

public boolean addAll(Collection<? extends E> c) {
return addAll(size, c);
}
/* 参数:当前数量也就是要得到当前链表的位置 */
public boolean addAll(int index, Collection<? extends E> c) {
checkPositionIndex(index);

Object[] a = c.toArray();
int numNew = a.length;
if (numNew == 0)
return false;
Node<E> pred, succ;
// 对插入前情况的判断
if (index == size) {
// 如果在尾部插入 pred=最后一个节点
succ = null;
pred = last;
} else {
// 否则在中部插入 succ=当前节点 pred=前一节点
/* - - - - - - - - - */
/* ^ ^ */
/* 1 2 如果想在2位置插入元素,前一个元素不动,将后面的元素后移*/
succ = node(index);
pred = succ.prev;
}
for (Object o : a) {
@SuppressWarnings("unchecked") E e = (E) o;
// 构造方法 前节点/内容/后节点 始终pred是前置节点
Node<E> newNode = new Node<>(pred, e, null);
if (pred == null)
// 如果pred==null 说明 本身列表开始就是空的或者在开头插入元素
first = newNode;
else
// 否则在后面插入newNode
pred.next = newNode;
// 向后循环节点
pred = newNode;
}
// 如果succ==null 说明到最后一个节点后位置
// 将最后的新插入的元素pred赋值给last
if (succ == null) {
last = pred;
} else {
/* 否则插入在succ前 */
pred.next = succ;
succ.prev = pred;
}

size += numNew;
modCount++;
return true;
}

基本方法

添加

1
2
3
4
5
6
7
8
9
10
/* add方法默认调用linklast方法,也就是向后添加元素 */
public boolean add(E e) {
linkLast(e);
return true;
}

/* 同样有addLast 达到相同的目的,就是不返回任何东西 */
public void addLast(E e) {
linkLast(e);
}

使用add方法后会默认的调用 linkLast 后将元素添加至List的末尾。

1
2
3
4
5
6
7
8
9
10
11
12
13
14
void linkLast(E e) {
final Node<E> l = last;
/* 获得最后一个元素当作新节点的前置节点 */
final Node<E> newNode = new Node<>(l, e, null);
/* 把当前节点付给last */
last = newNode;
if (l == null)
first = newNode;
else
// 将last的next指向新节点,完成双方相互链接
l.next = newNode;
size++;
modCount++;
}

当然也可以调用方法在最前面添加元素

1
2
3
4
5
6
7
8
9
10
11
12
13
14
15
16
17
18
19
public void addFirst(E e) {
linkFirst(e);
}

private void linkFirst(E e) {
// 获取首节点
final Node<E> f = first;
// 设置新节点
final Node<E> newNode = new Node<>(null, e, f);
//设置新节点为首节点
first = newNode;
if (f == null)
last = newNode;
else
// 将新节点与原首节点连接
f.prev = newNode;
size++;
modCount++;
}

移除

remove方法

1
2
3
4
5
6
7
8
9
10
11
12
13
14
15
16
17
18
19
20
21
22
23
24
25
26
27
28
29
30
31
32
33
34
public E remove(int index) {
/* 先判断是否越界 */
checkElementIndex(index);
return unlink(node(index));
}

E unlink(Node<E> x) {
// assert x != null;
final E element = x.item;
final Node<E> next = x.next;
final Node<E> prev = x.prev;
/* 如果prev是空 说明当前元素是第一个元素 如 A B C 移除A,直接将B指向首节点即可 */
if (prev == null) {
first = next;
} else {
/* 当前节点与前后节点断绝链接 如ABC移除B,则需要将A.next指向C,B.pre指向空 */
prev.next = next;
x.prev = null;
}
// 因为LinkedList为双向链表,需要取消next和prev
/* 如果是最后一个元素 */
if (next == null) {
last = prev;
} else {
/* 当前节点与前后节点断绝链接 因为LinkedList是双向链表 */
next.prev = prev;
x.next = null;
}
/* 置空 */
x.item = null;
size--;
modCount++;
return element;
}

removeFirst

1
2
3
4
5
6
7
8
9
10
11
12
13
14
15
16
17
18
19
20
21
22
public E removeFirst() {
final Node<E> f = first;
if (f == null)
throw new NoSuchElementException();
return unlinkFirst(f);
}

private E unlinkFirst(Node<E> f) {
// assert f == first && f != null;
final E element = f.item;
final Node<E> next = f.next;
f.item = null;
f.next = null; // help GC
first = next;
if (next == null)
last = null;
else
next.prev = null;
size--;
modCount++;
return element;
}

removeLast 和removeFirst同理

赋值取值操作

get方法

1
2
3
4
5
6
7
8
9
10
11
12
13
14
15
16
17
18
19
20
21
22
23
24
25
26
public E get(int index) {
checkElementIndex(index);
/* 得到index处节点的item信息 */
return node(index).item;
}

Node<E> node(int index) {
// assert isElementIndex(index);
// 分两个方向查找,1.如果给定的index小于size的一半
if (index < (size >> 1)) {
Node<E> x = first;
//从头开始
for (int i = 0; i < index; i++)
x = x.next;
// 返回最后一个
return x;
} else {
// 2.如果给定的index大于size的一半
Node<E> x = last;
// 从尾部开始找
for (int i = size - 1; i > index; i--)
x = x.prev;
//返回最后的那个
return x;
}
}

set方法

1
2
3
4
5
6
7
8
public E set(int index, E element) {
checkElementIndex(index);
Node<E> x = node(index);
E oldVal = x.item;
x.item = element;
/* set方法会返回原来的值 */
return oldVal;
}

LinkedList中的栈操作

peek方法

1
2
3
4
5
6
7
8
9
10
/**
* Retrieves, but does not remove, the head (first element) of this list.
* 只是检索栈首元素,但并不弹出
* @return the head of this list, or {@code null} if this list is empty
* @since 1.5
*/
public E peek() {
final Node<E> f = first;
return (f == null) ? null : f.item;
}

同理 peekFirst 和 peekLast

poll方法

1
2
3
4
5
6
7
8
9
10
/**
* Retrieves and removes the head (first element) of this list.
* 检索并且移除栈首元素 unlinkFirst是可以返回移除元素的
* @return the head of this list, or {@code null} if this list is empty
* @since 1.5
*/
public E poll() {
final Node<E> f = first;
return (f == null) ? null : unlinkFirst(f);
}

同理 pollFirst 和 pollLast

push方法

1
2
3
4
5
6
7
8
9
10
11
12
/**
* Pushes an element onto the stack represented by this list. In other
* words, inserts the element at the front of this list.
* 在栈首堆一个元素
* <p>This method is equivalent to {@link #addFirst}.
*
* @param e the element to push
* @since 1.6
*/
public void push(E e) {
addFirst(e);
}

pop方法

1
2
3
4
5
6
7
8
9
10
11
12
13
14
/**
* Pops an element from the stack represented by this list. In other
* words, removes and returns the first element of this list.
* 出栈
* <p>This method is equivalent to {@link #removeFirst()}.
*
* @return the element at the front of this list (which is the top
* of the stack represented by this list)
* @throws NoSuchElementException if this list is empty
* @since 1.6
*/
public E pop() {
return removeFirst();
}

offer方法

实际上 offer 是调用的 add 方法,但是区别就在 linkedlist 继承了 Dequ 和 List 父类。一般当 queue 用的时候要用 offer/push/pop 而当使用 list 的时候用 add/remove 。

总结

通过查看LinkedList的源码可以发现:

  1. 首先可以确定LinkedLIst是一个通过Node结构实现的双向链表
  2. 其次通过add和remove方法可以看出它不向ArrayList一样,需要对容量进行扩容操作,而是通过‘指针’指向前后节点实现的‘连接’。
  3. 然后通过get方法可以看出查找一个特定位置上的非常麻烦,需要遍历List,尽管使用了二分的方式进行了优化,但是查找性能依旧不能和ArrayList相比。

ArrayList的源码查看

Posted on 2018-10-04 | In Java
Words count in article: 1.5k | Reading time ≈ 6

ArrayList的源码

变量 含义 默认值
DEFAULT_CAPACITY 默认的List初始化容量 10
EMPTY_ELEMENTDATA 空实例的空数组内容 {}
DEFAULTCAPACITY_EMPTY_ELEMENTDATA 共享的空数组实例,用于默认大小的空实例。 {}
elementData 存储ArrayList内容的数组缓冲区,默认时 elementData == DEL []
size elementData数组大小

其中 elementData数组是ArrayList的存储结构,也就是说ArrayList使用数组存储元素, 但同时是使用transient进行修饰的,也就是不能序列化的,但实际上ArrayList实现了Serializable接口,那么这么做的原因时什么?

因为ArrayList具有自动扩容机制,元素到一定的大小就会自动扩容,这就会导致ArrayList中的元素一定不是满的,也就是说如果当前ArrayList的大小时50,实际元素可能远远小于50,此时就没有将全部elementData都序列化的必要了.

所以,ArrayList提供了一个writeObject方法,专门对elementData进行序列化.里面使用对小于size的所有元素进行序列化,就避免了上面阐述的问题.

1
2
3
for (int i=0; i<size; i++) {
s.writeObject(elementData[i]);
}

构造函数源码

1
2
3
4
5
6
7
8
9
10
11
12
13
14
15
16
17
18
19
20
21
22
23
24
25
26
27
28
29
30
31
32
33
34
35
36
/* 没有参数的情况下 */
public ArrayList() {
// 设置默认的内容为{}
this.elementData = DEFAULTCAPACITY_EMPTY_ELEMENTDATA;
}
/* 默认是拥有默认容量(10)的空的 array list */
private static final Object[] DEFAULTCAPACITY_EMPTY_ELEMENTDATA = {};
/* 这个默认的容量是定义好的10 */
private static final int DEFAULT_CAPACITY = 10;

/* 当参数是容量的大小的时候 */
public ArrayList(int initialCapacity) {
if (initialCapacity > 0) {
/* 如果自定义初始容量大小*/
this.elementData = new Object[initialCapacity];
} else if (initialCapacity == 0) {
this.elementData = EMPTY_ELEMENTDATA;
} else {
/* 如果参数小于0 报参数异常的错误(IllegalArgumentException) */
throw new IllegalArgumentException("Illegal Capacity: "+
initialCapacity);
}
}
/* 当参数是一个Collection结构的时候 */
public ArrayList(Collection<? extends E> c) {
elementData = c.toArray();
if ((size = elementData.length) != 0) {
// c.toArray might (incorrectly) not return Object[] (see 6260652)
if (elementData.getClass() != Object[].class)
/* 如果不是object类型的话 转换成object类型 */
elementData = Arrays.copyOf(elementData, size, Object[].class);
} else {
// replace with empty array.
this.elementData = EMPTY_ELEMENTDATA;
}
}

常用方法源码

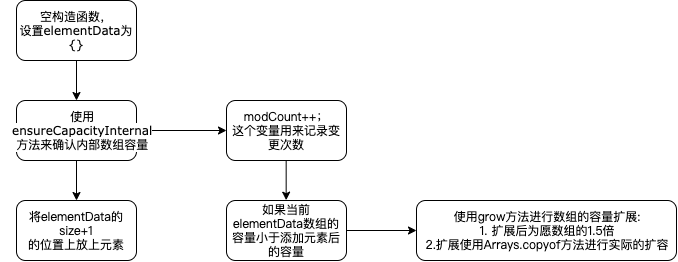
在看源码之前先通过下面这张图片了解以下如果新建一个ArrayList后添加一个元素的大致过程:

过程图

  • add 添加方法
1
2
3
4
5
6
7
8
9
10
11
12
13
14
15
16
17
18
19
20
21
22
23
24
25
26
27
28
29
30
31
32
33
34
35
36
37
38
39
40
41
42
43
44
/* 只有一个参数的添加 */
public boolean add(E e) {
/* 扩充容量 */
ensureCapacityInternal(size + 1); // Increments modCount!!
/* ArrayList其实就是个数组 将新add的值放到数组的最后面 */
elementData[size++] = e;
return true;
}

private void ensureCapacityInternal(int minCapacity) {
ensureExplicitCapacity(calculateCapacity(elementData, minCapacity));
}

private static int calculateCapacity(Object[] elementData, int minCapacity) {
/* 如果是空的话返回 默认或当前 */
if (elementData == DEFAULTCAPACITY_EMPTY_ELEMENTDATA) {
// 如果elementData == {}时,返回给出的值和默认的DEFAULT_CAPACITY其中大的那个
return Math.max(DEFAULT_CAPACITY, minCapacity);
}
return minCapacity;
}

private void ensureExplicitCapacity(int minCapacity) {
/* The number of times this list has been <i>structurally modified</i>. */
// 这个modCount 指的是数据结构改变的次数(比如添加、移除元素)
modCount++;
// overflow-conscious code
if (minCapacity - elementData.length > 0)
/* 如果当前的容量大于给定的长度的时候 需要扩充 */
grow(minCapacity);
}

private void grow(int minCapacity) {
// overflow-conscious code
int oldCapacity = elementData.length; // 原长度
int newCapacity = oldCapacity + (oldCapacity >> 1); //新长度 右移运算。长度为1.5倍的原长度
if (newCapacity - minCapacity < 0)
newCapacity = minCapacity;
if (newCapacity - MAX_ARRAY_SIZE > 0)
newCapacity = hugeCapacity(minCapacity);
// minCapacity is usually close to size, so this is a win:
// 使用Arrays.copyof方法进行最终扩容,所以ArrayList添加元素时比较耗费性能。
elementData = Arrays.copyOf(elementData, newCapacity);
}
  • remove 移除元素方法
1
2
3
4
5
6
7
8
9
10
11
12
13
14
15
16
17
18
19
20
21
22
23
24
25
26
27
28
29
30
31
32
33
34
35
public E remove(int index) {
//如果超出 则抛出IndexOutOfBoundsException异常
rangeCheck(index);

modCount++;
E oldValue = elementData(index);
/* 想要移除元素后面元素的个数*/
int numMoved = size - index - 1;
if (numMoved > 0)
/* arraycopy是个native方法 相当于把index+1位置上的元素挪到index位置上 */
System.arraycopy(elementData, index+1, elementData, index,
numMoved);
elementData[--size] = null; //清空元素,利于GC

return oldValue;
}

/* 只会移除第一个符合条件的条目 */
public boolean remove(Object o) {
if (o == null) {
for (int index = 0; index < size; index++)
if (elementData[index] == null) {
/* 这个fastRemove方法和上面的方法大相径庭 */
fastRemove(index);
return true;
}
} else {
for (int index = 0; index < size; index++)
if (o.equals(elementData[index])) {
fastRemove(index);
return true;
}
}
return false;
}
  • contain 是否包含
1
2
3
4
5
6
7
8
9
10
11
12
13
14
15
16
17
public boolean contains(Object o) {
return indexOf(o) >= 0;
}

public int indexOf(Object o) {
if (o == null) {
for (int i = 0; i < size; i++)
if (elementData[i]==null)
return i;
} else {
/* 内部就是for循环一个一个判断的 */
for (int i = 0; i < size; i++)
if (o.equals(elementData[i]))
return i;
}
return -1;
}
  • get 方法
1
2
3
4
5
6
7
8
9
public E get(int index) {
rangeCheck(index);

return elementData(index);
}
/* 本质就是返回数组位置的元素 */
E elementData(int index) {
return (E) elementData[index];
}

总结

  1. 有序性,可重复性 —> 因为内部使用数组实现,所以元素能够保证有序性且能够添加重复的元素
  2. 访问快 —> ArrayList实现了 RandomAccess 接口,能够通过get实现快速的随机访问.因为ArrayList其中内部存储是使用数组实现的,元素是连续的,通过下标就能够得到对应元素,所以检索会比较快.
  3. 插入删除慢 —> 插入和移除元素时,在扩容时,使用的是copyOf方法,也就是将原数组元素拷贝到目标数组的方式,效率低下.
  4. 非线程安全 —> ArrayList是非线程安全的,Vector是ArrayList的线程安全版本.在多线程时,可使用Vector代替ArrayList.

RandomAccess 只是一个标记接口,其中并没有实现方法,他的作用只是用来标记该结构支持随机访问.也就是说实现了这个接口的集合是支持 快速随机访问 策略的.举例来讲就是 ArrayList 的访问是随机访问,而 LinkedList的访问则是顺序访问的.
随机访问在使用fori循环时要比使用迭代器访问元素时效率高.

整理并学习stackOverFlow上的热门回答

Posted on 2018-07-25 | In Java
Words count in article: 1.2k | Reading time ≈ 4

基础Java知识

平常没事的时候会逛逛stackOverFlow,上面有很多非常基础的问题,并且回答者讲解的非常的透彻,我想通过整理上面的热门回答来梳理一下自己的Java基础知识。

热门

什么是NullPointerExpection,如何去尽可能的避免

当你声明一个引用变量(对象)的时候,实际上是创建一个指向该对象的指针。参考如下代码

1
2
int x ;
x = 10 ;

在例子中,我们声明了变量 x 。因为是原始类型,系统会默认付给变量x初始值是0。但是第二行使用x=10,将数值10付给变量x,实际过程是将10写入变量x所指向的内存位置。
然而,当我们声明一个引用类型,对于int来说也就是其包装类型。会出现不一样的情形。

1
2
Integer num;
num = new Integer(10);

当你创建num的时候,系统不会默认创建一个默认值,因为他引用对象,然而,他会包含一个指针,这个指针虽然存在,但是他没有初始值,所以java会将变量的指针指向空(null)。
在第二行使用new关键字实例化了num,这时,会将变量num指针指向这个实例对象。

在当用到这个变量之前未给变量做实例化时,也就是变量的指针还指向空时,运行后会出现NullPointerExpection 这个问题。

可能觉得在实际codeing的时候不会出现上面的问题,但是实际上,每个方法的引用对象如果不判断传进来的值是否非空,都可能会出现这个问题

错误的示范:

1
2
3
4
5
public void doSomething(SomeObject obj) {
//do something to obj
}
// 调用的时候 传递null值时,会出现空指针异常
doSomething(null);

正确的示范:

1
2
3
4
5
6
7
public void doSomething(SomeObject obj) {
if(obj != null) {
//do something
} else {
//do something else
}
}

尽量在每次开发的过程当中,仔细斟酌变量是否可能为空,当可能为空时一定要做这种判断来预防空指针。保证代码的健壮性。

如何比较字符串

在当使用 == 比较字符串是可能会出现bug,这时可以用equals解决。所以引出一个问题,什么时候使用 == 什么时候使用equals

主要有两方面的差异:

  1. == 是比较对象引用,也就是真正的比较两个对象或者变量的地址是否是相同的。而equals比较的是值是否相等。

  2. == 没有非空的判断,而equals如果比较的对象如果是空则会出现异常,所以一般使用equals的方法都是使用已知的非空对象.equals(Object) 如 "hello".equals(x)

equals是Object的方法,大部分类中也重写了equals方法,所以在比较对象的时候应该使用equals,而当比较基本数据类型如int的时候可以使用 ==

Java是传值还是传引用

Java是传值的 。但是,通常我们定位值的时候称他为 “引用” 。具一个非常典型的例子

1
2
3
4
5
6
7
8
9
10
11
12
13
14
15
public static void main(String[] args) {
Dog aDog = new Dog("Max");
// we pass the object to foo
foo(aDog);
// aDog variable is still pointing to the "Max" dog when foo(...) returns
aDog.getName().equals("Max"); // true
aDog.getName().equals("Fifi"); // false
}

public static void foo(Dog d) {
d.getName().equals("Max"); // true
// change d inside of foo() to point to a new Dog instance "Fifi"
d = new Dog("Fifi");
d.getName().equals("Fifi"); // true
}

虽然foo方法内改变了传进来的aDog的值,注意这里是 值,所以在调用完foo方法之后再去判断变量aDog的时候他的引用到的值没有变,变的只是当时传进去的值而不是变量的应用,所以可以说,对象的引用是按值传递的。如果这样还是迷糊的话,
还可以逆向来想,如果是传引用的话,在当foo方法改变了aDog的时候,也就是说明改变了aDog所引用到的真正的这个值。这样是不能成立。

所以不管怎么想:Java是传值的!!

怎样快速打印出array数组内的值

因为array并没有实现toString()方法,所以当使用array.toString()的时候会打印出类似 [I@17f052a3 的地址信息,在jdk1.5之后可以使用

1
2
3
4
int[] x = new int[]{1,2,3,4,5};
String arrayString = Arrays.toString(x);
System.out.println(arrayString);
//结果: [1, 2, 3, 4, 5]

这样的方式可以非常方便的打印出数组内所有元素,嵌套数组可以使用deepToString方法。

1
2
3
4
System.out.println(Arrays.toString(deepArray));
//output: [[Ljava.lang.String;@106d69c, [Ljava.lang.String;@52e922]
System.out.println(Arrays.deepToString(deepArray));
结果:[[John, Mary], [Alice, Bob]]

bash相关问题总结

Posted on 2018-07-12 | In Bash
Words count in article: 515 | Reading time ≈ 1

bash相关问题总结

七月专题 - -

关于bash中的 <<< 的含义

在StackOverflow中有个例子非常的详细。。先贴连接 What does <<< mean? 以下是我的渣翻译,可能会翻译错。。

我们可以这样对字符串进行处理

1
echo "$string" | command

然而在bash中,这样写(使用管道)就相当于把命令分到子shell中进行处理,考虑这种情况

1
2
echo "hello world" | read first second
echo $second $first

它会输出一个空行,子shell成功的读到了两个变量,但是随后子shell退出,两个变量就消失掉了。所以输出是没有结果的。应当这样写

1
2
3
4
echo "hello world" | {
read first second
echo $second $first
}

但是这样还是没有解决这种分成子shell去执行的尴尬。这时候就能够使用 <<< 了

1
read first second <<< echo "hello world"

关于${!var} var是变量名

使用${!var}的作用是当ver不存在的时候会原样输出,也就是显示${var}

关于bash中的trap命令的使用

trap可以强化bash脚本,让脚本更加稳定。

trap的使用方式

trap有三种使用方式,对应这不同的对信号的回应方式。

  1. trap ”something“ signal

其中”something“ 是在接受signal信号之后作出的命令

  1. trap signal

trap不指定任何命令,接受信号的默认操作,默认操作是结束进程的运行

  1. trap “” signal

trap命令指定一个空命令串,允许忽视信号

常用信号

  • HUB(1) 挂起,通常因终端掉线或用户退出而引发

  • INT(2) 中断,通常因按下Ctrl+C组合键而引发

  • QUIT(3) 退出,通常因按下Ctrl+/组合键而引发

  • ABRT(6) 中止,通常因某些严重的执行错误而引发

  • ALRM(14) 报警,通常用来处理超时

  • TERM(15) 终止,通常在系统关机时发送

  • KILL(9) 杀死进程

  • STOP 停止进程执行

更过的信号 可以使用 trap -l 命令来查看

<i class="fa fa-angle-left"></i>1…8910…12<i class="fa fa-angle-right"></i>
NanYin

NanYin

Was mich nicht umbringt, macht mich starker.

111 posts
16 categories
21 tags
RSS
GitHub E-Mail
近期文章
  • ThreadLocal
  • Java的四种引用类型
  • Markdown语法入门
  • IDEA设置代码注释模板和JavaDoc文档生成
  • 基于Java的WebService实践
0%
© 2023 NanYin
|
本站访客数:
|
博客全站共140.1k字
|