NanYin的博客

记录生活点滴


  • Home

  • About

  • Tags

  • Categories

  • Archives

  • Search

SpringBoot的WEB开发之国际化

Posted on 2019-07-15 | In SpringBoot
Words count in article: 2.8k | Reading time ≈ 12

准备工作

SpringBoot默认是支持Thymeleaf模版引擎的。相应的如果使用Thymeleaf就可以使用thymeleaf的语法在页面显示返回给页面的数据。

使用thymeleaf

导入starter

autoConfig

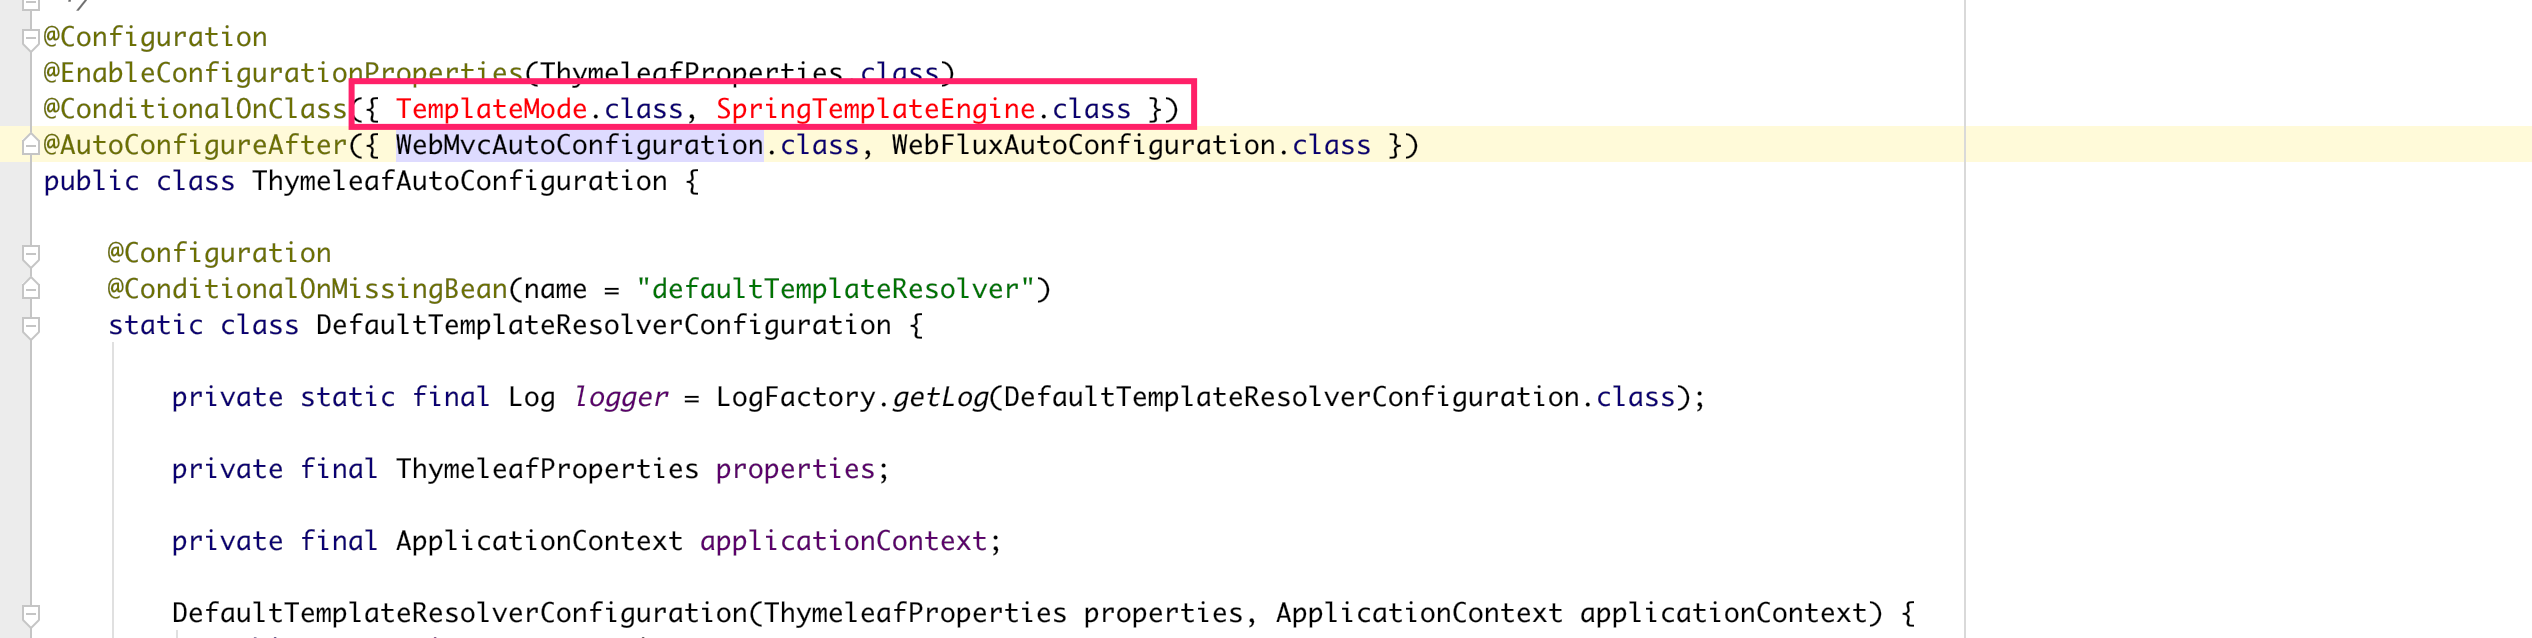
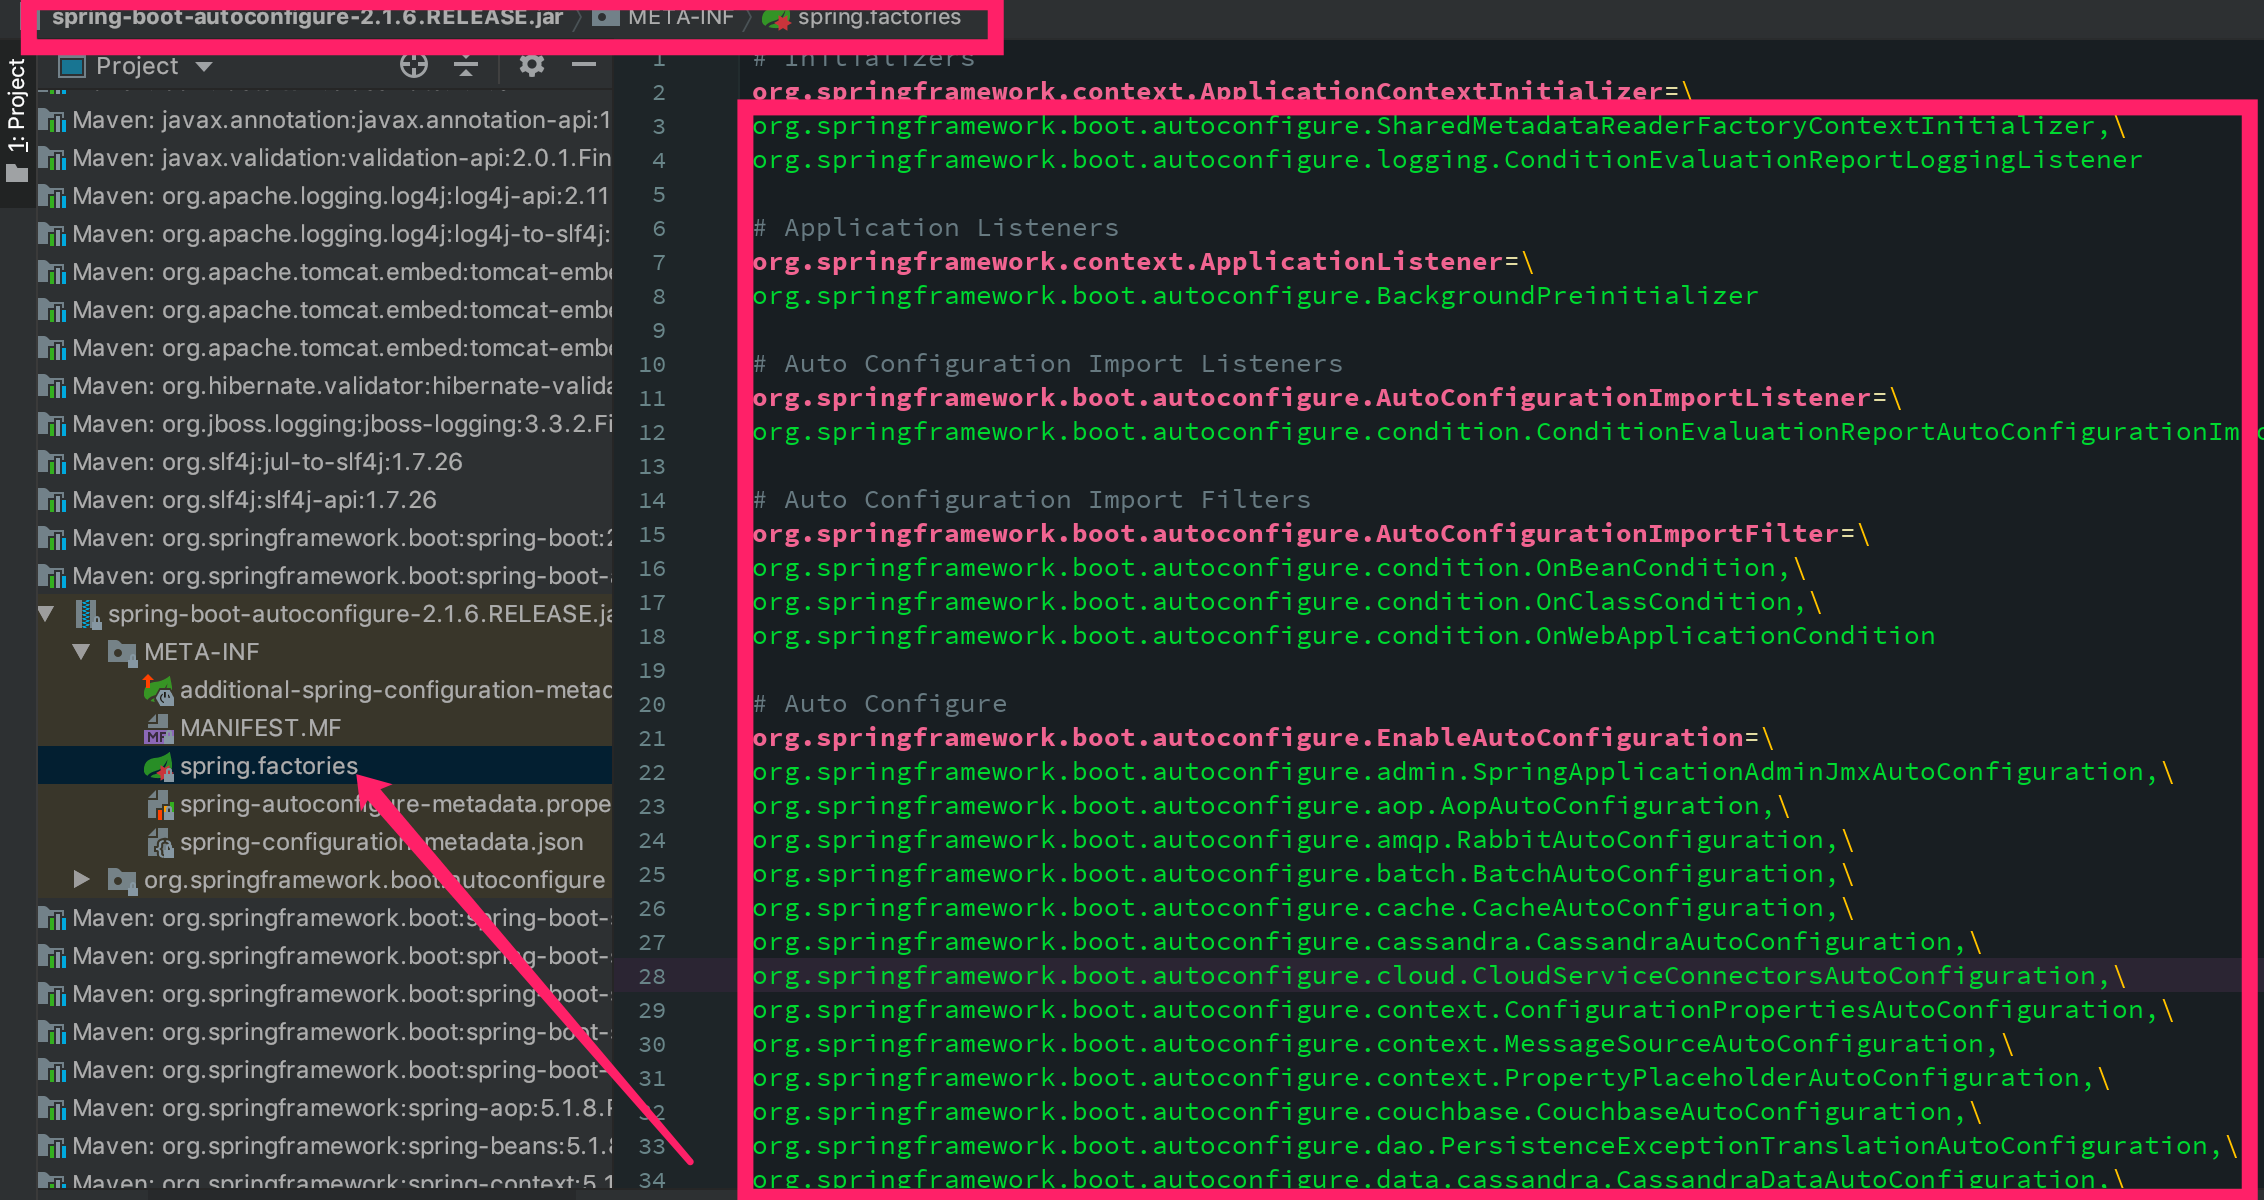
如图,SpringBoot自动配置是导入有Thymeleaf相关自动配置文件的,但是,红色部分是缺少的部分,也就是说少包。自然SpringBoot会提供这些相关的包的starters.

那么在官网上的starters中可以找到spring-boot-starter-thymeleaf,说明SpringBoot提供Thymeleaf的starter需要导入,才能使用Thymeleaf。

在SpringBoot中Thymeleaf的自动配置

1
2
3
4
5
6
7
8
9
10
11
12
13
@ConfigurationProperties(prefix = "spring.thymeleaf")
public class ThymeleafProperties {

// charset
private static final Charset DEFAULT_ENCODING = StandardCharsets.UTF_8;
// 默认加载模版的路径
public static final String DEFAULT_PREFIX = "classpath:/templates/";
// 默认加载的文件类型 是html
public static final String DEFAULT_SUFFIX = ".html";
// 可自己修改配置文件中的 前缀和后缀,如果 spring.thymeleaf.suffix=.htmlx
private String prefix = DEFAULT_PREFIX;

private String suffix = DEFAULT_SUFFIX;

使用Thymeleaf进行页面渲染

所以在SpringBoot中在Controller中使用如下:

1
2
3
4
5
6
7
8
@Controller
public class HelloController {
@RequestMapping("/home")
public String home(Map<String,String> map){
map.put("hello","Hello World~~~");
return "home";
}
}

这样映射器就会自动映射到classpath:/templates/home.html文件上。

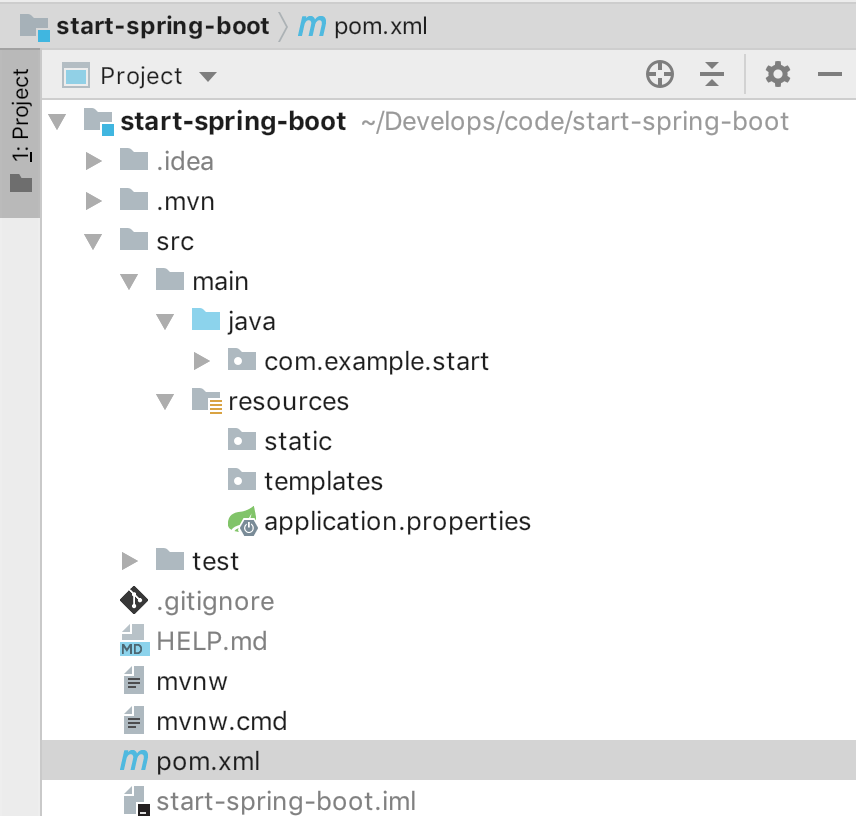
在templates下建立home.html文件

1
2
3
4
5
6
7
8
9
10
11
<!DOCTYPE html>
<!--引入 xmlns:th 用于thymeleaf语法提示-->
<html lang="en" xmlns:th="http://www.thymeleaf.org">
<head>
<meta charset="UTF-8">
<title>Title</title>
</head>
<body>
<h1 th:text="${hello}">hello world</h1>
</body>
</html>

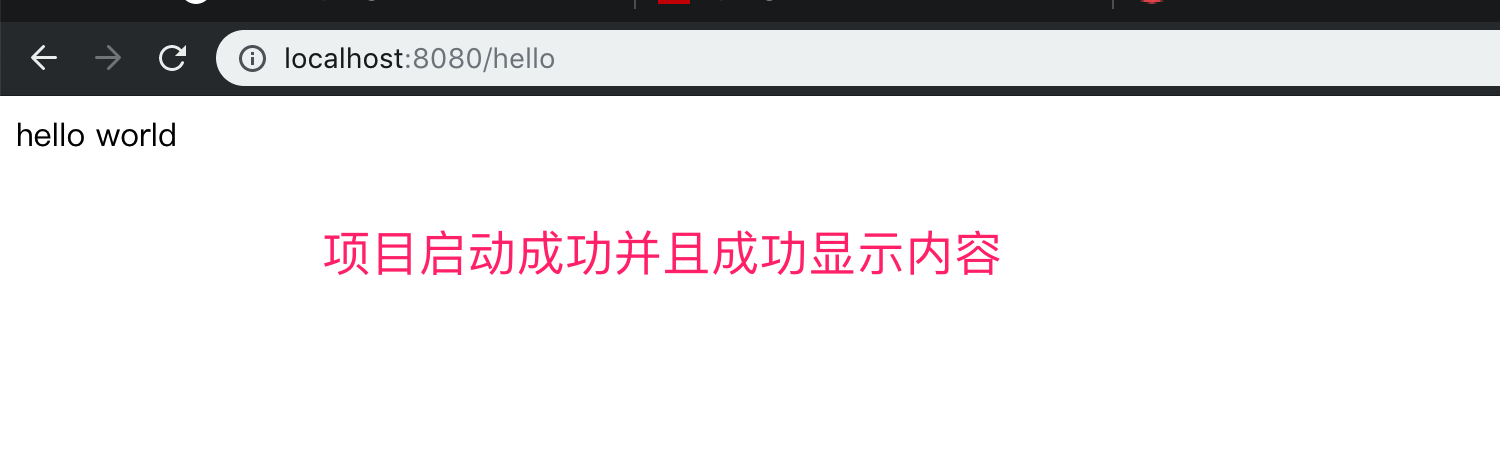
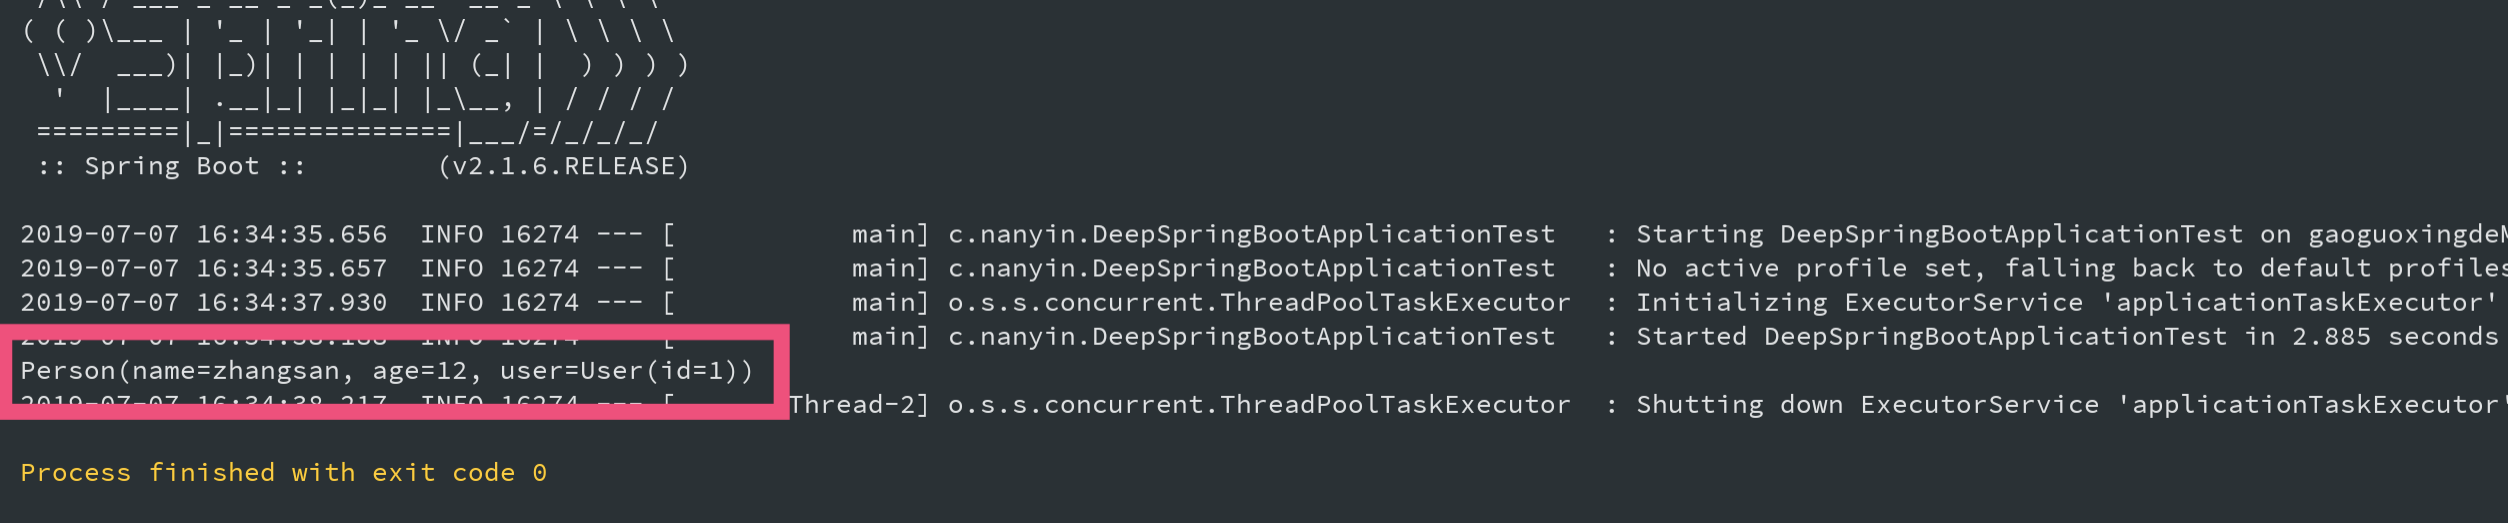
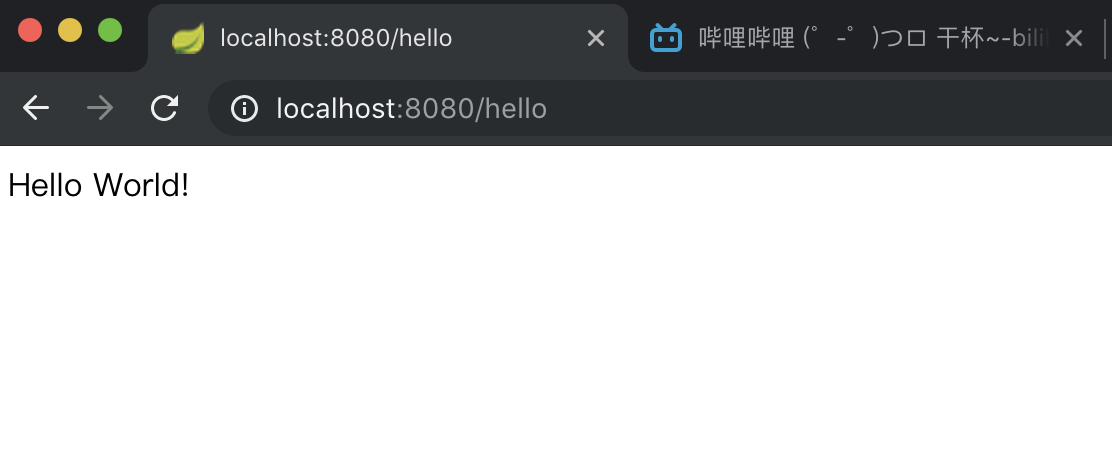
重启后查看http://localhost:8080/home发现已经可以让 /home 映射到 home.html 文件上了。并且根据我们传过来的值 Hello World~~~ 显示在页面上了。

Thymeleaf语法可直接参考官方的文档;

使用SpringMVC

SpringMvc框架是一种丰富model view controller 的web框架。SpringMVC通过使用 @Controller 和 @RestController 完成对 HTTP 请求的处理。通过使用 @RequestMapping 完成对请求对controller的映射。

自动配置

SpringBoot 对 SpringMVC 在自动配置的时候,进行了很多默认的设置。包括前一篇文章中的关于静态资源加载的两种方式( Webjars 和本地加载位置),也是通过 SpringBoot 进行自动配置的。更多的 SpringBoot 对 SpringMVC 在哪些地方进行了自动配置,可以参考文档中的SpringMVC 特性。

自动配置代码参考

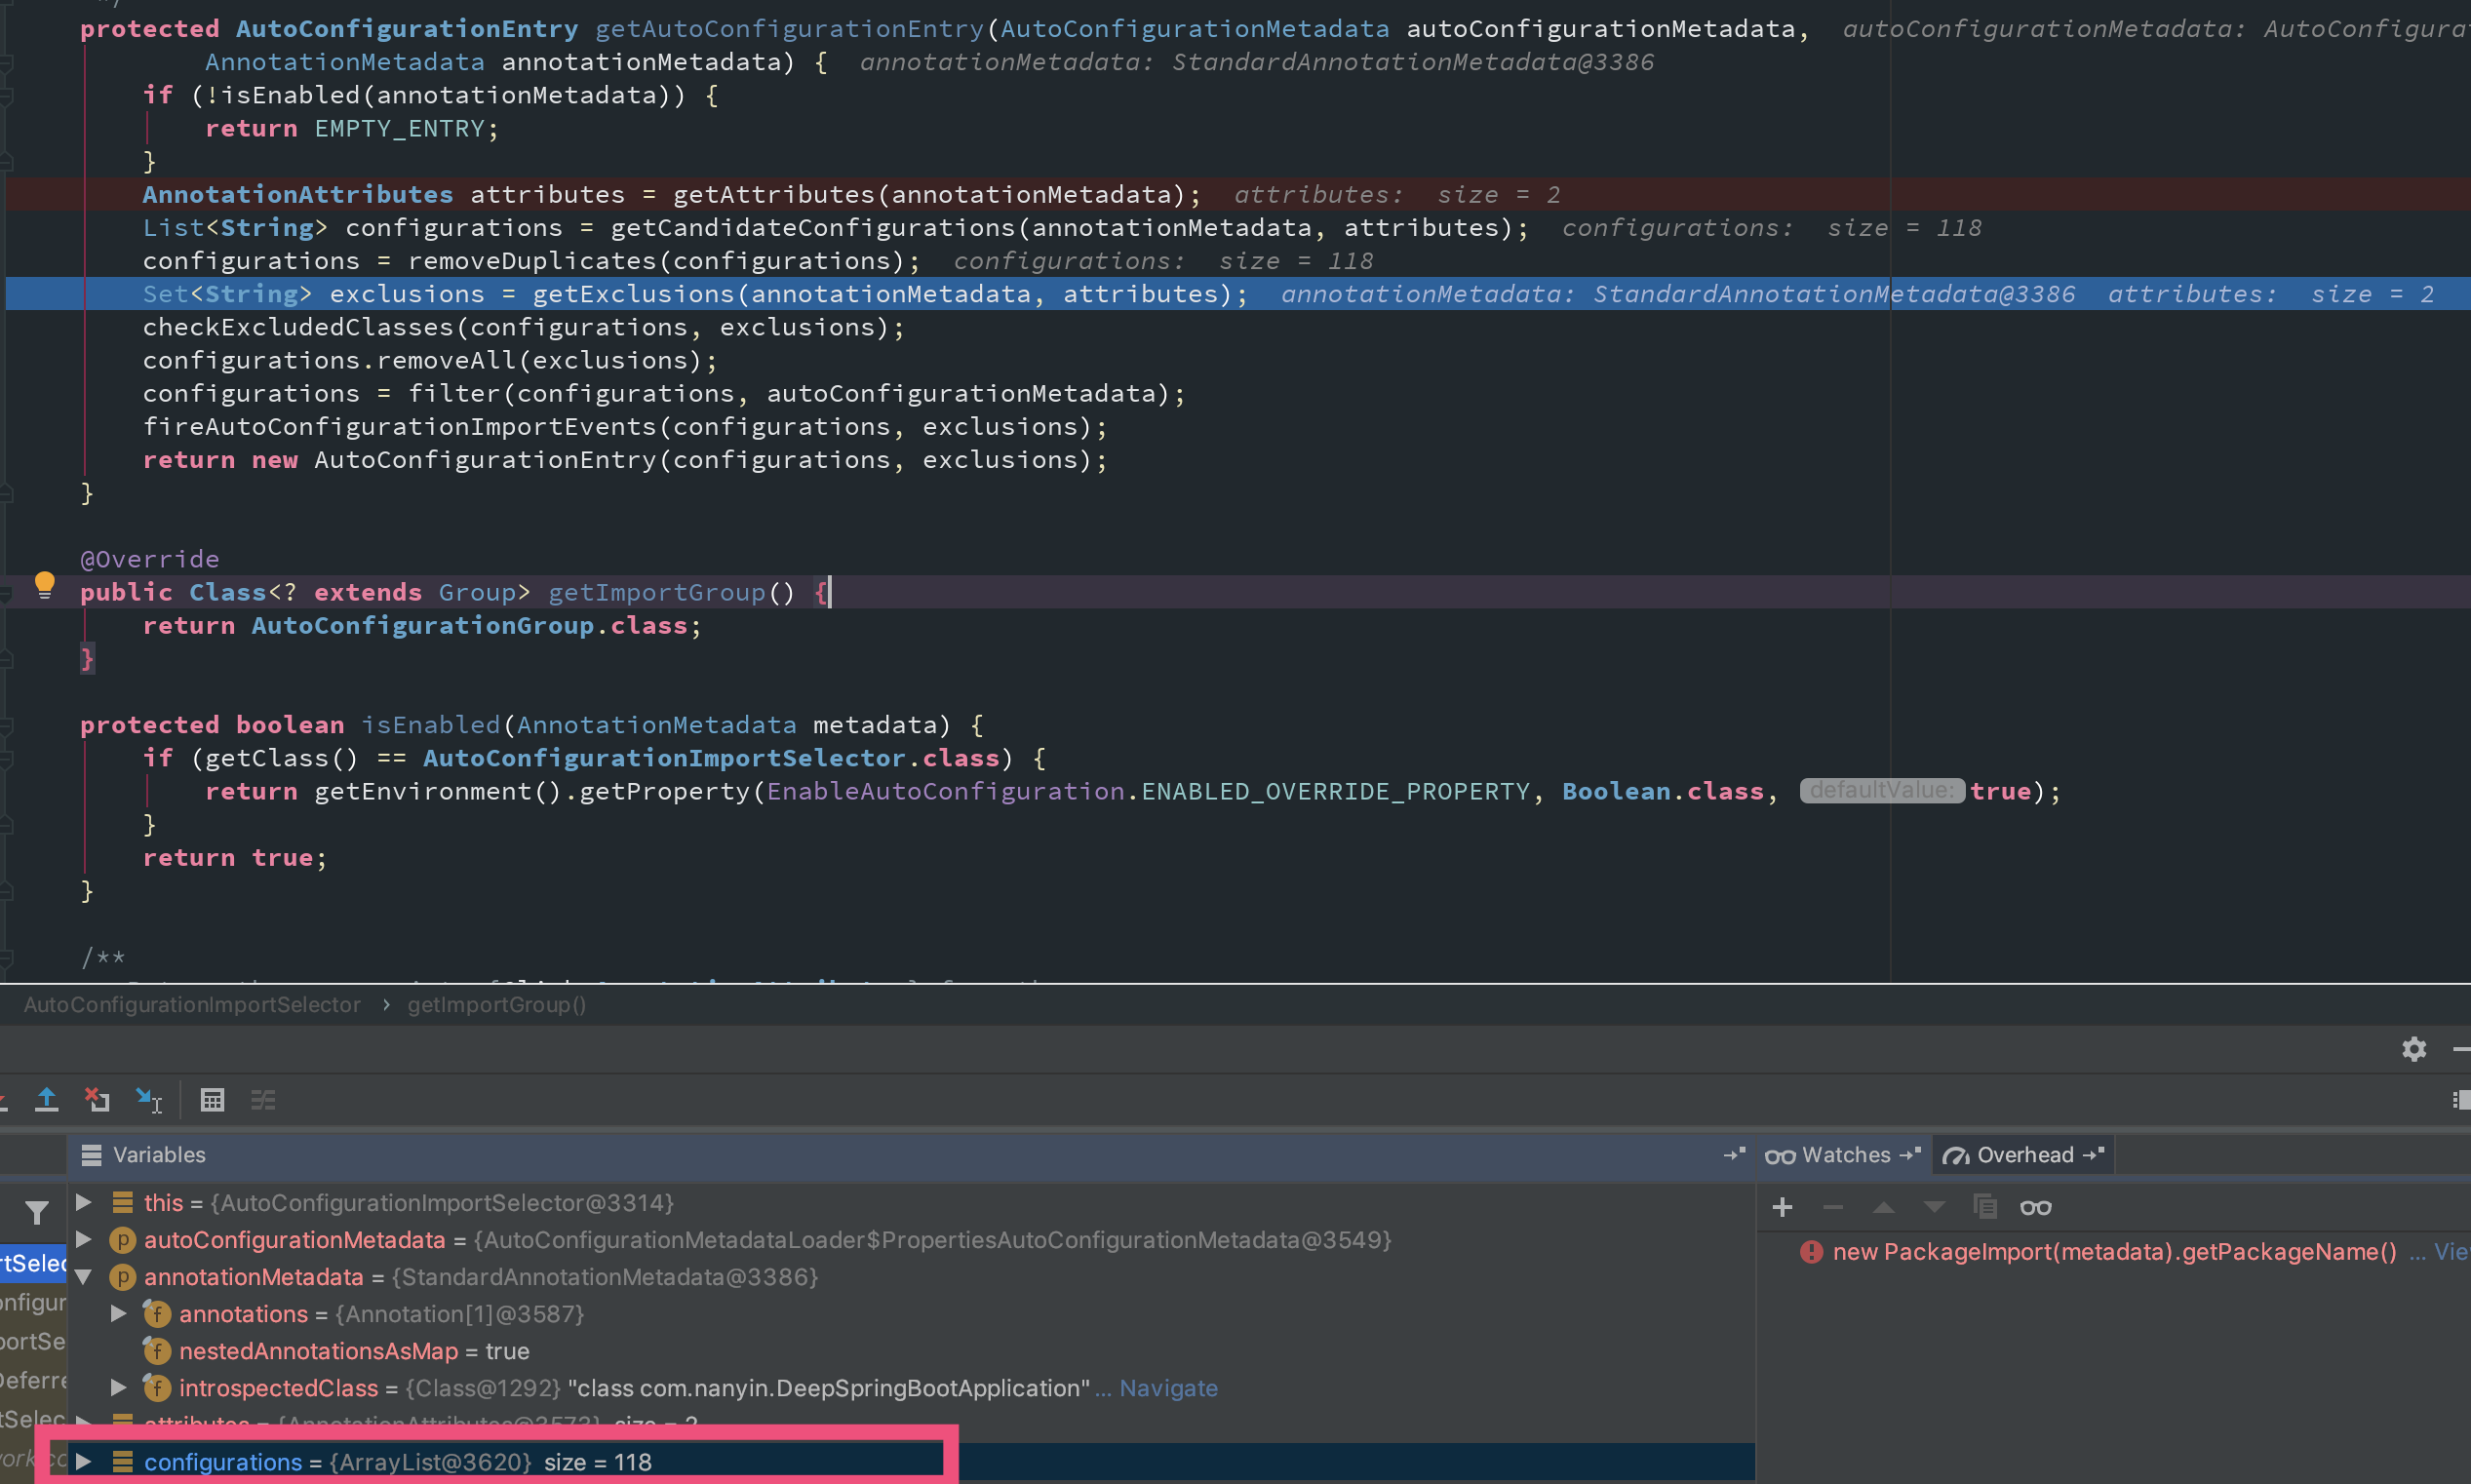
拿 ContentNegotiatingViewResolver这个bean来说,SpringMVC的自动配置类是如何对拓展的支持。

1
2
3
4
5
6
7
8
9
10
11
12
13
14
15
16
17
18
19
20
21
22
23
24
25
26
27
28
29
30
31
32
33
34
35
36
37
38
39
40
41
42
43
44
45
@Bean
@ConditionalOnBean(ViewResolver.class)
// 如果类路径中不存在ContentNegotiatingViewResolver这个类的时候
@ConditionalOnMissingBean(name = "viewResolver", value = ContentNegotiatingViewResolver.class)
public ContentNegotiatingViewResolver viewResolver(BeanFactory beanFactory) {
// 返回这个Resolver
ContentNegotiatingViewResolver resolver = new ContentNegotiatingViewResolver();
resolver.setContentNegotiationManager(beanFactory.getBean(ContentNegotiationManager.class));
// ContentNegotiatingViewResolver uses all the other view resolvers to locate
// a view so it should have a high precedence
resolver.setOrder(Ordered.HIGHEST_PRECEDENCE);
return resolver;
}

// ContentNegotiatingViewResolver 类中的初始化servlet容器方法
protected void initServletContext(ServletContext servletContext) {
// 找出所有的容器中的ViewResolver
Collection<ViewResolver> matchingBeans =
BeanFactoryUtils.beansOfTypeIncludingAncestors(obtainApplicationContext(), ViewResolver.class).values();
if (this.viewResolvers == null) {
this.viewResolvers = new ArrayList<>(matchingBeans.size());
// 循环添加到viewResolver中
for (ViewResolver viewResolver : matchingBeans) {
if (this != viewResolver) {
this.viewResolvers.add(viewResolver);
}
}
}

@Override
@Nullable
//实现ViewResolver的实现方法
public View resolveViewName(String viewName, Locale locale) throws Exception {
RequestAttributes attrs = RequestContextHolder.getRequestAttributes();
Assert.state(attrs instanceof ServletRequestAttributes, "No current ServletRequestAttributes");
List<MediaType> requestedMediaTypes = getMediaTypes(((ServletRequestAttributes) attrs).getRequest());
if (requestedMediaTypes != null) {
// 获取候选的view
// 在getCandidateViews这个方法里就是把全局的viewResolver循环一遍
List<View> candidateViews = getCandidateViews(viewName, locale, requestedMediaTypes);
// 寻找最好的/最合适的view
View bestView = getBestView(candidateViews, requestedMediaTypes, attrs);
if (bestView != null) {
return bestView;
}

通过上述代码的描述,可以发现如果自己实现ViewResolver,只需要实现ViewResolver后加入到容器中即可。SpringBoot会自动获取容器中的ViewResover。

定制开发

如果想保留 SpringBoot 的MVC特性,并且想去添加MVC配置如拦截器,视图控制器等,你可以添加自己的配置类,并且继承WebMvcConfigurer,但是需要注意的是不能使用 @EnableWebMvc 注解。如果使用 @EnableWebMvc 注解,则表示要你全面接管SpringMvc配置功能,不使用SpringBoot自动配置的功能。

  1. 使用bean的方式,让 InnerViewResolver 自动发现容器中的ViewResolver
1
2
3
4
5
6
7
8
9
10
11
12
13
14
15
16
@Configuration
//@EnableWebMvc // 使用这个注解表示完全不实用SpringBoot对SpringMVC的自动配置功能。
public class MvcConfig implements WebMvcConfigurer {

@Bean
public MyViewResolver myViewResolver(){
return new MyViewResolver();
}

class InnerViewResolver implements ViewResolver {

@Override
public View resolveViewName(String viewName, Locale locale) throws Exception {
return null;
}
}

这样将一个ViewResolver放到容器中,那么前面说到的 InnerViewResolver 会自动的发现这个bean来使用。

  1. 使用 WebMvcConfigurer 实现
1
2
3
4
5
6
7
8
9
10
11
12
13
14
15
16
17
18
19
20
21
22
23
24
@Configuration
//@EnableWebMvc
public class MvcConfig implements WebMvcConfigurer {

@Override
public void configureViewResolvers(ViewResolverRegistry registry)
{
registry.viewResolver(new InnerViewResolver());
}

@Override
public void addViewControllers(ViewControllerRegistry registry) {
registry.addRedirectViewController("/index","/home");
}

// ViewResolverRegistry 类中的viewResolver方法,直接添加到全局变量 viewResolvers中,代替前面的遍历
public void viewResolver(ViewResolver viewResolver) {
if (viewResolver instanceof ContentNegotiatingViewResolver) {
throw new BeanInitializationException(
"addViewResolver cannot be used to configure a ContentNegotiatingViewResolver. " +
"Please use the method enableContentNegotiation instead.");
}
this.viewResolvers.add(viewResolver);
}

继承WebMvcConfigurer使用继承方法,将类放到容器中。

国际化开发

下面从自动配置入手,来看SpringBoot是怎么配置国际化的。

让SpringBoot配置指定国际化文件

1
2
3
4
5
6
7
8
9
10
11
12
13
14
15
16
17
public class MessageSourceAutoConfiguration {

private static final Resource[] NO_RESOURCES = {};
// 在配置文件中可以进行配置的内容 以spring.message开头
@Bean
@ConfigurationProperties(prefix = "spring.messages")
public MessageSourceProperties messageSourceProperties() {
return new MessageSourceProperties();
}
/***********************MessageSourceProperties**********************/
public class MessageSourceProperties {

/**
* 以逗号分隔的基本名称列表 每一个都是在完整的路径下加载,比如 i18n.home,i18n.hello这样
* 如果在类路径上,就去掉i18n.
*/
private String basename = "messages";

如果对basename的值的设置仍有疑惑,那来直接看解析basename的代码。

1
2
3
4
5
6
7
8
9
10
11
12
13
14
15
16
17
18
19
20
21
22
23
24
25
26
27
28
29
public ConditionOutcome getMatchOutcome(ConditionContext context, AnnotatedTypeMetadata metadata) {
// 获得propertiesf中的spring.messages.basename属性,如果没有默认是messages
String basename = context.getEnvironment().getProperty("spring.messages.basename", "messages");
ConditionOutcome outcome = cache.get(basename);
if (outcome == null) {
// 调用方法解析basename
outcome = getMatchOutcomeForBasename(context, basename);
cache.put(basename, outcome);
}
return outcome;
}

private ConditionOutcome getMatchOutcomeForBasename(ConditionContext context, String basename) {
ConditionMessage.Builder message = ConditionMessage.forCondition("ResourceBundle");
for (String name : StringUtils.commaDelimitedListToStringArray(StringUtils.trimAllWhitespace(basename))) {
// 将basename以逗号分隔,循环这个数组
for (Resource resource : getResources(context.getClassLoader(), name)) {
// 这里的getResource方法 是加载classpath + name + .properties中的内容
// 所以国际化文件只支持 properties文件,其他文件不支持
// return new PathMatchingResourcePatternResolver(classLoader)
// .getResources("classpath*:" + target + ".properties");
if (resource.exists()) {
// 对每一个获取Resource 新建一个match实例对象
return ConditionOutcome.match(message.found("bundle").items(resource));
}
}
}
return ConditionOutcome.noMatch(message.didNotFind("bundle with basename " + basename).atAll());
}

国际化步骤

上面通过对SpringBoot对国际化的配置的分析,知道了在properties文件中怎么更改国际化文件的配置信息。下面来具体操作,进行国际化。

默认的国际化

创建国际化的properties

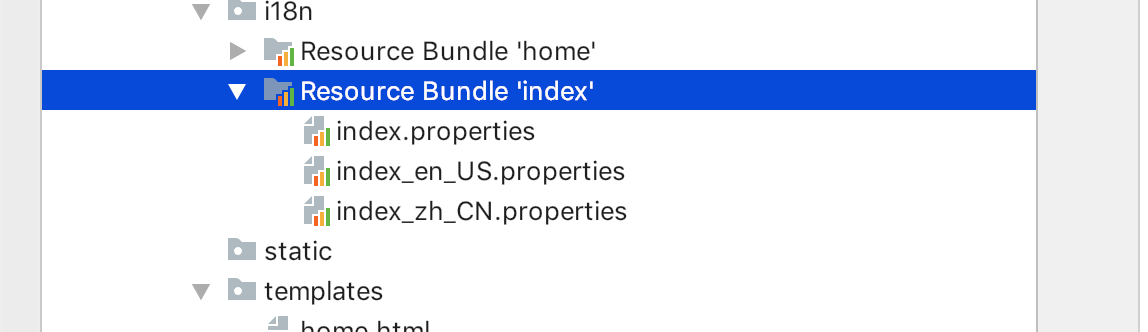
在resources文件夹下创建文件夹i18n ,在文件夹下右键创建Resource Bundle 文件。

resource

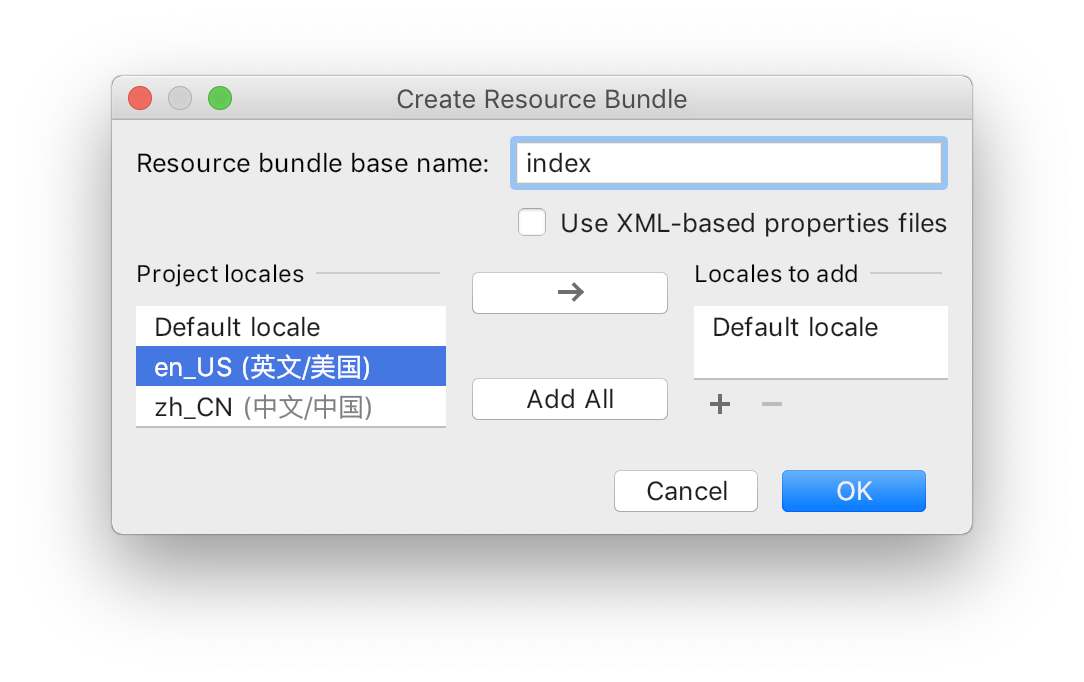
左边project locale中有三个选项,default和自己添加的zh_CN和en_US分别表示中文和英文。点击add All后确认,创建文件。如下图:

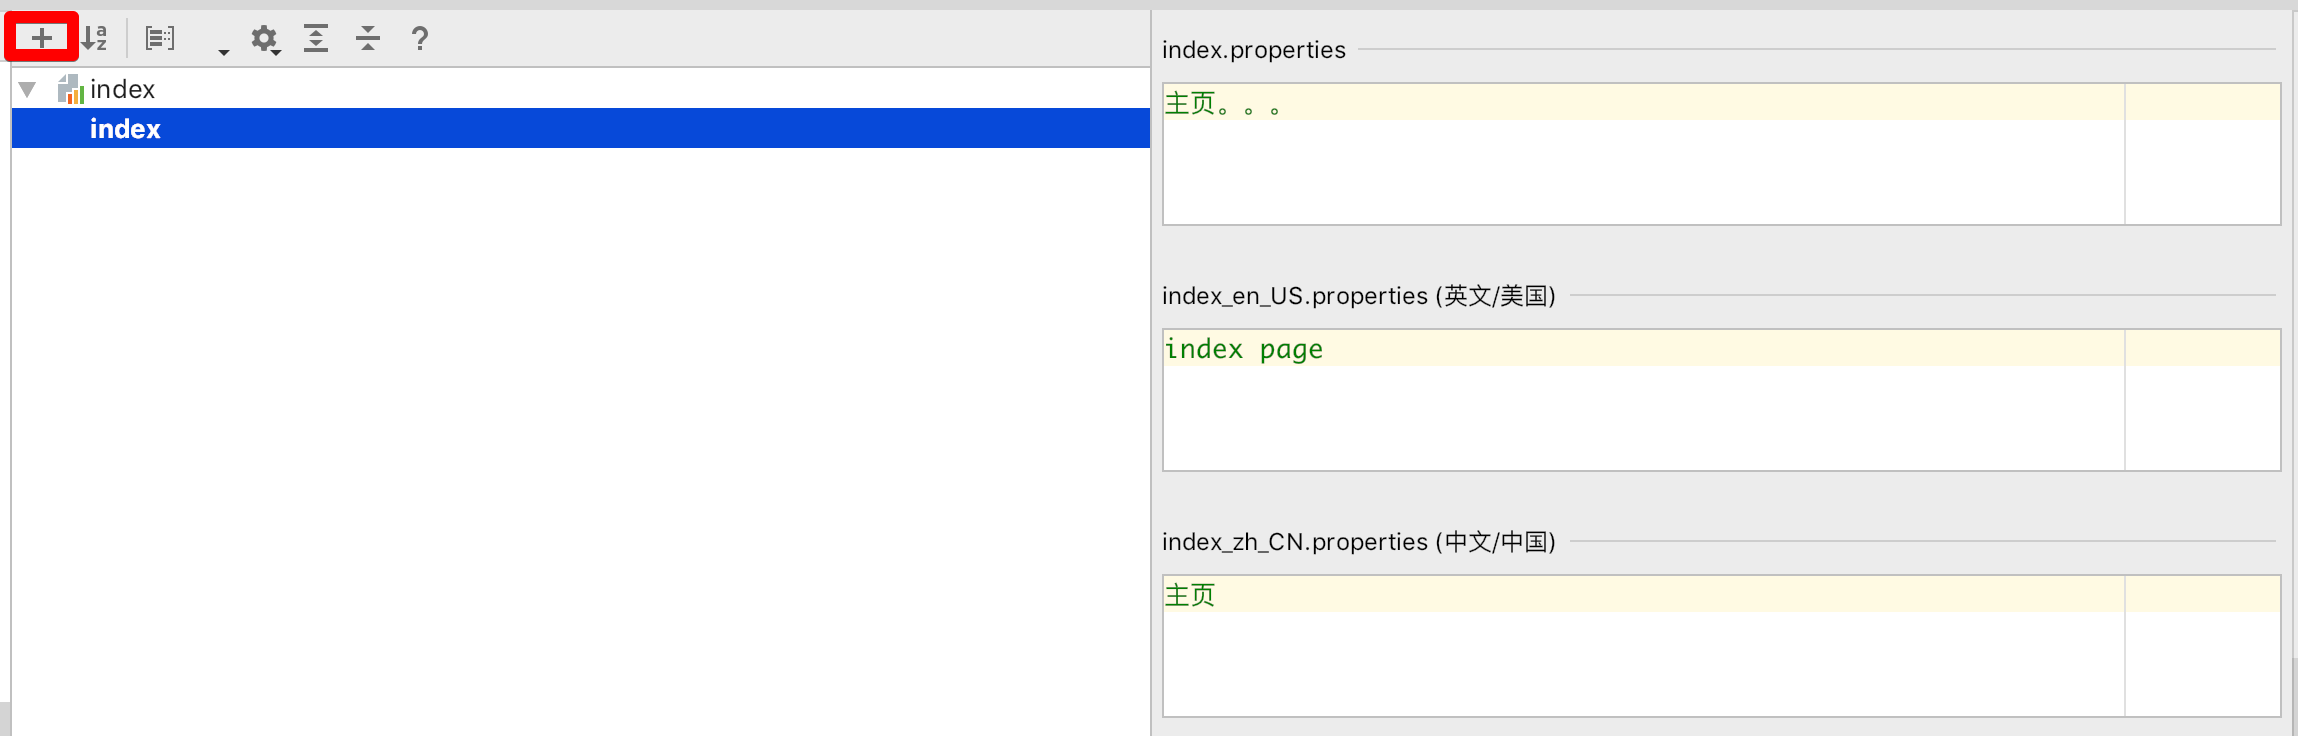
双击其中的一个配置文件比如index.properties,使用idea可以发现编辑区的左下角有一个Resource Bundle tab页,点击之后,来到如下图的界面,新建一个选项,输入各配置文件中的值。

创建controller和html页面

  1. 创建controller

    1
    2
    3
    4
    @RequestMapping("/index")
    public String index(){
    return "index";
    }
  2. 创建html页面

    1
    2
    3
    4
    5
    6
    7
    8
    9
    10
    <html lang="en" xmlns:th="http://www.thymeleaf.org">
    <head>
    <meta charset="UTF-8">
    <title>Title</title>
    </head>
    <body>
    <-- 使用th:text会替换标签内的文本内容 使用#{}来表示国际化内容-->
    <h1 th:text="#{index}">这里是主页</h1>
    </body>
    </html>

重启程序,发现index页面上显示的是主页,这个内容,正好是在index_zh_CN.properties中定义的index的值。SpringBoot会根据请求头中的语言来判断使用哪个配置文件中的内容。

如何切换页面的中英文?

在dispatcherServlet中在渲染视图的时候,会通过locale的属性来改变渲染后的语言。

1
2
3
4
5
protected void render(ModelAndView mv, HttpServletRequest request, HttpServletResponse response) throws Exception {
// 可以通过请求的locale来定义返回的locale
Locale locale =
(this.localeResolver != null ? this.localeResolver.resolveLocale(request) : request.getLocale());
response.setLocale(locale);

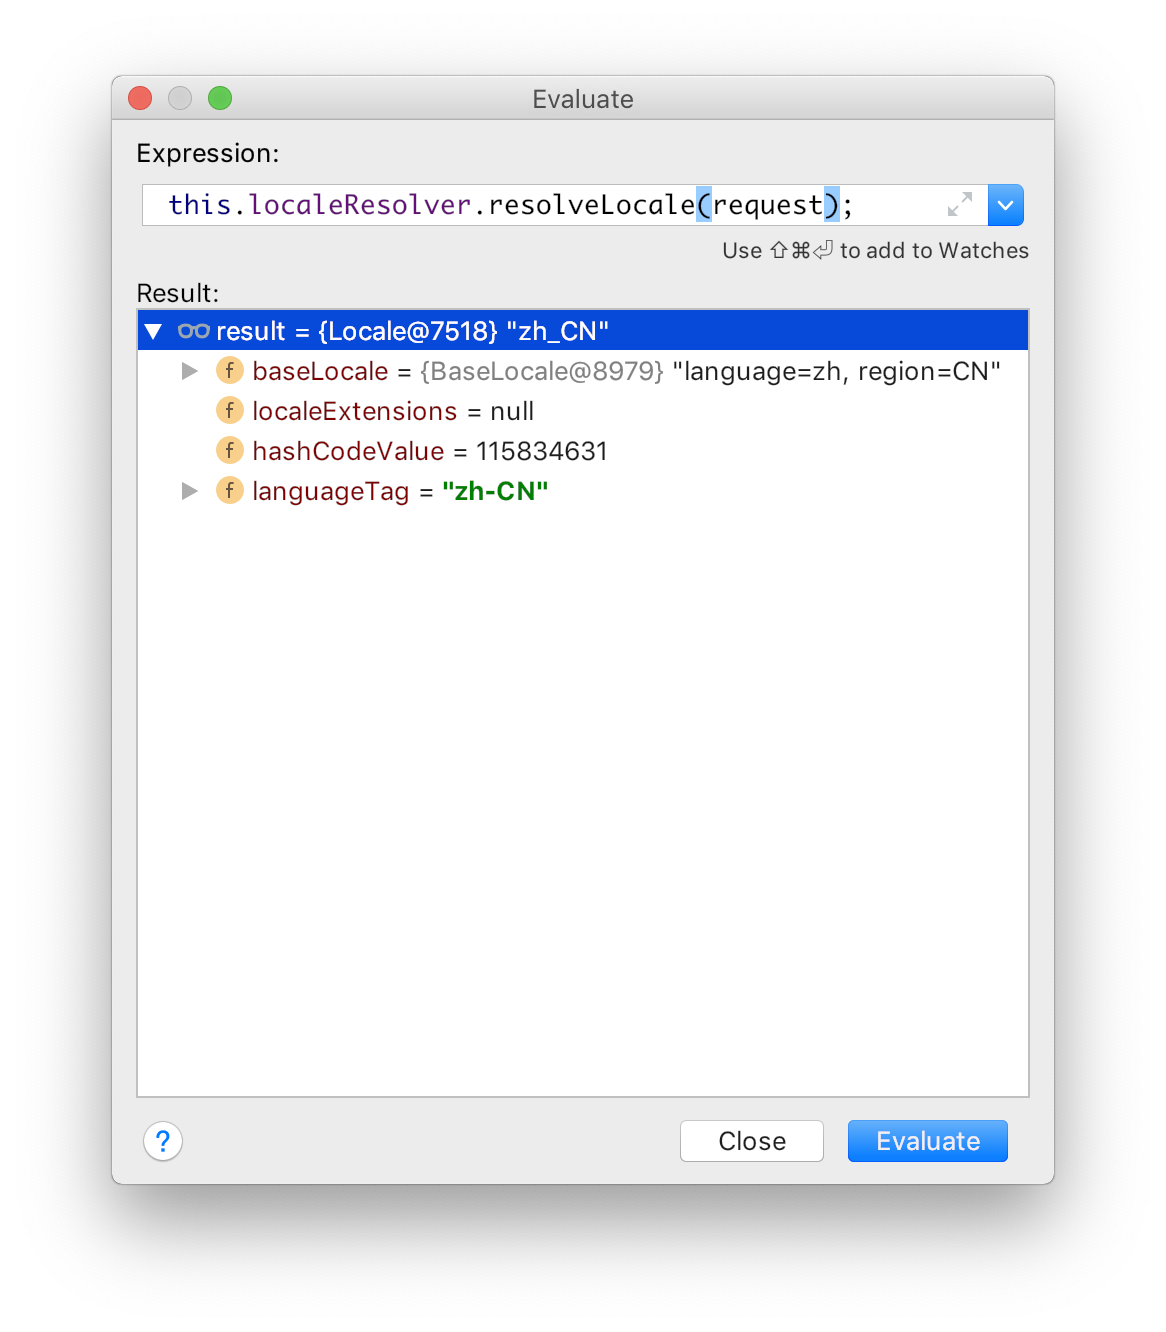
通过debug发现this.localeResolver中是有值的,说明Spring容器中有localeResolver,进而可以得出结论:SpringBoot中自动配置来默认的localeResover。

计算

在WebMvcAutoConfiguration中的确配置了关于locale的信息。

1
2
3
4
5
6
7
8
9
10
11
12
@Bean
@ConditionalOnMissingBean
@ConditionalOnProperty(prefix = "spring.mvc", name = "locale")
public LocaleResolver localeResolver() {
if (this.mvcProperties.getLocaleResolver() == WebMvcProperties.LocaleResolver.FIXED) {
return new FixedLocaleResolver(this.mvcProperties.getLocale());
}
// 设置了 容器中的localeResolver 为 AcceptHeaderLocaleResolver
AcceptHeaderLocaleResolver localeResolver = new AcceptHeaderLocaleResolver();
localeResolver.setDefaultLocale(this.mvcProperties.getLocale());
return localeResolver;
}

因为配置了默认的localeResolver ,所以在使用this.localeResolver.resolveLocale(request)处理这个请求的时候,就会使用AcceptHeaderLocaleResolver类中的方法,而这个方法正是拿的request中的Accept-Language

1
2
3
4
5
6
7
8
9
10
11
12
@Override
public Locale resolveLocale(HttpServletRequest request) {
Locale defaultLocale = getDefaultLocale();
if (defaultLocale != null && request.getHeader("Accept-Language") == null) {
return defaultLocale;
}
// 从request中拿Accept-Language这个值。
Locale requestLocale = request.getLocale();
List<Locale> supportedLocales = getSupportedLocales();
if (supportedLocales.isEmpty() || supportedLocales.contains(requestLocale)) {
return requestLocale;
}

这样的话疑惑就解开了,默认的SpringBoot构件web应用会使用当前浏览器的地区语言来进行国际化。

改变国际化语言标准的判断方式

上面说了默认的SpringBoot会从request中获取地区语言信息,来判断加载哪个配置。

在自动配置的方法上标注着这样一段@ConditionalOnMissingBean,说明如果有localeResolver这个类那么这个方法是不会生效的。所以改变的方法就是自己实现localeResolver.

1
2
3
4
5
6
7
8
9
10
11
12
13
14
15
16
17
18
19
20
21
22
23
24
25
26
27
28
29
30
31
32
33
34
35
36
37
38
39
40
41
42
43
public class MyLocalResolver implements LocaleResolver {

private Locale defaultLocale;

@Override
public Locale resolveLocale(HttpServletRequest request) {
Locale defaultLocale = getDefaultLocale();
String language = request.getParameter("language");
// 获取请求中的 ?language=「xxx」
String[] s = new String[2];
if(language != null && !"".equals(language)){
s = getS(language);
}else{
//如果是空则找浏览器中的属性
String header = getFirstLangInRequest(request);
if(header!=null && !"".equals(header)){
s = getS(header);
}else{
//否则给个默认的local
s = getS("zh-CN");
}
}
defaultLocale = new Locale(s[0],s[1]);
return defaultLocale;
}

private String getFirstLangInRequest(HttpServletRequest request) {
return request.getHeader("Accept-Language").split(",")[0];
}

private String[] getS(String language) {
return language.split("-");
}

public Locale getDefaultLocale() {
return this.defaultLocale;
}
}
//添加到bean中 方法名称必须是localeResolver 或者指定bean的名称为localeResolver
@Bean
public LocaleResolver localeResolver(){
return new MyLocalResolver();
}

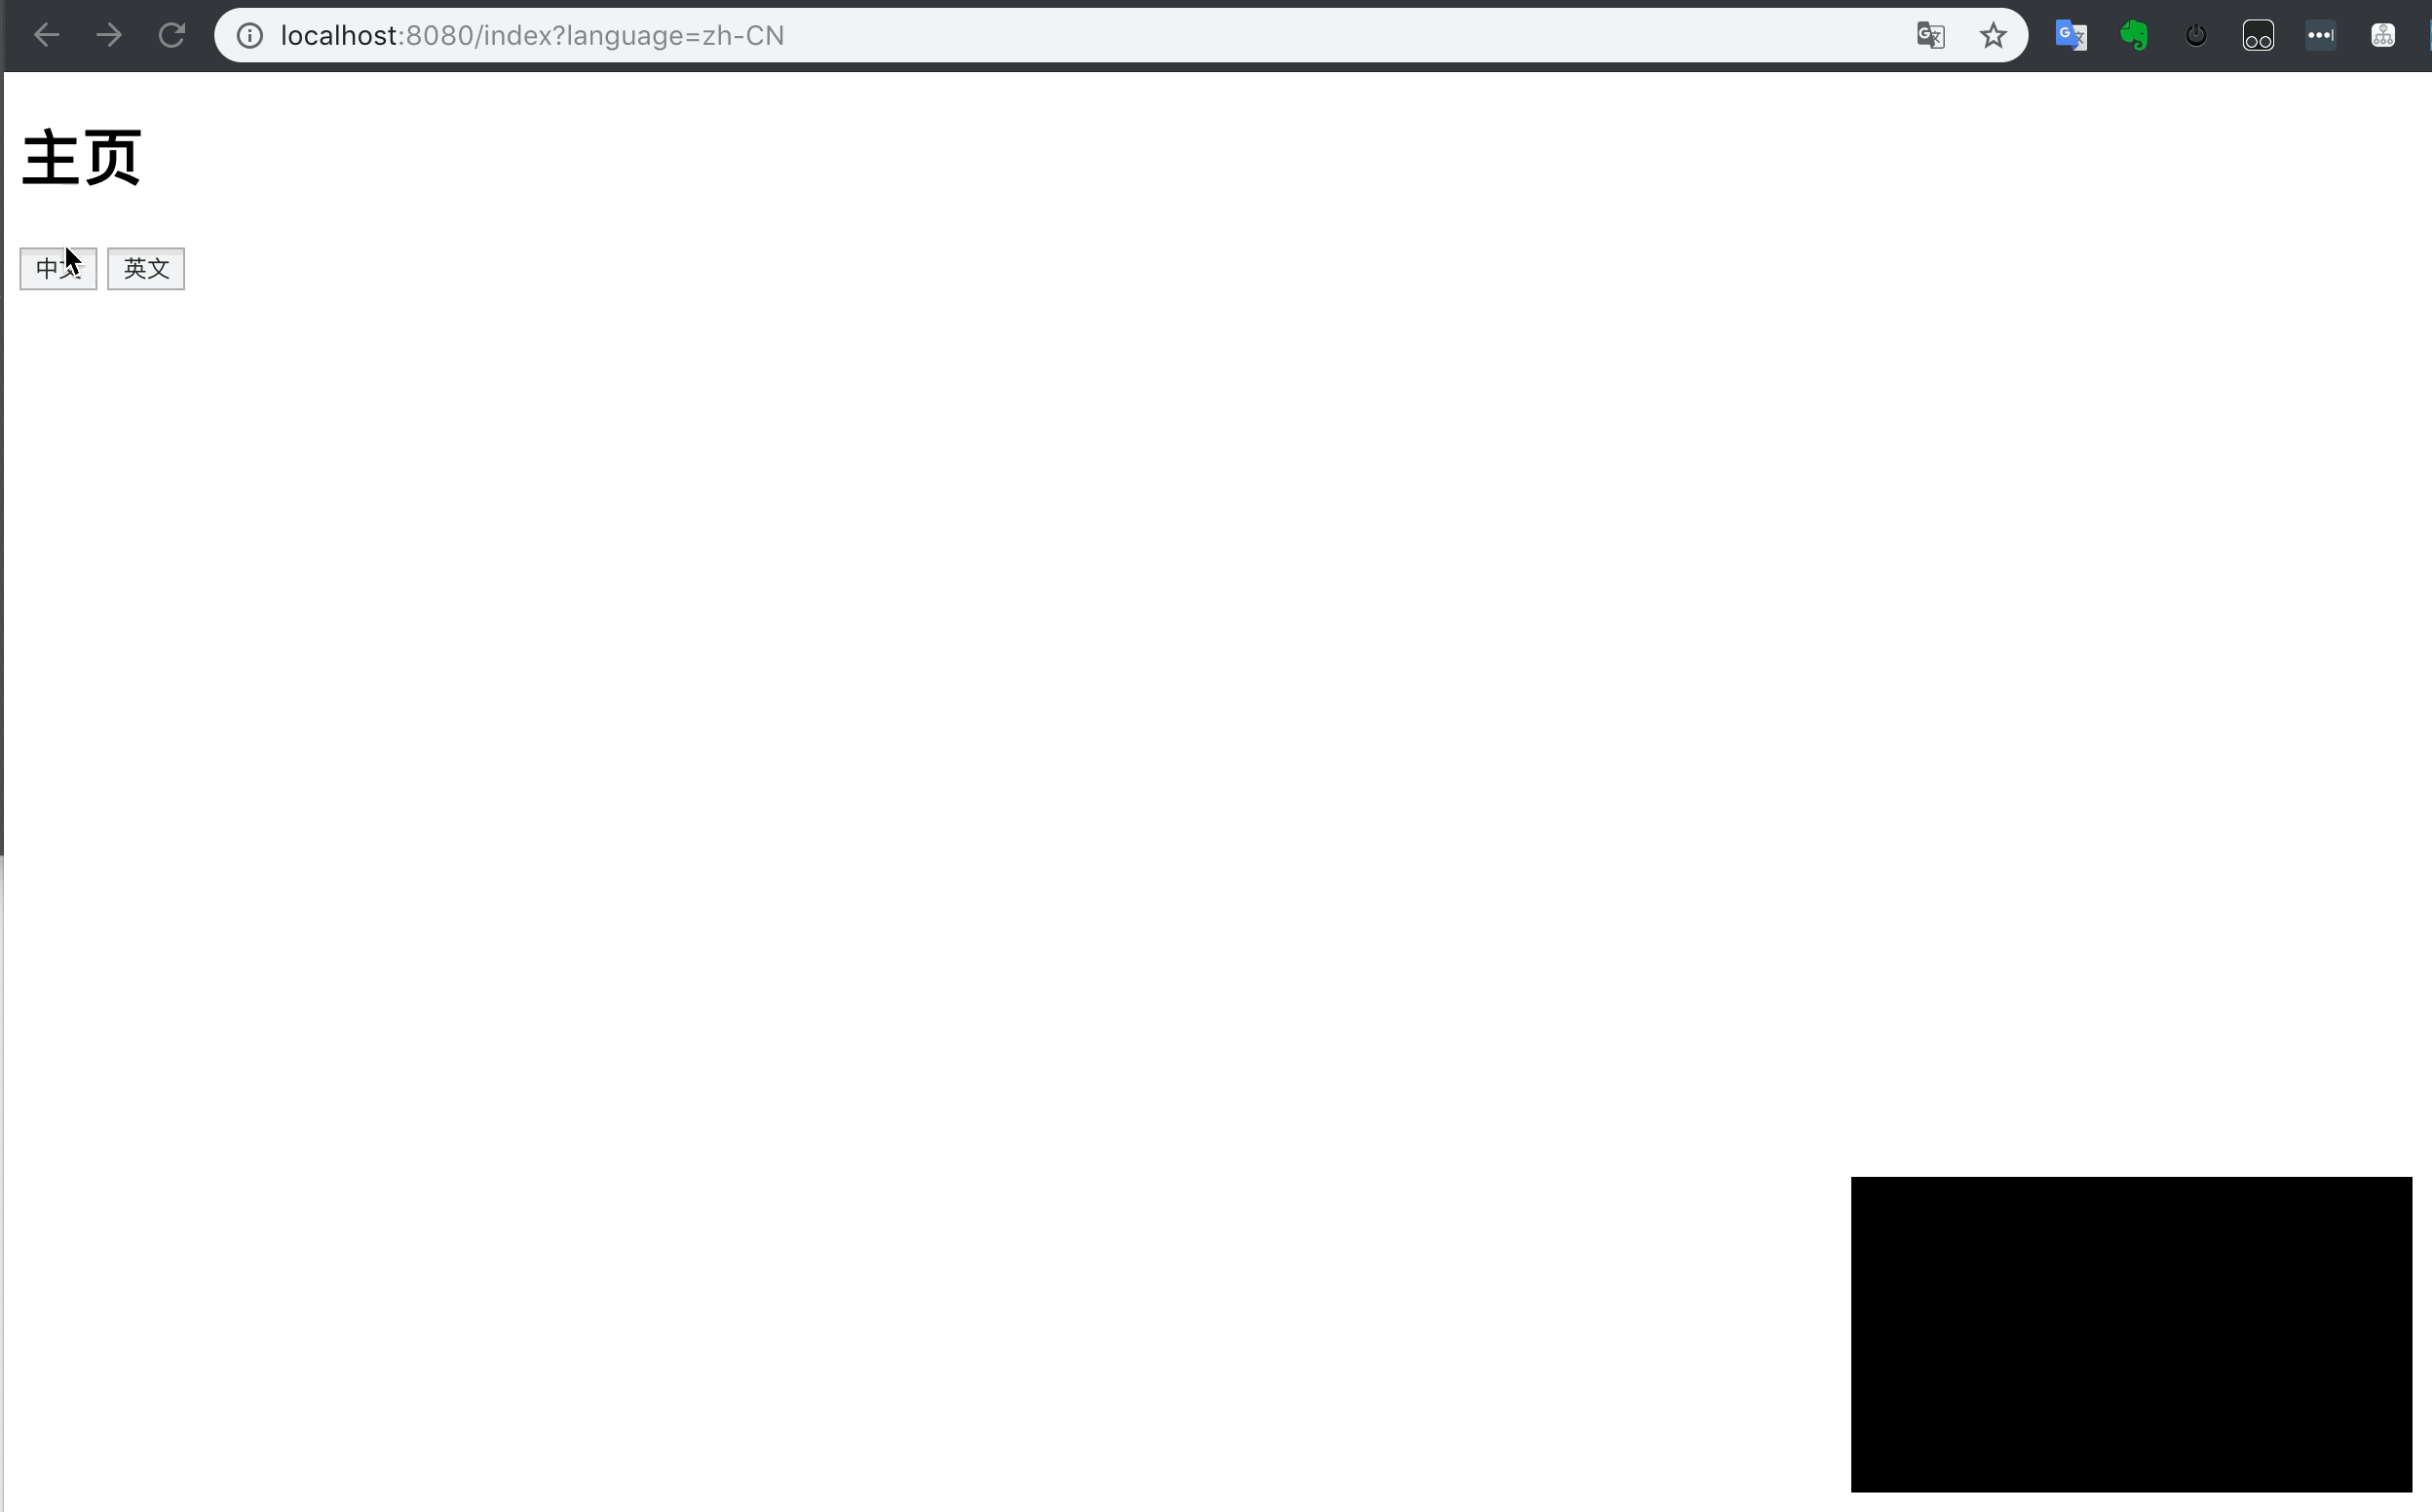
稍微修改一下index.html中的内容

1
2
3
4
5
6
<body>
<h1 th:text="#{index}">这里是主页</h1>
<-- 点击按钮时变换中英文 -->
<a th:href="@{/index(language='zh-CN')}"><button th:text="#{but1}" >这是切换中文的按钮</button></a>
<a th:href="@{/index(language='en-US')}"><button th:text="#{but2}" >这是切换英文的按钮</button> </a>
</body>

重启程序,进行测试:

测试成果

总结

如何在SpringBoot中使用国际化

  1. 编写国际化相关的 ResourceBundle文件,也就是对应的语言配置文件如:index_en_US.properties,index_zh_CN.properties,注意这个文件格式是固定的xxx_语言代码_大写的国家代码,并且必须是properties文件。
  2. 编写html接收国际化变量,使用Thymeleaf引擎可以使用语法#{}来使用国际化变量。

如何改造

因为SpringBoot默认实现了LocaleResolver,并且标注了ConditionalOnMissingBean注解,所以,只需要自己实现LocaleResolver类,重写相关方法,就可以达到改造的目的。需要注意的是,在注册bean的时候,方法名必须localeResolver,或者指定bean的名称为localeResolver。

SpringBoot的WEB开发之Hello-World

Posted on 2019-07-13 | In SpringBoot
Words count in article: 1.6k | Reading time ≈ 6

创建基本的web应用

SpringBoot可以快速的创建一个restful的web应用。下面开始从零开始创建一套基本的web应用。

使用idea创建Spring initializr

我这里直接使用idea中的Spring initializr 来创建SpringBoot应用。同理可以使用start.spring.io中。创建完成后直接在IDE中导入即可。

  1. 需要在idea中新建项目

新建项目

  1. 填写项目的基本信息

基本信息

  1. 勾选需要的依赖

勾选依赖

  1. 最后点击finish完成创建。

文档结构说明

新建SpringBoot应用后自动创建的目录结构如如上图,其中SpringBoot启动类StartSpringBootApplication放在java/com/example/start文件夹中,用于启动整个项目。

对于资源文件,SpringBoot给出来一套目录标准。

resource文件夹中的application.properteis为整体的SpringBoot配置文件。其中有static和templates目录。

  • static 文件夹用于存放静态资源,如js,css
  • templates 文件夹用于存放模版文件,如jsp,html

那么SpringBoot是如何建立这些目录文件标准的呢?

web目录相关的自动配置

web目录相关的自动配置是在WebMvcAutoConfiguration自动配置类中进行配置。而对资源的加载使用的是addResourceHandler 方法

1
2
3
4
5
6
7
8
9
10
11
12
13
14
15
16
17
18
19
20
21
22
23
24
25
26
27
28
29
@Override
public void addResourceHandlers(ResourceHandlerRegistry registry) {
// 是否启用默认资源处理
if (!this.resourceProperties.isAddMappings()) {
logger.debug("Default resource handling disabled");
return;
}
// 获取资源处理程序所服务资源的缓存周期
Duration cachePeriod = this.resourceProperties.getCache().getPeriod();
CacheControl cacheControl = this.resourceProperties.getCache().getCachecontrol().toHttpCacheControl();
// 如果映射器还未映射到/webjars/** 则进行如下操作
if (!registry.hasMappingForPattern("/webjars/**")) {
// 添加对/webjars/** 的资源映射
customizeResourceHandlerRegistration(registry.addResourceHandler("/webjars/**")
.addResourceLocations("classpath:/META-INF/resources/webjars/")
// 加载包下的 /META-INF/resources/webjars/ 下的内容
.setCachePeriod(getSeconds(cachePeriod)).setCacheControl(cacheControl));
}
// 静态路径pattern 为 "/**"
String staticPathPattern = this.mvcProperties.getStaticPathPattern();
if (!registry.hasMappingForPattern(staticPathPattern)) {
//如果映射器还没有映射 /** 路径的资源时
customizeResourceHandlerRegistration(registry.addResourceHandler(staticPathPattern)
// 加载所有的默认定义的位置里的资源。
.addResourceLocations(getResourceLocations(this.resourceProperties.getStaticLocations()))
.setCachePeriod(getSeconds(cache
Period)).setCacheControl(cacheControl));
}
}

webjars

WebJars是打包到JAR(Java Archive)文件中的客户端Web库(例如jQuery和Bootstrap)。

from webjars官网

根据以上内容举个例子来讲解如何使用webjars进行静态资源的加载:

  1. 去官网找相关资源的依赖

依赖

  1. 添加到pom.xml文件中

webjar

以粉色的竖线为分割线,左侧为下载完的webjars的jar包,右侧为在pom.xml文件中的依赖信息。

加载webjars

如果SpringBoot发现有webjar的应用jar包,则加载路径classpath:/META-INF/resources/webjars/下的文件。在图中例子中就是jquery文件夹下的所有内容。这样SpringBoot就能够识别jquery包下的所有静态文件了。

映射webjars

SpringBoot会将所有已将加载jars映射到 /webjars/** 这个路径上。

比如上面我们添加了jquery.min.js。我们启动程序,可以在http://localhost:8080/webjars/jquery/3.4.1/jquery.min.js这个地址上访问,发现系统已经通过webjars将资源加载到了。在实际的使用中,使用script标签引用webjars也是引用这个地址的静态文件。

项目内静态资源

使用webjars用来加载静态资源非常方便,但是如果自己写的js和css等静态资源也需要加载时,就需要放到SpringBoot默认加载的目录下。

1
2
3
4
5
6
7
8
9
10
11
12
@ConfigurationProperties(prefix = "spring.resources", ignoreUnknownFields = false)
public class ResourceProperties {
private static final String[] CLASSPATH_RESOURCE_LOCATIONS = { "classpath:/META-INF/resources/",
"classpath:/resources/", "classpath:/static/", "classpath:/public/" };
private String[] staticLocations = CLASSPATH_RESOURCE_LOCATIONS;
private boolean addMappings = true;
private final Chain chain = new Chain();
private final Cache cache = new Cache();
// 获取静态资源目录
public String[] getStaticLocations() {
return this.staticLocations;
}

通过getStaticLocations获取静态资源的目录,默认的SpringBoot定义了classpath下的以下的文件,都可以放置静态文件,都可以通过url的方式访问到这个静态文件。

  • classpath:/META-INF/resources
  • classpath:/resources/
  • classpath:/static/
  • classpath:/public/

需要注意的是这个classpath就是一开始创建SpringBoot应用帮我们创建好的resource路径

这个类也是一个xxxxProperties类,所以可以通过改变相应的配置文件中的属性来改变这个路径。这里的路径使用的变量是staticLocations,所以相应的在application.properties文件中可以使用spring.resources.staticLocations=路径名称就行了。

主页的设置

SpringBoot默认的使用静态资源文件夹下的index.html作为首页。

1
2
3
4
5
6
7
8
9
private Optional<Resource> getWelcomePage() {
String[] locations = getResourceLocations(this.resourceProperties.getStaticLocations());
//遍历每个locations寻找index.html页面作为首页
return Arrays.stream(locations).map(this::getIndexHtml).filter(this::isReadable).findFirst();
}

private Resource getIndexHtml(String location) {
return this.resourceLoader.getResource(location + "index.html");
}

如果找到主页的index.html后,就开始做主页的映射操作

1
2
3
4
5
6
7
8
9
10
11
12
13
@Bean
public WelcomePageHandlerMapping welcomePageHandlerMapping(ApplicationContext applicationContext) {
return new WelcomePageHandlerMapping(new TemplateAvailabilityProviders(applicationContext),
applicationContext, getWelcomePage(), this.mvcProperties.getStaticPathPattern());
}

WelcomePageHandlerMapping(TemplateAvailabilityProviders templateAvailabilityProviders,
ApplicationContext applicationContext, Optional<Resource> welcomePage, String staticPathPattern) {
// 如果存在,设置首页为index.html 映射路径为: /**
if (welcomePage.isPresent() && "/**".equals(staticPathPattern)) {
logger.info("Adding welcome page: " + welcomePage.get());
setRootViewName("forward:index.html");
}

上面是依据SpringBoot加载静态资源的方式做的简单总结。

添加controller

在上一步创建完项目后,可以紧跟着写一个SpringMVC测试的controller,看看能否启动项目。

1
2
3
4
5
6
7
8
9
10
// 起到了@Controller和@Responsebody两种作用,实际上就是
// 两种注解的整合
@RestController
public class HelloController {

@RequestMapping("/hello")
public String hello(){
return "hello world";
}
}

如果你也像我勾选来数据库相关的starters,在启动时,控制台会提示需要配置数据库的基本配置。

那么怎么找这些配置呢?

  1. 去官网找配置
  2. 直接看代码

如果你没有碰到上面这个问题,那么请忽略以下部分。

因为前几篇文章中已经分析来SpringBoot是如何完成自动配置的,所以这里我想通过找代码的方式直接看它能够配置哪些属性。

  1. 首先在autoconfiguration包下面的spring.factory中搜索jdbc

jdbc

  1. 点击关于DataSource的自动配置类
1
2
3
4
5
6
7
8
9
10
11
12
13
14
15
16
17
18
19
@EnableConfigurationProperties(DataSourceProperties.class)
@Import({ DataSourcePoolMetadataProvidersConfiguration.class, DataSourceInitializationConfiguration.class })
public class DataSourceAutoConfiguration {

// 使用DataSourceProperties类作为属性类,以下为基本属性

@ConfigurationProperties(prefix = "spring.datasource")
public class DataSourceProperties implements BeanClassLoaderAware, InitializingBean {

private ClassLoader classLoader;

private String name;
private boolean generateUniqueName;
private Class<? extends DataSource> type;

private String driverClassName;
private String url;
private String username;
private String password;

根据DataSourceProperties类,可以知道如果我们像配置DataSource,那么有这几个属性可以进行配置。

1
2
3
4
5
# spring.datasource 为前缀,后面为属性名,和Properties类中的属性相对应。
spring.datasource.url=jdbc:mysql://localhost:3306/springboot
spring.datasource.driverClassName=com.mysql.jdbc.Driver
spring.datasource.username=root
spring.datasource.password=123456

测试结果

结果

MySql使用外键(8.0)

Posted on 2019-07-11 | In MYSQL
Words count in article: 795 | Reading time ≈ 3

使用外键约束

Mysql默认使用的是innoDB引擎,该引擎是支持外键的,下面来说说如何创建外键及各种外键使用的效果。

基本概念

需要注意的是外键不支持虚拟构造出的列上。

MySql支持外键,允许跨表交叉引用相关数据,有助于帮助保持数据的一致性。在create和alter表中的语句如下:

1
2
3
4
5
6
7
8
9
10
11
12
13
14
15
16
17
18
19
20
21
22
23
24
25
26
27
28
29
30

-- 中括号内是非必写的
[CONSTRAINT [symbol]] FOREIGN KEY
[index_name] (col_name, ...)
REFERENCES tbl_name (col_name,...)
[ON DELETE reference_option]
[ON UPDATE reference_option]

reference_option:
RESTRICT | CASCADE | SET NULL | NO ACTION | SET DEFAULT

CREATE TABLE child (
id INT,
parent_id INT,
-- 定义索引
INDEX par_ind (parent_id),
-- parent_id关联parent表中的id字段
-- 如果父表删除了,则子表也需要删除字段内容
FOREIGN KEY (parent_id)
REFERENCES parent(id)
ON DELETE CASCADE
) ENGINE=INNODB;

-- 添加外键
ALTER TABLE tb1 ADD FOREIGN KEY (parent_id)
REFERENCES parent(id)
ON DELETE CASCADE

-- 删除外键
ALTER TABLE tbl_name DROP FOREIGN KEY fk_symbol;

index_name 指的是外键的标识,如果子表已经显式的定义了可以支持外键的索引(上面例子中的par_ind),则忽略。否则,mysql会依照以下规则隐式的创建一个外键索引。

  • 如果定义CONSTRAINT symbol 值,则使用这个值,否则使用外键名 index_name.
  • 如果上面两个都没有定义,外键名使用引用外键列的名称。

更新/删除行为

Mysql如何使用外键来保证参照的完整性。

对于支持外键的innoDB存储引擎来说,MYSQL拒绝在子表中插入或删除在父表中没有匹配到的外键候选值。

当父表中的外键候选值发生变化的时候,根据不同的行为策略,来影响子表中对应的外键的键值。具体的策略如下:

CASCADE 【级联】

如果在父表中删除和更新数据,会自动的删除和更新子表中的匹配到的所有数据。支持删除级联ON DELETE CASCADE和更新级联ON UPDATE CASCADE,两个表之间,不要定义几个这样的子句,这些子句作用域父表或子表中的同一列。

SET NULL 【置空】

如果在父表中删除和更新数据,则自动的置空NULL子表中的外键对应的字段。如果在更新或删除操作中指定了ON DELETE SET NULL或者ON UPDATE SET NULL 时,必须保障*子表外键的那个字段没有设置为 NOT NULL *

RESTRICT 【限制】

如果在伏笔啊哦中删除和更新数据,子表拒绝删除或更新对应字段内容。

NO ACTION【无动作】

NO ACTION 是标准SQL中的关键字,在mysql中NO ACTION和RESTRICT的作用相同,都是在在修改或者删除之前去检查从表中是否有对应的数据,如果有,拒绝操作。

但是有些数据库系统会有延迟检查功能,会导致NO Action 会延迟检查是否有对应数据,但是MYSQL外键的检查是立即执行的,所以RESTRICT和NO ACTION是完全相同的

SET DEFAULT

需要注意的是,set default只是MySQL 解析器认可,但是InnoDB和NDB 拒绝在定义表时,出现ON DELETE SET DEFAULT or ON UPDATE SET DEFAULT 语句。

SpringBoot的日志使用

Posted on 2019-07-10 | In SpringBoot
Words count in article: 818 | Reading time ≈ 3

SpringBoot的日志使用

SpringBoot的日志选择

SpringBoot默认使用SLF4j和logback用作日志。为什么是两个,为什么是这两个?

日志框架的大致分类

日志框架分为日志的门面框架和具体的实现框架,为什么需要门面框架,是因为不同的系统对日志的需求可能不同,系统一可能使用日志框架一,系统二还需要实现日志功能,如果还用日志框架一,则需要适配系统二进行api的调整。

门面日志框架就为了解决这一问题。让调用框架的api统一,具体的实现可以随不同的系统进行调整。类似jdbc,操作接口需要进行统一。

所以SpringBoot的日志使用分别是用来日志门面框架SLF4j和日志具体实现框架logback作为日志服务。

使用日志

简易使用SLF4j

参考SLF4j官网中的hello world程序:

1
2
3
4
5
6
7
8
9
10
// 导入slf4j的jar包
import org.slf4j.Logger;
import org.slf4j.LoggerFactory;

public class HelloWorld {
public static void main(String[] args) {
Logger logger = LoggerFactory.getLogger(HelloWorld.class);
logger.info("Hello World");
}
}

下图表示了使用slf4j和各个日志实现框架的匹配。绿色的是适配层,深蓝色的是实现框架。比如使用logback作为实现框架,则需要导入slf4j的jar包和logback的相关jar包。但是如果使用log4j作为实现框架,还需导入中间的适配层jar包(中间绿色的)。

使用slf4j

在Springboot-logging-start中使用如下的jar包依赖:

jar包依赖

每一个实现框架都有各自的配置文件,使用slf4j后,配置文件还是使用具体实现的配置文件。

SpringBoot中的SLF4j

  1. SpringBoot底层自动配置使用的是SLF4j和logback。
  2. SprintBoot使用中间包将其他日志框架转化为slf4j框架。
  3. 引入其他日志框架时,需要把这个日志的jar包排除掉。否则与slf4j的jar包相冲突,上一条就是原因。

在测试文件中测试SpringBoot的日志使用

1
2
3
4
5
6
7
8
9
10
11
12
13
Logger logger = LoggerFactory.getLogger(this.getClass());
@Test
public void testLogger(){
// 由低到高 日志的级别,日志框架可以根据配置文件调整输出的日志级别,
// 只会输出相应日志级别及后面的高级别日志信息
logger.trace("这是trace日志");
logger.debug("这是debug日志");
// SpringBoot默认使用的是info级别,
// 可以使用日志的配置文件调整级别
logger.info("这是info日志");
logger.warn("这是warn日志");
logger.error("这是error日志");
}

日志级别有trace, debug,info,warn,error五种日志级别。并且由低到高排序。指定日志级别,则系统会输出当前日志级别和更高的日志级别的日志。

1
2
3
4
5
6
7
8
9
10
11
12
13
14
15
16
# 全局的日志记录级别
#logging:
# level: trace

# 指定的包下的日志记录级别
logging:
level:
com :
nanyin : debug
# pattern: 输出格式
# file:
# console:

# file: -- 这里用于指定日志记录的文件名,可以指定具体的路径,未指定则生成在当前项目下
# path: -- 这里用于指定日志文件的路径,springboot会默认生成路径,默认文件名
# 这两个指定一个就好了,都指定则会默认使用file

使用自定义的配置文件

更换log4j2作为日志框架

SpringBoot中的配置文件(拓展)

Posted on 2019-07-08 | In SpringBoot
Words count in article: 2k | Reading time ≈ 8

SpringBoot中的配置文件(拓展)

如果有多个环境,配置文件需要根据环境来变化,只有一个配置文件就显的鸡肋了,每次变更环境的时候都需要修改一遍配置文件,两个还好,多了就相当麻烦了。

SpringBoot提供了多配置文件的用法,让环境的变化尽可能少的影响到配置文件的更改。

多配置文件

加载顺序

Spring会按以下顺序查找地址,如果有则优先使用前面的配置文件的属性,如果后面的文件有前面文件没有的属性,则会添加,否则忽略。

  1. file:./config/
  2. file:./
  3. classpath:/config/
  4. classpath:/

指定/添加默认加载地址

使用spring.config.location来指定默认的加载地址。

如果spring.config.location 指定的值为: classpath:/custom-config/,file:./custom-config/,则系统会优先找这个文件。

如果使用spring.config.additional-location来添加配置文件的加载地址。

命名格式

可以使用 application-{profile}.properties来定义一个特殊的配置文件。特殊的这个配置文件如果调用,那么他总会覆盖掉默认的application.properties文件中的内容。

比如使用application-dev.properties作为开发环境的配置文件,在其中指定了服务端口8081.而在默认的application.properties中指定的端口号为8080.那么,系统会使用哪个端口呢?

下面我使用yml文件作为例子(同properties文件)

1
2
3
4
5
6
7
8
9
10
11
12
# application.yml文件中的内容
server:
port: 8080

# yaml文件格式指定使用哪个配置
spring:
profiles:
active: dev

# application-dev.properties文件中的内容
server:
port: 8081

通过spring.profiles.active=dev(这时properties格式)。来特殊指定启用哪些配置文件。这里启用的是application-dev.properties文件。

运行结果

由控制台的输出结果可以看出,springBoot激活了名为dev的配置文件及application-dev.properties文件,并且更改端口为dev中指定的8081端口。

使用yaml文档块

yaml文件提供一种特性叫做文档块。使用三个-来隔离配置信息

1
2
3
4
5
6
7
8
9
10
11
12
13
14
15
16
17
18
19
20
21
22
23
# 默认的
server:
port: 8080

spring:
profiles:
active: dev

# 文档块1
---
spring:
profiles: dev

server:
port: 8081

# 文档块2
---
spring:
profiles: prod

server:
port: 8082

使用文档块能够减少多个配置文件。与多个配置文件效果是等同的。

自动配置

其实在前面的文章中已经大概了解了SpringBoot如何进行自动配置,但是仅仅停留在了EnableAutoConfiguration注解的使用和浅层的解析上,这次需要更加深入的了解如何调用到自动配置类、我们如果想自己在配置文件中配置属性,该怎么去配置。

如何进行的自动配置

首先还是进入到SpringBootApplication注解中

1
2
3
4
5
@SpringBootConfiguration
@EnableAutoConfiguration
@ComponentScan(excludeFilters = { @Filter(type = FilterType.CUSTOM, classes = TypeExcludeFilter.class),
@Filter(type = FilterType.CUSTOM, classes = AutoConfigurationExcludeFilter.class) })
public @interface SpringBootApplication {

发现这里调用了EnableAutoConfiguration注解。再点进这个注解中。

1
2
3
4
@AutoConfigurationPackage
// 引用了AutoConfigurationImportSelector这个类
@Import(AutoConfigurationImportSelector.class)
public @interface EnableAutoConfiguration {

这里通过import注解使用了AutoConfigurationImportSelector类,这个类直接翻译过来叫做自动配置导入选择器。进入这个类中看。

1
2
public class AutoConfigurationImportSelector implements DeferredImportSelector, BeanClassLoaderAware,
ResourceLoaderAware, BeanFactoryAware, EnvironmentAware, Ordered {

这里我们可以看到AutoConfigurationImportSelector继承了DeferredImportSelector这个类。这个类中需要实现的方法是void process(AnnotationMetadata metadata, DeferredImportSelector selector);方法。

所以需要看AutoConfigurationImportSelector中是如何实现父类中定义的process方法。

1
2
3
4
5
6
7
8
9
10
11
12
13
14
public void process(AnnotationMetadata annotationMetadata, DeferredImportSelector deferredImportSelector) {
Assert.state(deferredImportSelector instanceof AutoConfigurationImportSelector,
() -> String.format("Only %s implementations are supported, got %s",
AutoConfigurationImportSelector.class.getSimpleName(),
deferredImportSelector.getClass().getName()));
// 获得自动配置的entry,点进这个方法看如何获取自动配置的配置信息的
AutoConfigurationEntry autoConfigurationEntry = ((AutoConfigurationImportSelector) deferredImportSelector)
.getAutoConfigurationEntry(getAutoConfigurationMetadata(), annotationMetadata);
this.autoConfigurationEntries.add(autoConfigurationEntry);
// 循环所有configuration然后放到entries中添加到容器中。
for (String importClassName : autoConfigurationEntry.getConfigurations()) {
this.entries.putIfAbsent(importClassName, annotationMetadata);
}
}

通过getAutoConfigurationEntry这个方法获取到所有的自动配置的信息。点进这个方法看是如何获取到的

1
2
3
4
5
6
7
8
9
10
protected AutoConfigurationEntry getAutoConfigurationEntry(AutoConfigurationMetadata autoConfigurationMetadata,
AnnotationMetadata annotationMetadata) {
if (!isEnabled(annotationMetadata)) {
return EMPTY_ENTRY;
}
AnnotationAttributes attributes = getAttributes(annotationMetadata);
// 返回自动配置类的全类名
List<String> configurations = getCandidateConfigurations(annotationMetadata, attributes);
// 去掉重复的
configurations = removeDuplicates(configurations);

通过getCandidateConfigurations来获取自动配置的全类名。

1
2
3
4
protected List<String> getCandidateConfigurations(AnnotationMetadata metadata, AnnotationAttributes attributes) {
// 第一个参数返回的是 EnableAutoConfiguration.class
List<String> configurations = SpringFactoriesLoader.loadFactoryNames(getSpringFactoriesLoaderFactoryClass(),
getBeanClassLoader());

接着调用loadFactoryNames获取自动配置类的List

1
2
3
4
5
6
7
public static List<String> loadFactoryNames(Class<?> factoryClass, @Nullable ClassLoader classLoader) {

// 这里的factoryClassName是EnableAutoConfiguration
String factoryClassName = factoryClass.getName();
// 下面这句话的意思是需要在loadSpringFactories这个map中获取key为EnableAutoConfiguration的value
return loadSpringFactories(classLoader).getOrDefault(factoryClassName, Collections.emptyList());
}

那么这个map的值是怎么形成的呢?

1
2
3
4
5
6
7
8
9
10
11
12
13
14
15
16
17
18
19
20
21
22
// 在FACTORIES_RESOURCE_LOCATION中获取资源
Enumeration<URL> urls = (classLoader != null ?
classLoader.getResources(FACTORIES_RESOURCE_LOCATION) :
ClassLoader.getSystemResources(FACTORIES_RESOURCE_LOCATION));
//定义一个MAP,将结果都存到这个map中
result = new LinkedMultiValueMap<>();
//对每个资源循环
while (urls.hasMoreElements()) {
URL url = urls.nextElement();
UrlResource resource = new UrlResource(url);
// 转化为properties
Properties properties = PropertiesLoaderUtils.loadProperties(resource);
for (Map.Entry<?, ?> entry : properties.entrySet()) {
String factoryClassName = ((String) entry.getKey()).trim();
for (String factoryName : StringUtils.commaDelimitedListToStringArray((String) entry.getValue())) {
// 最后添加到result中
result.add(factoryClassName, factoryName.trim());
}
}
}
cache.put(classLoader, result);
return result;

下图是对result的debug结果,框中是所有的结果,但横线处是我们自动配置需要的。

Debugx

结果在FACTORIES_RESOURCE_LOCATION(META-INF/spring.factories)中可以找到.

factory

这里的所有类都是可以自动配置到Spring的容器中。

如何根据自动配置类配置属性

进入到spring.factories中进行查看所有autoConfigure类,用CacheAutoConfiguration举例,来分析以后想要配置关于cache的属性,怎么查找到这个配置属性,怎么配置到properties文件中。

直接点进类中发现有很多注解,一个个看

1
2
3
4
5
6
7
8
9
10
11
12
13
14
15
//表示一个配置文件
@Configuration
// 仅当classpath中存在特定的CacheManager类时匹配
@ConditionalOnClass(CacheManager.class)
// 如果Spring 容器中存在CacheAspectSupport
@ConditionalOnBean(CacheAspectSupport.class)
//如果Spring容器不满足bean的name为cacheResolver,value为CacheMaager
@ConditionalOnMissingBean(value = CacheManager.class, name = "cacheResolver")
// 开启自动配置属性,指向 CacheProperties类
@EnableConfigurationProperties(CacheProperties.class)
@AutoConfigureAfter({ CouchbaseAutoConfiguration.class, HazelcastAutoConfiguration.class,
HibernateJpaAutoConfiguration.class, RedisAutoConfiguration.class })
// 缓存配置的选择器
@Import(CacheConfigurationImportSelector.class)
public class CacheAutoConfiguration {

其中EnableConfigtionProperties注解用来开启配置属性。

1
2
3
4
5
6
7
8
9
10
// spring.cache就是在配置文件中使用的前缀
@ConfigurationProperties(prefix = "spring.cache")
public class CacheProperties {
// 以下就是各属性值
private CacheType type;
private List<String> cacheNames = new ArrayList<>();
private final Caffeine caffeine = new Caffeine();
private final Couchbase couchbase = new Couchbase();
private final EhCache ehcache = new EhCache();
private final Redis redis = new Redis();

用cache中的redis对象为例子,如何去配置redis缓存。

其中指定了前缀,和中间的redis对象,所以redis的配置中的属性就应该是spring.cache.redis.xxx.

1
2
3
4
5
public static class Redis {
private Duration timeToLive;
private boolean cacheNullValues = true;
private String keyPrefix;
private boolean useKeyPrefix = true;

比如需要配置不允许redis缓存空值,就需要配置cacheNullValues属性,所以可以在配置文件中写

1
spring.cache.redis.chcheNullValues=false

其他类型的自动配置类同理,每个自动配置类都配备一个xxxProperties.class类进行属性的匹配,所以如果需要某个属性,则直接向对应的类中查找,找出前缀和属性名,则可直接找出完成的配置名称。

经过上面的分析,在也不用担心该如何配置配置文件了。

自定义SpringBoot Starter实现自动配置

如果自行进行自动配置。主要实现的文件是:

  • xxxxAutoConfiguration类
  • xxxxProperties类
  • resources/META-INF/ 下的 spring.factories 文件中添加:org.springframework.boot.autoconfigure.EnableAutoConfiguration=com.example.autocinfigure.xxxxAutoConfigure

在创建自动配置包前需要在pom文件中添加自动配置的包依赖。

1
2
3
4
5
6
7
<dependencies>
<dependency>
<groupId>org.springframework.boot</groupId>
<artifactId>spring-boot-autoconfigure</artifactId>
<version>1.5.9.RELEASE</version>
</dependency>
</dependencies>

加载的基本过程:

  1. Spring Boot在启动时扫描项目所依赖的JAR包,寻找包含spring.factories文件的JAR包
  2. 根据spring.factories配置加载AutoConfigure类
  3. 根据 @Conditional注解的条件,进行自动配置并将Bean注入Spring Context

SpringBoot深入自动配置

Posted on 2019-07-07 | In SpringBoot
Words count in article: 1.3k | Reading time ≈ 5

SpringBoot深入自动配置

引入

在上一篇Spring Boot与微服务基本介绍中,介绍了创建maven项目到运行springboot的基本过程。

其中使用主程序来启动SpringBoot

1
2
3
4
5
6
7
@SpringBootApplication
public class DeepSpringBootApplication {
public static void main(String[] args) {
// 使用SpringApplication.run方法来启动spring boot应用 其中参数有类和args
SpringApplication.run(DeepSpringBootApplication.class,args);
}
}

仅仅是添加了一个@SpringBootApplication注解,这个注解的作用是什么,原理是什么,接下来就通过源码简单看一下。

SpringBootApplication启动注解

1
2
3
4
5
6
7
8
9
10
11
12
13
14
15
16
17
18
19
20
//点开@SpringBootApplication源码
@Target(ElementType.TYPE)
@Retention(RetentionPolicy.RUNTIME)
@Documented
@Inherited
@SpringBootConfiguration
@EnableAutoConfiguration
@ComponentScan(excludeFilters = { @Filter(type = FilterType.CUSTOM, classes = TypeExcludeFilter.class),
@Filter(type = FilterType.CUSTOM, classes = AutoConfigurationExcludeFilter.class) })
public @interface SpringBootApplication {
/** AliasFor注解的作用是为了声明别名
* AliasFor在下面代码中的作用就是通过别名引用在annotatin指定的类的特定方法
* 如果有兴趣可以参考AliasFor的官方文档
* https://docs.spring.io/spring/docs/current/javadoc-api/org/springframework/core/annotation/AliasFor.html
* 比如这里就会指定 EnableAutoConfiguration的exclude方法
**/
@AliasFor(annotation = EnableAutoConfiguration.class)
Class<?>[] exclude() default {};
// 。。。其他的省略
}

在上面的@SpringBootApplication源码中,其中使用到了三个比较重要的基本注解@SpringBootConfiguration、@EnableAutoConfiguration和@ComponentScan。下面分别来对这三个注解进行简单分析。

SpringBootConfiguration

1
2
3
4
5
6
7
8
9
10
11
/**
* 标示是一个spring boot应用的配置类,用作 @Configuratio的替代品
* 以便自动找到配置
*/
@Target(ElementType.TYPE)
@Retention(RetentionPolicy.RUNTIME)
@Documented
@Configuration
public @interface SpringBootConfiguration {

}

其实这时SpringBoot对Spring的@Configuration的注解的包装

Configuration

1
2
3
4
5
6
7
8
@Target(ElementType.TYPE)
@Retention(RetentionPolicy.RUNTIME)
@Documented
@Component
public @interface Configuration {
@AliasFor(annotation = Component.class)
String value() default "";
}

简单理解为,Configuration 注解上标注了@Component原注解,所以它也是一个spring组件,会通过扫描把标志这个注解的类作为spring的配置类加载到容器中。

实际上加载Configuration的方法有三种,自动扫描配置类只是其中的一种,其他两种是

  1. 通过AnnotationConfigApplicationContext类
1
2
3
4
5
6
7
8
9
10
11
12
13
@Configuration
public class AppConfig {
@Bean
public MyBean myBean() {
// instantiate, configure and return bean ...
}
}

AnnotationConfigApplicationContext ctx = new AnnotationConfigApplicationContext();
// 注册Bean
ctx.register(AppConfig.class);
ctx.refresh();
MyBean myBean = ctx.getBean(MyBean.class);
  1. 使用xml配置文件,将标注为@Configuration的类作为一个bean来声明在xml文件中。
1
2
3
4
<beans>
<context:annotation-config/>
<bean class="com.acme.AppConfig"/>
</beans>

标记@Configuration注解的类表示这个类中声明了一个或多个@Bean方法,可以交由spring容器处理。可以在运行时生成bean定义和bean之间的服务请求。

更加详细的参考Spring官网Configuration注解

EnableAutoConfiguration

EnableAutoConfiguration是spring boot中的注解,它的作用就是猜测并自动配置可能需要的bean,也就是自动配置功能。

1
2
3
4
5
6
7
@AutoConfigurationPackage
@Import(AutoConfigurationImportSelector.class)
public @interface EnableAutoConfiguration {
String ENABLED_OVERRIDE_PROPERTY = "spring.boot.enableautoconfiguration";
Class<?>[] exclude() default {};
String[] excludeName() default {};
}

其中重要的两个注解@AutoConfigurationPackage和@Import中的内容

AutoConfigurationPackage

1
2
3
4
5
6
7
8
9
10
11
12
13
14
15
16
17
18
19
// 标注@AutoConfigurationPackage的注解可以使用Registrar进行注册
// @Import的作用就是引用配置类,将多个配置类放到一个主配置中
@Import(AutoConfigurationPackages.Registrar.class)
public @interface AutoConfigurationPackage {
}

// 注册方法
static class Registrar implements ImportBeanDefinitionRegistrar, DeterminableImports {
// 注册bean定义信息
@Override
public void registerBeanDefinitions(AnnotationMetadata metadata, BeanDefinitionRegistry registry) {
// 这里的packageName是标注这个注解的类的包的路径名称,如下图
register(registry, new PackageImport(metadata).getPackageName());
}
@Override
public Set<Object> determineImports(AnnotationMetadata metadata) {
return Collections.singleton(new PackageImport(metadata));
}
}

debug1

将主配置类的所在的包及下面的所有子包扫描到Spring容器中。

1
2
3
4
5
6
7
8
9
10
11
12
13
14
15
16
17
18
// 以编程方式注册自动配置包名称.将给定的包【这里的是com.nanyin 】注册添加到已经注册的包名称中
public static void register(BeanDefinitionRegistry registry, String... packageNames) {
// private static final String BEAN = AutoConfigurationPackages.class.getName();
if (registry.containsBeanDefinition(BEAN)) {
BeanDefinition beanDefinition = registry.getBeanDefinition(BEAN);
ConstructorArgumentValues constructorArguments = beanDefinition.getConstructorArgumentValues();
constructorArguments.addIndexedArgumentValue(0, addBasePackages(constructorArguments, packageNames));
}
else {
// 使用标准的类定义 GenericBeanDefinition 注册bean
GenericBeanDefinition beanDefinition = new GenericBeanDefinition();
beanDefinition.setBeanClass(BasePackages.class);
beanDefinition.getConstructorArgumentValues().addIndexedArgumentValue(0, packageNames);
beanDefinition.setRole(BeanDefinition.ROLE_INFRASTRUCTURE);
// 注册bean
registry.registerBeanDefinition(BEAN, beanDefinition);
}
}

@Import(AutoConfigurationImportSelector.class)

自动导入组件的选择器。将需要导入的组件以全类名的方式返回一个数组。

1
2
3
4
5
6
7
8
9
10
11
12
13
@Override
public void process(AnnotationMetadata annotationMetadata, DeferredImportSelector deferredImportSelector) { Assert.state(deferredImportSelector instanceof AutoConfigurationImportSelector,
() -> String.format("Only %s implementations are supported, got %s",
AutoConfigurationImportSelector.class.getSimpleName(),
deferredImportSelector.getClass().getName()));
//获取自动导入的内容的全类名,在这一步进行debug见下图
AutoConfigurationEntry autoConfigurationEntry = ((AutoConfigurationImportSelector) deferredImportSelector)
.getAutoConfigurationEntry(getAutoConfigurationMetadata(), annotationMetadata);
this.autoConfigurationEntries.add(autoConfigurationEntry);
for (String importClassName : autoConfigurationEntry.getConfigurations()) {
this.entries.putIfAbsent(importClassName, annotationMetadata);
}
}

代码中断点得出的自动导入的包名称:

代码导入1

通过方法getConstructorArgumentValues得到自动配置的包的名称,调用了SpringFactoriesLoader的方法,其中

1
2
3
4
5
6
7
8
9
10
11
12
protected List<String> getCandidateConfigurations(AnnotationMetadata metadata, AnnotationAttributes attributes) {
List<String> configurations = SpringFactoriesLoader.loadFactoryNames(getSpringFactoriesLoaderFactoryClass(),
getBeanClassLoader());
Assert.notEmpty(configurations, "No auto configuration classes found in META-INF/spring.factories. If you "
+ "are using a custom packaging, make sure that file is correct.");
return configurations;
}
// 调用loadFactoryNames获得一组包名称
public static List<String> loadFactoryNames(Class<?> factoryClass, @Nullable ClassLoader classLoader) {
String factoryClassName = factoryClass.getName();
return loadSpringFactories(classLoader).getOrDefault(factoryClassName, Collections.emptyList());
}

最后通过文件中spring.factorys文件中的内容来获取最终的自动导入自动配置类包范围。

导入

导入包内容

ComponentScan

组件扫描指令,需要与@Configuration一起使用。与Spring提供的xml配置<context:component-scan>作用相同。

在SpringBootApplication注解中是这样定义ComponentScan的:

1
2
3
4
@ComponentScan(excludeFilters = { 
@Filter(type = FilterType.CUSTOM, classes = TypeExcludeFilter.class),
@Filter(type = FilterType.CUSTOM, classes = AutoConfigurationExcludeFilter.class)
})

excludeFilters的作用是指定哪些类型不符合组件扫描的条件,也就是排除掉指定的类。

SpringBoot中使用配置

Posted on 2019-07-07 | In SpringBoot
Words count in article: 1.6k | Reading time ≈ 7

SpringBoot中使用配置

一、配置文件

SpringBoot使用全局的配置文件,配置文件名是固定的

  • application.properties
  • application.yml

使用配置文件可以更改系统自动配置的默认值,比如端口号等信息。

YAML

yaml以数据为中心,比xml,json更适合做配置文件。

YAML与properties对比

YAML:

1
2
server:
port: 8080

properties:

1
server.port: 8080

YAML语法

  1. 基本语法

k : v 表示一对键值对 「中间需要有空格」,以空格的缩紧来表示层级关系,使用左对其的数据都是一个层级的。

例如下面代码中的port和path是一个层级的。

1
2
3
server:
port: 8081
path: /hello
  1. 值的写法
  • 字面量

key : value 字面量直接写,并且字符串不需要添加引号,类似properties。如果添加引号会有特殊的意义。

双引号: 不会转义特殊字符
单引号: 会转义特殊字符,最终会转义成普通的字符串输出

  • 对象

    1. 非行内写法 -> key : value 对象一样按照key,value来写

      1
      2
      3
      person:
      firstName: zhang
      lastName: san
    2. 行内写法

      1
      person:{firstName: zhang,lastName: san}
  • 数组(list,set)

使用 - 来表示数组中的一个元素

1
2
3
4
person
- zhangsan
- lisi
- wangwu

使用yml配置文件进行配置

编写bean对象
1
2
3
4
5
6
7
8
9
10
11
12
13
14
15
16
17
18
19
20
21
22
23
24
25
26
27
28
29
30
31
import lombok.Data;
import org.springframework.boot.context.properties.ConfigurationProperties;
import org.springframework.stereotype.Component;
/***
* 如果需要使用ConfigurationProperties 这个注解需要添加
*
* <dependency>
* <groupId>org.springframework.boot</groupId>
* <artifactId>spring-boot-configuration-processor</artifactId>
* <optional>true</optional>
* </dependency>
*
* @Author nanyin
* @Date 16:29 2019-07-07
*
* 使用Lombok的data注解可以自动的配置 setter,getter,toString属性,
* 但是需要IDE的Lombok插件
**/
@Data
@ConfigurationProperties(value = "person")
@Component
public class Person {
private String name;
private int age;
private User user;
}

@Data
public class User {
private int id;
}
使用configurationPropertis配置类

根据bean对象在application.yml文件中编写如下yml内容:

1
2
3
4
5
person:
name: zhangsan
age: 12
user:
id: 1
使用SpringBoot的单元测试

在测试文件夹下建立DeepSpringBootApplicationTest测试类。

1
2
3
4
5
6
7
8
9
10
11
12
13
14
15
16
17
18
/***
* 使用spring的测试,可以使用spring的注入功能
* 这里的runWith注解说明的是让junit使用Spring的运行测试方式
* 也就是说可以使用spring的注入等特性
* @Author nanyin
* @Date 16:27 2019-07-07
**/
@RunWith(SpringRunner.class)
@SpringBootTest
public class DeepSpringBootApplicationTest {
@Autowired
Person person;

@Test
public void testPerson(){
System.out.println(person.toString());
}
}

如果需要使用上面的代码进行SpringBoot的单元测试,需要在pom.xml文件中添加如下内容:

1
2
3
4
5
6
7
8
9
10
11
12
13
14
15
16
17
18
<dependency>
<groupId>junit</groupId>
<artifactId>junit</artifactId>
<version>4.12</version>
<scope>test</scope>
</dependency>
<dependency>
<groupId>org.springframework</groupId>
<artifactId>spring-test</artifactId>
<version>5.1.8.RELEASE</version>
<scope>test</scope>
</dependency>
<dependency>
<groupId>org.springframework.boot</groupId>
<artifactId>spring-boot-test</artifactId>
<version>2.1.6.RELEASE</version>
<scope>test</scope>
</dependency>

最后运行刚才的测试类,得到的结果是:

运行结果

通过运行结果可知道,使用application.yml文件编写配置信息成功的放到Person这个类中。

PropertySource

上面使用yml文件,通过configurationPropertis对Person进行了配置。

configurationPropertis它会从全局配置文件application.yml配置文件中的配置。但如果指定某个具体配置文件中的配置呢?

答案是PropertySource注解

  1. 使用properties文件

    在classpath路径下新建要个person.properties文件,文件内容如下;

    1
    2
    3
    person.age= 12
    person.id= 2
    person.name=zhangsan

    在原来的基础上添加PropertySource注解

    1
    2
    3
    4
    5
    6
    7
    8
    9
    10
    @Data
    // 指定使用到的配置文件,这里的value可以是数组,也就是可以加载多个配置文件
    @PropertySource(value="classpath:person.properties")
    @ConfigurationProperties(value = "person")
    @Component
    public class Person {
    private String name;
    private int age;
    private User user;
    }

    运行结果和上面测试结果的相同。

  2. 使用yml文件

    使用yml文件作为配置文件时,与properties文件略有不同,是因为PropertySource实际上上默认是不支持yaml文件的。所以如果使用yml文件就需要略加改造。经过一番谷歌后。

    PropertySourceFactory是spring 4.3之后出现的为PropertySource的工厂接口,注解默认使用的是DefaultPropertySourceFactory来创建ResourcePropertySource对象。

    spring通过YamlPropertiesFactoryBean来加载yaml文件。这个类可以将一个或多个文件加载为java.util.Properties对象。

    1
    2
    3
    4
    5
    6
    7
    8
    9
    10
    11
    12
    13
    14
    15
    16
    17
    18
    19
    20
    21
    22
    23
    24
    25
    26
    27
    28
    29
    30
    31
    32
    33
    34
    35
    36
    package com.nanyin.config;

    import org.springframework.beans.factory.config.YamlPropertiesFactoryBean;
    import org.springframework.core.env.PropertiesPropertySource;
    import org.springframework.core.env.PropertySource;
    import org.springframework.core.io.support.EncodedResource;
    import org.springframework.core.io.support.PropertySourceFactory;
    import org.springframework.lang.Nullable;

    import java.io.FileNotFoundException;
    import java.io.IOException;
    import java.util.Properties;

    public class YamlPropertiesFactory implements PropertySourceFactory {
    @Override
    public PropertySource<?> createPropertySource(@Nullable String name, EncodedResource resource) throws IOException {
    Properties propertiesFromYaml = loadYamlIntoProperties(resource);
    String sourceName = name != null ? name : resource.getResource().getFilename();
    return new PropertiesPropertySource(sourceName, propertiesFromYaml);
    }

    private Properties loadYamlIntoProperties(EncodedResource resource) throws FileNotFoundException {
    try {
    YamlPropertiesFactoryBean factory = new YamlPropertiesFactoryBean();
    factory.setResources(resource.getResource());
    factory.afterPropertiesSet();
    return factory.getObject();
    } catch (IllegalStateException e) {
    // for ignoreResourceNotFound
    Throwable cause = e.getCause();
    if (cause instanceof FileNotFoundException)
    throw (FileNotFoundException) e.getCause();
    throw e;
    }
    }
    }

    实现上述代码后,在配置类中的PropertySource中添加factory

    1
    2
    3
    4
    5
    6
    7
    8
    9
    10
    11
    @PropertySource(value={"classpath:person.yml"},
    factory = YamlPropertiesFactory.class)
    @ConfigurationProperties(prefix = "person")
    @Component
    @Data
    public class Person {
    private int id;
    private String name;
    private int age;
    private User user;
    }

    yaml文件文件中的内容.其中使用${xxx}的结构可以调用其他属性的值,这里user的id值就是直接使用person的id值。

    1
    2
    3
    4
    5
    6
    person:
    age: 12
    id: 2
    name: zhangsan
    user:
    id: ${person.id}

    二、配置类

在原来使用Spring时,繁多的xml让人头疼。而在SpringBoot中,推荐使用类的方式代替xml等配置文件,改用注解的方式。

  1. 创建一个类,类名为MyConfig

  2. 为类标注为@Configuration

  3. 将需要引入到容器中的bean作为返回值写到方法中,其中方法的名称就是容器中bean的名称。

  4. 进行测试,容器中加载到了这个配置类中配置的bean

1
2
3
4
5
6
7
8
9
10
11
12
13
14
15
16
17
18
19
20
21
22
23
24
25
26
27
28
29
30
31
32
// 标注@Configuration注解,表示这个是Spring的配置类,用来代替配置文件如 xxx.xml
@Configuration
public class MyConfig {

@Autowired
Person person;

/**
* 使用@bean注解向容器中添加bean,用来替代原来xml配置文件中的
*<beans>
* <context:annotation-config/>
* <bean class="com.acme.AppConfig"/>
*</beans>
* 其中方法的返回值是添加到容器中的内容
*/
@Bean
public HelloService helloService(){
// 可以使用person的配置值
System.out.println("加载MyConfig配置文件!!! 其中配置文件中的 name 属性:" + person.getName());
return new HelloService() ;
}
}

// SpringBoot测试
public class DeepSpringBootApplicationTest {
@Autowired
ApplicationContext ctx;
@Test
public void testContainsBean(){
System.out.println(ctx.containsBean("helloService"));
}
}

将HelloService手动通过配置类的方式添加到容器中,作用和使用xml的方式一样,但是更简单,更容易看懂。

结果

SpringBoot与微服务简介

Posted on 2019-07-06 | In SpringBoot
Words count in article: 737 | Reading time ≈ 3

SpringBoot与微服务简介

SpringBoot通过整合Spring的各个技术栈用来简化Spring应用开发,使用约定大于配置的思想。简单快速的创建一个独立的,产品级的应用。

SpringBoot

优点

  1. 快速创建独立运行的Spring项目与各大主流框架的集成。

  2. 自带嵌入式的servlet容器。

  3. springboot带有starters自动依赖与版本控制。

  4. 大量的自动配置,约定大于配置。

  5. 无需配置xml,告别大量的xml文件。

springboot的hello world

创建一个maven应用

  1. 创建一个普通的maven项目
  1. 创建后的maven结构,包含pom.xml文件内容
  1. 开启idea中对maven的自动导入功能

在POM文件中添加依赖

1
2
3
4
5
6
7
8
9
10
11
12
13
14
15
16
17
18
19
<!-- org.springframework.boot 作用:
1. 默认使用java版本,默认编码
2. 引用管理的功能,比如version会从这里继承出去
3. 识别插件配置
4. 识别.properties 和.yml配置文件
5. 整体的版本依赖
-->
<parent>
<groupId>org.springframework.boot</groupId>
<artifactId>spring-boot-starter-parent</artifactId>
<version>2.1.6.RELEASE</version>
</parent>

<dependencies>
<dependency>
<groupId>org.springframework.boot</groupId>
<artifactId>spring-boot-starter-web</artifactId>
</dependency>
</dependencies>

创建应用主程序

1
2
3
4
5
6
7
8
9
10
11
12
13
14
15
16
17
18
19
import org.springframework.boot.SpringApplication;
import org.springframework.boot.autoconfigure.EnableAutoConfiguration;
import org.springframework.boot.autoconfigure.SpringBootApplication;

/**
* EnableAutoConfiguration 表示告诉spring boot如何去配置spring,
* 其可以帮助 SpringBoot 应用将所有符合条件的 @Configuration 配置都加载到当前 IoC 容器之中
* 自从添加spring-boot-starter-web这个starter添加了tomcat和spring MVC后,使用该注解,就说明使用spring启动一个web项目
* SpringBootApplication 等同于使用@Configuration @EnableAutoConfiguration @ComponentScan这三个注解
* @Author nanyin
* @Date 21:46 2019-07-04
**/
@SpringBootApplication
public class DeepSpringBootApplication {
public static void main(String[] args) {
// 使用SpringApplication.run方法来启动spring boot应用 其中参数有类和args
SpringApplication.run(DeepSpringBootApplication.class,args);
}
}

使用SPringMvc编写controller层

1
2
3
4
5
6
7
8
9
10
11
12
13
import org.springframework.stereotype.Controller;
import org.springframework.web.bind.annotation.RequestMapping;
import org.springframework.web.bind.annotation.ResponseBody;

@Controller
public class HelloController {

@RequestMapping("/hello")
public @ResponseBody
String home() {
return "Hello World!";
}
}

运行主程序进行测试

打开http://localhost:8080/hello 查看网页上的内容显示出hello world字符。测试成功

测试

导入maven插件打jar包

在pom.xml文件中添加如下内容

1
2
3
4
5
6
7
8
<build>
<plugins>
<plugin>
<groupId>org.springframework.boot</groupId>
<artifactId>spring-boot-maven-plugin</artifactId>
</plugin>
</plugins>
</build>

保存之后使用mvn package命令打成jar包,可以在输出信息中找出打完的jar包的位置。
使用java -jar xxxxxx.jar命令运行程序。

微服务

微服务其实是一种架构风格,一个应用应该是一组小型服务组成,小型服务通过http api的方式进行沟通。每一个小型服务都是一个功能元素,能够独立替换和独立升级的应用单元。

详细请参考martinfowler.com 中的这篇微服务文章:微服务

设计模式之命令模式

Posted on 2019-06-28 | In 设计模式
Words count in article: 743 | Reading time ≈ 2

设计模式之命令模式

命令模式是对象的行为模式,命令模式将一个请求封装成一个对象,从而让你使用不同的请求把客户端参数化,对请求排队或者记录请求日志,可以提供命令的撤销和恢复功能。

应用场景

  1. 通过要执行的操作来参数化对象。可以使用回调函数在过程语言中表达此类参数化,也就是说,某个函数已注册到稍后要调用的某个位置。命令模式可以说是面向对象的回调函数。起到在特定位置被调用的目的。

  2. 在不同的时间下进行发出请求和执行请求,命令对象可以独立于请求,拥有一个独立的生命周期。命令允许请求的一方和接收请求的一方能够独立演化。

  3. 撤销操作,命令模式可以在命令执行的时候可以在命令类中存贮当前状态,可以通过遍历此列表并分别转发调用unexecute和execute来实现无限级别的撤销和重做。

  4. 可以更容易的将命令记录到日志中。

  5. 命令模式使新的命令很容易地被加入到系统里。具有很好的拓展性。

模式结构

命令模式涉及到五个角色,它们分别是:

  1. 客户端(Client)角色:创建一个具体命令(ConcreteCommand)对象并确定其接收者。

  2. 命令(Command)角色:声明了一个给所有具体命令类的抽象接口。

  3. 具体命令(ConcreteCommand)角色:定义一个接收者和行为之间的弱耦合;实现execute()方法,负责调用接收者的相应操作。execute()方法通常叫做执行方法。

  4. 请求者(Invoker)角色:负责调用命令对象执行请求,相关的方法叫做行动方法。

  5. 接收者(Receiver)角色:负责具体实施和执行一个请求。任何一个类都可以成为接收者,实施和执行请求的方法叫做行动方法

代码

抽象命令角色

1
2
3
public interface Command {
void excute();
}

请求者角色

1
2
3
4
5
6
7
8
9
10
11
12
13
// 请求者用来请求命令
public class King {
private Command command;

public Command invoke(Command command){
this.command = command;
return this.command;
}

public void action(){
command.excute();
}
}

接收者角色

1
2
3
4
5
6
7
8
9
10
11
12
13
14
15
public class Soldier {

// 行动方法
public void prepareWeapon(){
System.out.println("Soldier prepare Weapon !!!");
}

public void attack(){
System.out.println("Soldier Attack!!!");
}

public void retreat(){
System.out.println("Soldier Retreat!!");
}
}

具体命令者角色

1
2
3
4
5
6
7
8
9
10
11
12
13
14
15
public class AttackCommand implements Command{

Soldier soldier ;

public AttackCommand(Soldier soldier) {
this.soldier = soldier;
}

@Override
public void excute() {
// 收到请求,执行操作
soldier.prepareWeapon();
soldier.attack();
}
}

客户端代码

1
2
3
4
5
6
7
8
9
10
11
12
13
public class App {
public static void main(String[] args) {
// 接受者和请求者
King king = new King();
Soldier soldier = new Soldier();
// 请求者请求命令
king.invoke(new AttackCommand(soldier));
// 请求者发起命令
king.action();
king.invoke(new RetreatCommand(soldier));
king.action();
}
}

设计模式之迭代器模式

Posted on 2019-06-27 | In 设计模式
Words count in article: 524 | Reading time ≈ 2

设计模式之迭代器模式

迭代器是一种行为模式,它提供一种顺序访问聚合对象元素的方法,而不会暴露其基础表示。

应用场景

  • 指向访问集合对象内容,而不暴露其内部实现。
  • 可以对集合对象多次遍历
  • 为不同集合对象提供统一的遍历接口

模式结构

迭代器模式大致分为四个角色:抽象容器,具体容器,抽象迭代器,具体迭代器。结构图如下:

结构图

容器一般为一种数据结构的类,例如list、map。 迭代器是提供遍历这个数据结构的方法的类。

代码

在java中提供很多Iterator的模式。例如

1
2
3
4
5
6
7
8
9
10
11
public class example {
public static void main(String[] args) {
List<Integer> list = new ArrayList<>();
list.add(1);
list.add(2);
Iterator iterator = (Iterator) list.iterator();
while (iterator.hasNext()){
System.out.println(iterator.next());
}
}
}

这里的ArrayList类中实现类Iterator接口的内部类,并且使用iterator()方法调用new Itr();,具体内容可以查看ArrayList源码。

下面自己实现一个简单的Iterator.

第一部分:抽象迭代器

1
2
3
4
public interface Iterator<E> {
boolean hasNext();
E next();
}

第二部分:抽象容器类

1
2
3
4
5
public interface Task {
void add(int mark);
void removeLast();
Iterator<Object> iterator();
}

第三部分:实现类

1
2
3
4
5
6
7
8
9
10
11
12
13
14
15
16
17
18
19
20
21
22
23
24
25
26
27
28
29
30
31
32
33
34
35
36
37
38
39
40
41
42
public class MyTask implements Task {

private int size = 0 ;

private Object[] taskTag = new Object[16];

@Override
public void add(int mark) {
taskTag[size] = mark;
size ++;
}

@Override
public void removeLast() {
taskTag[--size] = null;
}

@Override
public Iterator<Object> iterator() {
// 调用内部类实现迭代器
return new MyTaskItr();
}
// 使用内部类实现迭代器
private class MyTaskItr implements Iterator<Object>{

private int curr;

@Override
public boolean hasNext() {
return size != curr;
}

@Override
public Object next() {
int i = curr;
if(i >= size){
throw new NoSuchElementException("no element");
}
return taskTag[curr++];
}
}
}

客户端调用

1
2
3
4
5
6
7
8
9
10
11
12
13
14
15
16
17
public class App {
public static void main(String[] args) {
Task task = new MyTask();
task.add(1);
task.add(3);
task.add(4);
task.add(2);
task.removeLast();
task.removeLast();
task.add(5);
Iterator taskIterator = task.iterator();
while(taskIterator.hasNext()){
System.out.println(taskIterator.next());
}
// 结果依次打印出 1,3,5
}
}

简单而强大的迭代器模式。

<i class="fa fa-angle-left"></i>1…345…12<i class="fa fa-angle-right"></i>
NanYin

NanYin

Was mich nicht umbringt, macht mich starker.

111 posts
16 categories
21 tags
RSS
GitHub E-Mail
近期文章
  • ThreadLocal
  • Java的四种引用类型
  • Markdown语法入门
  • IDEA设置代码注释模板和JavaDoc文档生成
  • 基于Java的WebService实践
0%
© 2023 NanYin
|
本站访客数:
|
博客全站共140.1k字
|