NanYin的博客

记录生活点滴


  • Home

  • About

  • Tags

  • Categories

  • Archives

  • Search

Spring的Bean的实例化

Posted on 2020-01-17 | In Spring
Words count in article: 4.3k | Reading time ≈ 19

Bean的实例化

在refresh方法执行到 finishBeanFacotyInitializawtion 时,在方法内部会执行对Bean的实例化操作:

1
2
3
4
5
6
7
8
9
10
11
12
13
14
15
16
17
18
19
20
21
22
23
24
25
26
27
28
29
30
31
32
33
// Instantiate all remaining (non-lazy-init) singletons.
finishBeanFactoryInitialization(beanFactory);

protected void finishBeanFactoryInitialization(ConfigurableListableBeanFactory beanFactory) {
// 为BeanFactoy添加conversionService
if (beanFactory.containsBean(CONVERSION_SERVICE_BEAN_NAME) && // 是否包含 conversionService
beanFactory.isTypeMatch(CONVERSION_SERVICE_BEAN_NAME, ConversionService.class)) {
beanFactory.setConversionService(
beanFactory.getBean(CONVERSION_SERVICE_BEAN_NAME, ConversionService.class));
}

// Register a default embedded value resolver if no bean post-processor
// (such as a PropertyPlaceholderConfigurer bean) registered any before:
// at this point, primarily for resolution in annotation attribute values.
if (!beanFactory.hasEmbeddedValueResolver()) {
beanFactory.addEmbeddedValueResolver(strVal -> getEnvironment().resolvePlaceholders(strVal));
}

// 尽早初始化LoadTimeWeaverAware Bean,以便尽早注册其转换器。
String[] weaverAwareNames = beanFactory.getBeanNamesForType(LoadTimeWeaverAware.class, false, false);
for (String weaverAwareName : weaverAwareNames) {
getBean(weaverAwareName);
}

// 取消使用临时的classLoader
beanFactory.setTempClassLoader(null);

// 允许缓存所有的Bean Definition 元数据,
beanFactory.freezeConfiguration();

// 初始化所有剩余的(非懒加载的)单例的Bean
beanFactory.preInstantiateSingletons();
}

重点在于 preInstantiateSingletons 方法,用来初始化所有的单例Bean。实际上在前面的getBean获取weaverAware就能够看出真正调用获取单实例的Bean的方法就是 getBean 方法。

1
2
3
4
5
6
7
8
9
10
11
12
13
14
15
16
17
18
19
20
21
22
23
24
25
26
27
28
29
30
31
32
33
34
35
36
37
38
39
40
41
public void preInstantiateSingletons() throws BeansException {
// logging ....

List<String> beanNames = new ArrayList<>(this.beanDefinitionNames);

// 触发有非懒加载的Bean的初始化
for (String beanName : beanNames) {
// 获取所有的RootBeanDefinition,所谓的Rootxxx,其实就是统一的BeanDefinition视图
RootBeanDefinition bd = getMergedLocalBeanDefinition(beanName);
if (!bd.isAbstract() && bd.isSingleton() && !bd.isLazyInit()) {
if (isFactoryBean(beanName)) {
// 如果是FactoryBean,则使用getBean时需要加上前缀 &
Object bean = getBean(FACTORY_BEAN_PREFIX + beanName);
if (bean instanceof FactoryBean) {
final FactoryBean<?> factory = (FactoryBean<?>) bean;
boolean isEagerInit;
if (System.getSecurityManager() != null && factory instanceof SmartFactoryBean) {
// 如果继承SmartFactoryBean
isEagerInit = AccessController.doPrivileged((PrivilegedAction<Boolean>)
((SmartFactoryBean<?>) factory)::isEagerInit,
getAccessControlContext());
}
else {
isEagerInit = (factory instanceof SmartFactoryBean &&
((SmartFactoryBean<?>) factory).isEagerInit());
}
if (isEagerInit) {
// 执行getBean获取Bean
getBean(beanName);
}
}
}
else {
// 执行getBean获取Bean
getBean(beanName);
}
}
}

// 触发初始化后的callback...
}

在preInstantiateSingletons 中,可以看到它会遍历所有的已经注册到容器中的Bean,最后会通过 getBean() 进行对Bean的初始化操作。

其中判断了如果是 Factorybean 的情况下应该先去添加一个前缀 ‘&’ ,才能获取真正的FactoryBean的实现类的对象Bean。如果不添加前缀 ‘&’,则会返回实现类中的getObject方法返回的对象。

因为经过分析,是 getBean 方法是达到初始化Bean实例的目的,所以接下来看 getBean 中是如何实现的。

getBean

getBean方法比较复杂,所以我依据调用顺序拆出来大致5个小章节来展开讲。

1.getBean通过调用doGetBean创建实例

1
2
3
public Object getBean(String name) throws BeansException {
return doGetBean(name, null, null, false);
}

2. 检查缓存中是否存在

调用doGetBean方法后,首先会先使用getSingleton方法判断缓存中是否存在实例,会执行以下逻辑:

  1. 判断缓存中是否存在?
  2. 如果存在,如果当前单例正在创建中,则说明出现了循环引用。
  3. 如果存在,实例没有正在创建,没有循环引用。
  4. 只要缓存中存在,都直接返回缓存中的BeanInstance
1
2
3
4
5
6
7
8
9
10
11
12
13
14
15
16
17
18
19
20
protected <T> T doGetBean(final String name, @Nullable final Class<T> requiredType,
@Nullable final Object[] args, boolean typeCheckOnly) throws BeansException {
// 获得Beanname字符串,因为有FactoryBean需要添加&符号
final String beanName = transformedBeanName(name);
Object bean;

Object sharedInstance = getSingleton(beanName);
if (sharedInstance != null && args == null) {
if (logger.isTraceEnabled()) {
if (isSingletonCurrentlyInCreation(beanName)) {
logger.trace("Returning eagerly cached instance of singleton bean '" + beanName +
"' that is not fully initialized yet - a consequence of a circular reference");
}
else {
logger.trace("Returning cached instance of singleton bean '" + beanName + "'");
}
}
bean = getObjectForBeanInstance(sharedInstance, name, beanName, null);
}
//...

3. 如果typeCheckOnly为false,则标记已创建

作用是:将指定的bean标记为已创建,允许bean工厂优化其缓存以重复创建指定的bean。

4. 获取depend-on的Bean,先对其进行register和实例化

需要注意的是,这里的 depend-on 的内容是使用 @DependsOn 注解指定的BeanName(注解方式)

1
2
3
4
5
6
7
8
9
10
11
12
13
14
15
16
17
18
19
20
21
22
// 获得RootBeanDefinition
final RootBeanDefinition mbd = getMergedLocalBeanDefinition(beanName);
// 检查merge后的beanDefinition
checkMergedBeanDefinition(mbd, beanName, args);
// 确保当前bean依赖的bean的初始化。
String[] dependsOn = mbd.getDependsOn();
if (dependsOn != null) {
for (String dep : dependsOn) {
if (isDependent(beanName, dep)) {
// throw exception ...
}
// 先registr 依赖的Bean
registerDependentBean(dep, beanName);
try {
// 对每一个dep进行先行的实例化
getBean(dep);
}
catch (NoSuchBeanDefinitionException ex) {
// throw exception ...
}
}
}

5.调用createBean创建Bean实例

在使用createBean创建Bean时,会通过 Object bean = resolveBeforeInstantiation(beanName, mbdToUse);来处理初始化Bean前置方法触发AOP的功能。

1
2
3
4
5
6
7
8
9
10
11
12
13
14
15
16
17
18
19
20
21
22
23
24
25
26
27
28
29
30
31
32
33
34
35
36
37
38
39
40
41
42
43
44
45
46
47
48
49
50
51
52
53
54
55
56
57
58
59
60
61
62
protected Object resolveBeforeInstantiation(String beanName, RootBeanDefinition mbd) {
Object bean = null;
if (!Boolean.FALSE.equals(mbd.beforeInstantiationResolved)) {
// Make sure bean class is actually resolved at this point.
if (!mbd.isSynthetic() && hasInstantiationAwareBeanPostProcessors()) {
Class<?> targetType = determineTargetType(beanName, mbd);
if (targetType != null) {
// 执行前置方法,获取代理Bean
bean = applyBeanPostProcessorsBeforeInstantiation(targetType, beanName);
if (bean != null) {
bean = applyBeanPostProcessorsAfterInitialization(bean, beanName);
}
}
}
mbd.beforeInstantiationResolved = (bean != null);
}
return bean;
}

protected Object applyBeanPostProcessorsBeforeInstantiation(Class<?> beanClass, String beanName) {
for (BeanPostProcessor bp : getBeanPostProcessors()) {
// 使用 EnableAspectJAutoProxy 注解,将AbstractAutoProxyCreator import 进来,
// 所以在这里可以调用 AbstractAutoProxyCreator后置的处理器方法,来实现AOP功能
if (bp instanceof InstantiationAwareBeanPostProcessor) {
InstantiationAwareBeanPostProcessor ibp = (InstantiationAwareBeanPostProcessor) bp;
Object result = ibp.postProcessBeforeInstantiation(beanClass, beanName);
if (result != null) {
return result;
}
}
}
return null;
}
@Override
public Object postProcessBeforeInstantiation(Class<?> beanClass, String beanName) {
Object cacheKey = getCacheKey(beanClass, beanName); //获得beanClass
if (!StringUtils.hasLength(beanName) || !this.targetSourcedBeans.contains(beanName)) {
if (this.advisedBeans.containsKey(cacheKey)) {
return null;
}
if (isInfrastructureClass(beanClass) || shouldSkip(beanClass, beanName)) {// 如果是一个基础设施的类 或者是一个original instance
this.advisedBeans.put(cacheKey, Boolean.FALSE); //添加到advisedBeans里面
return null;
}
}
// 如果有自定义的 TargetSource
// 抑制目标Bean的不必要的默认实例化
// TargetSource将以自定义方式处理目标实例。
TargetSource targetSource = getCustomTargetSource(beanClass, beanName); //获得targetSource
if (targetSource != null) {
if (StringUtils.hasLength(beanName)) {
this.targetSourcedBeans.add(beanName);
}
Object[] specificInterceptors = getAdvicesAndAdvisorsForBean(beanClass, beanName, targetSource);
// 生成代理
Object proxy = createProxy(beanClass, beanName, specificInterceptors, targetSource); //创建代理类
this.proxyTypes.put(cacheKey, proxy.getClass());
// 返回生成的代理Bean
return proxy;
}
return null;
}

如果存在需要创建Proxy代理Bean,则先去创建代理Bean,在创建完后,则会开始调用 doCreateBean 方法创建Bean实例。

接着调用 Object beanInstance = doCreateBean(beanName, mbdToUse, args); 创建实例,并返回一个Object的类型的beanInstance

doCreateBean这个方法比较长,大致能通过这几步完成这个方法;

  1. 使用 createBeanInstance 创建一个包装Bean
  2. 允许MergedBeanPostProcessor使用后置方法处理包装后的Bean
  3. 如果 allowCircularReferences 属性为true,则先获取 达到这个Bean的早期的ref ,用来 防止Bean在生成时循环引用 的问题,后面会详细讲这里是如果获取早期的ref应用,和又是如何防止Bean的循环应用的问题。
  4. 通过 populateBean 方法为Bean进行赋值,包括依赖!!
  5. 通过 initializeBean 方法,执行各种初始化方法和前、后置方法。
  6. 通过三级缓存机制,用来防止出现循环引用的问题。
  7. 注册Bean为一次性的

createBeanInstance 创建一个包装Bean

1
2
3
4
5
6
7
8
9
10
11
12
13
14
15
16
17
18
19
20
21
22
23
24
25
26
27
28
29
30
31
32
33
34
35
36
37
38
39
40
41
42
43
44
protected BeanWrapper createBeanInstance(String beanName, RootBeanDefinition mbd, @Nullable Object[] args) {
//.....省略部分
// Shortcut when re-creating the same bean...
/**
* 这里指的ShortCut的含义是当多次构建同一个 bean 时,可以使用这个Shortcut,
* 也就是说不在需要每次推断应该使用哪种方式构造bean
* 比如在多次构建同一个prototype类型的 bean 时,就可以走此处的Shortcut
* 这里的 resolved 和 autowireNecessary 将会在 bean 第一次实例化的过程中被设置
*/
boolean resolved = false;
boolean autowireNecessary = false;
if (args == null) {
synchronized (mbd.constructorArgumentLock) {
if (mbd.resolvedConstructorOrFactoryMethod != null) {
resolved = true;
autowireNecessary = mbd.constructorArgumentsResolved;
}
}
}
// 如果已经创建过了
if (resolved) {
// 如果以解析构造函数
if (autowireNecessary) {
return autowireConstructor(beanName, mbd, null, null);
}
else {
return instantiateBean(beanName, mbd);
}
}
// Candidate constructors for autowiring?
// 如果是通过构造函数来自动注入的
Constructor<?>[] ctors = determineConstructorsFromBeanPostProcessors(beanClass, beanName);
if (ctors != null || mbd.getResolvedAutowireMode() == AUTOWIRE_CONSTRUCTOR ||
mbd.hasConstructorArgumentValues() || !ObjectUtils.isEmpty(args)) {
return autowireConstructor(beanName, mbd, ctors, args);
}
// Preferred constructors for default construction?
ctors = mbd.getPreferredConstructors();
if (ctors != null) {
return autowireConstructor(beanName, mbd, ctors, null);
}
// 没有特殊处理,使用无参数构造器
return instantiateBean(beanName, mbd);
}

如果使用默认的无参数构造起,会调用beanInstance = getInstantiationStrategy().instantiate(mbd, beanName, parent); 获取使用反射生成的实例。

1
2
3
4
5
6
7
8
9
10
11
// 检测 bean 配置中是否配置了 lookup-method 或 replace-method
// 如果没有,则使用默认的JDK代理生成对象,否则使用CGlib代理
if (!bd.hasMethodOverrides()) {
// 省略代码。。。。
// 实例化
return BeanUtils.instantiateClass(constructorToUse);
}
else {
// 必须生成CGLIB子类
return instantiateWithMethodInjection(bd, beanName, owner);
}

知道最后使用Constructor.newInstance创建一个对象。

先缓存早期的实例

Spring中存在三层缓存,分别为第一级的 singletonObjects 、第二级的 earlySingletonObjects 、第三级的singletonFactories。

1
2
3
4
5
6
7
8
/** Cache of singleton objects: bean name to bean instance. */
private final Map<String, Object> singletonObjects = new ConcurrentHashMap<>(256);

/** Cache of singleton factories: bean name to ObjectFactory. */
private final Map<String, ObjectFactory<?>> singletonFactories = new HashMap<>(16);

/** Cache of early singleton objects: bean name to bean instance. */
private final Map<String, Object> earlySingletonObjects = new HashMap<>(16);

那么,Spring如何依靠这三级缓存来防止循环引用(circular references)的作用的呢?先通过下面的图片来简单了解下,当发生循环引用时,Spring如何使用三级缓存的。

图1

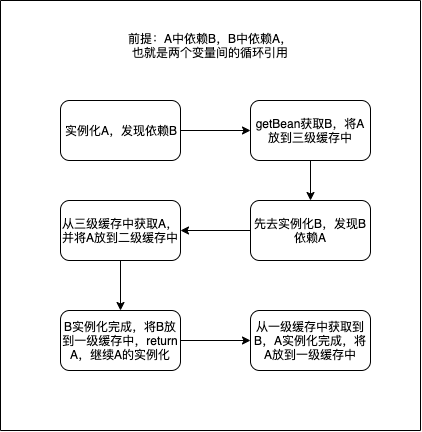
如图中所示,对象A依赖于对象B,而对象B依赖对象A的情况。下面根据图中各节点情况来具体分析代码的实现:

1. 实例化A,发现依赖B

在初始化A的过程中,会调用 populateBean 方法进行属性的赋值,其中 AutoWired 的类型来分别处理(By Name 还是 By Type),
但不管是哪个类型,最后都会使用 getBean 来先获取依赖。

2. 获取B,将A放到三级缓存中

其实在进行A的属性赋值前,就已经通过 doCreateBean 方法中的 addSingletonFactory 方法将A放到三级缓存中:

1
2
3
4
5
6
7
8
9
10
11
12
13
14
15
16
17
18
19
20
boolean earlySingletonExposure = (mbd.isSingleton() && this.allowCircularReferences &&
isSingletonCurrentlyInCreation(beanName));
// 如果 allowCircularReferences 为true
if (earlySingletonExposure) {
// log.....
// 放到第三级的singletonFactory里
addSingletonFactory(beanName, () -> getEarlyBeanReference(beanName, mbd, bean));
}
// 第三级缓存,也就是SingleFactory
protected void addSingletonFactory(String beanName, ObjectFactory<?> singletonFactory) {
synchronized (this.singletonObjects) {
// 如果对象没有生成过
if (!this.singletonObjects.containsKey(beanName)) {
// 放到三级缓存中,同时如果二级缓存中存在,移除掉
this.singletonFactories.put(beanName, singletonFactory);
this.earlySingletonObjects.remove(beanName);
this.registeredSingletons.add(beanName);
}
}
}
3. 实例化B,发现依赖A

在上一步中,A依赖B,会调用getBean先去获取B,但同样在doCreateBean 方法中的 populateBean 方法中同样会调用 getBean 先去获取依赖A。

1
2
3
4
5
6
Object sharedInstance = getSingleton(beanName);
if (sharedInstance != null && args == null) {
// log....
// 通过getObjectForBeanInstance获取Bean,完成实例化
bean = getObjectForBeanInstance(sharedInstance, name, beanName, null);
}

通过getSingleton方法从三级缓存获取bean,如果成功的在第三级缓存中找到Bean,则移除第三级缓存中的Bean,并放到二级缓存中。

1
2
3
4
5
6
7
8
9
10
11
12
13
14
15
16
17
18
protected Object getSingleton(String beanName, boolean allowEarlyReference) {
Object singletonObject = this.singletonObjects.get(beanName);
if (singletonObject == null && isSingletonCurrentlyInCreation(beanName)) {
synchronized (this.singletonObjects) {
singletonObject = this.earlySingletonObjects.get(beanName);
if (singletonObject == null && allowEarlyReference) {
ObjectFactory<?> singletonFactory = this.singletonFactories.get(beanName);
if (singletonFactory != null) {
singletonObject = singletonFactory.getObject();
// 如果三级缓存中有bean,则放到二级缓存中
this.earlySingletonObjects.put(beanName, singletonObject);
this.singletonFactories.remove(beanName);
}
}
}
}
return singletonObject;
}
4. 实例化完成,将B放到一级缓存中

在调用doGetBean方法时,会通过 getSingleton方法中的addSingleton将实例添加到一级缓存中:

1
2
3
4
5
6
7
8
sharedInstance = getSingleton(beanName, () -> {
try {
// 准备好后,进行创建当前Bean实例
return createBean(beanName, mbd, args);
}
catch (BeansException ex) {
}
});

在getSingleton中调用了addSingleton(beanName, singletonObject),将完成的实例放到一级缓存中。

1
2
3
4
5
6
7
8
protected void addSingleton(String beanName, Object singletonObject) {
synchronized (this.singletonObjects) {
this.singletonObjects.put(beanName, singletonObject);
this.singletonFactories.remove(beanName);
this.earlySingletonObjects.remove(beanName);
this.registeredSingletons.add(beanName);
}
}
5. 返回A的创建过程,继续创建A

最后创建完成A后,同样会将A放到一级缓存中。至此对象A,对象B全部创建完成。利用了三级缓存机制避免了循环引用。

populateBean 执行Bean的初始化

在上一节中提到了,初始化对象时,需要调用populateBean(beanName, mbd, instanceWrapper)该方法来达到属性值的填充。

忽略 BeanPostProcessor后置处理器,那么实际上步骤比较简单明了:

  1. 如果不存在属性值,则直接返回,跳过这个方法。
  2. 如果存在,先获得所有的属性值,依据AutoWired属性,将依赖项注入到容器中
  3. 最后进行真正的属性填充
1. 检查是否存在属性
1
2
3
4
5
6
7
8
9
10
if (bw == null) {
if (mbd.hasPropertyValues()) {
throw new BeanCreationException(
mbd.getResourceDescription(), beanName, "Cannot apply property values to null instance");
}
else {
// 如果没有直接跳过
return;
}
}
2.依据ByName还是ByType进行属性的注入
1
2
3
4
5
6
7
8
9
10
11
12
13
14
15
16
17
18
// 获得属性
PropertyValues pvs = (mbd.hasPropertyValues() ? mbd.getPropertyValues() : null);
// 获得autowired类型(by type 还是 by name)核心是pvs.add(propertyName, bean); 获得适当的bean当道pvs中
int resolvedAutowireMode = mbd.getResolvedAutowireMode();
if (resolvedAutowireMode == AUTOWIRE_BY_NAME || resolvedAutowireMode == AUTOWIRE_BY_TYPE) {
MutablePropertyValues newPvs = new MutablePropertyValues(pvs);
// 如果适用,按名称添加基于自动装配的属性值。
if (resolvedAutowireMode == AUTOWIRE_BY_NAME) {
autowireByName(beanName, mbd, bw, newPvs);
}
// 如果适用,按类型添加基于自动装配的属性值。.
if (resolvedAutowireMode == AUTOWIRE_BY_TYPE) {
// 其中resolveDependency包含JSR330中的Inject方法
autowireByType(beanName, mbd, bw, newPvs);
}
// 但是不管是ByType还是ByName最后都是调用getBean方法先获取属性依赖Bean
pvs = newPvs;
}

根据 resolvedAutowireMode 的值的不同,选择不同的装配方式

  • 按名称注入,使用@Autowired默认的方式
  • 按类型注入,使用@Resource或者使用JSR330标准中的@Inject注解的默认方式

但是,不管依赖哪种方式进行装配,最后都会使用getBean来获取属性依赖,装配到容器中,并将值放到 newPvs 等待填充。

3.属性填充

最后通过使用 applyPropertyValues 方法实现属性的填充:

主要步骤如下:

  1. 如果pvs是空的,则直接返回
  2. 否则创建一个deep copy,用于解决所有对值的引用,对未被解析的先解析&&已解析的直接加入deepCopy中。
  3. 获取到 deepCopy 后,使用 setPropertyValues 添加到BeanWrapper中
1
2
3
4
5
6
7
8
9
10
11
12
13
14
15
16
17
18
19
20
21
22
23
24
25
26
27
28
29
30
31
32
33
34
35
36
37
38
39
40
41
42
43
44
45
46
47
48
49
50
51
52
53
54
55
56
57
58
59
60
61
62
63
64
65
66
67
68
69
70
71
72
73
74
75
76
77
78
79
80
81
82
83
84
85
86
87
88
89
90
91
92
93
94
95
96
protected void applyPropertyValues(String beanName, BeanDefinition mbd, BeanWrapper bw, PropertyValues pvs) {
// 如果pvs内容是空的,则直接return
if (pvs.isEmpty()) {
return;
}
// 设置 SecurityContextProvider
if (System.getSecurityManager() != null && bw instanceof BeanWrapperImpl) {
((BeanWrapperImpl) bw).setSecurityContext(getAccessControlContext());
}
MutablePropertyValues mpvs = null;
List<PropertyValue> original;
if (pvs instanceof MutablePropertyValues) {
mpvs = (MutablePropertyValues) pvs;
// 已经是转化过的
if (mpvs.isConverted()) {
// Shortcut: use the pre-converted values as-is.
// 照原样使用预先转换的值
try {
bw.setPropertyValues(mpvs);
return;
}
catch (BeansException ex) {
}
}
original = mpvs.getPropertyValueList(); // 获取一个List<PropertyValue> 属性组
}
else {
original = Arrays.asList(pvs.getPropertyValues());
}
// 获得 BeanDefinitionValueResolver
TypeConverter converter = getCustomTypeConverter();
if (converter == null) {
converter = bw;
}
BeanDefinitionValueResolver valueResolver = new BeanDefinitionValueResolver(this, beanName, mbd, converter);

// Create a deep copy, resolving any references for values.
// 创建一个深层副本,以解决所有对值的引用。对未被解析的先解析/已解析的直接加入deepCopy中
List<PropertyValue> deepCopy = new ArrayList<>(original.size());
boolean resolveNecessary = false;
for (PropertyValue pv : original) {
if (pv.isConverted()) {
// 如果已转化,直接添加到deepCopy中
deepCopy.add(pv);
}
else {
// 获得属性名和属性值
String propertyName = pv.getName();
Object originalValue = pv.getValue();
// 是否是AutowiredPropertyMarker
if (originalValue == AutowiredPropertyMarker.INSTANCE) {
//获取应用于写入属性值的方法
Method writeMethod = bw.getPropertyDescriptor(propertyName).getWriteMethod();
if (writeMethod == null) {
throw new IllegalArgumentException("Autowire marker for property without write method: " + pv);
}
originalValue = new DependencyDescriptor(new MethodParameter(writeMethod, 0), true);
}
// 使用valueResolver解析属性值,给定一个PropertyValue,返回一个值,如有必要,解析工厂中对其他bean的任何引用
Object resolvedValue = valueResolver.resolveValueIfNecessary(pv, originalValue);
Object convertedValue = resolvedValue;
boolean convertible = bw.isWritableProperty(propertyName) &&
!PropertyAccessorUtils.isNestedOrIndexedProperty(propertyName);
if (convertible) {
// 如果可转化,转化这个属性
convertedValue = convertForProperty(resolvedValue, propertyName, bw, converter);
}
// 可能将转换后的值存储在合并的bean定义中,避免对每个创建的bean实例进行重新转换
if (resolvedValue == originalValue) {
if (convertible) {
pv.setConvertedValue(convertedValue);
}
deepCopy.add(pv);
}
else if (convertible && originalValue instanceof TypedStringValue &&
!((TypedStringValue) originalValue).isDynamic() &&
!(convertedValue instanceof Collection || ObjectUtils.isArray(convertedValue))) {
pv.setConvertedValue(convertedValue);
deepCopy.add(pv);
}
else {
resolveNecessary = true;
deepCopy.add(new PropertyValue(pv, convertedValue));
}
}
}
if (mpvs != null && !resolveNecessary) {
// 设置已转化属性
mpvs.setConverted();
}

try {
// 放到PropertyValues里面
bw.setPropertyValues(new MutablePropertyValues(deepCopy));
}
}

initializeBean 初始化Bean

在使用populateBean后,调用initializeBean方法进行bean的init,在init方法内部,可分为一下几部分调用

  1. invokeAwareMethods 方法,设置Aware属性
  2. applyBeanPostProcessorsBeforeInitialization 方法,调用 BeanProcessor中的Bean初始化前的后置方法
  3. invokeInitMethods 方法,激活自定义的init方法
  4. 执行BeanProcessor中的初始化后的后置方法
1. invokeAwareMethods

寻找是否满足特定的条件,如果满足则进行相关属性的填充

1
2
3
4
5
6
7
8
9
10
11
12
13
14
15
16
17
18
private void invokeAwareMethods(final String beanName, final Object bean) {
if (bean instanceof Aware) {
// 如果是 BeanNameAware,设置BeanName
if (bean instanceof BeanNameAware) {
((BeanNameAware) bean).setBeanName(beanName);
}
// 如果是 BeanClassLoaderAware,设置classloader
if (bean instanceof BeanClassLoaderAware) {
ClassLoader bcl = getBeanClassLoader();
if (bcl != null) {
((BeanClassLoaderAware) bean).setBeanClassLoader(bcl);
}
}
if (bean instanceof BeanFactoryAware) {
((BeanFactoryAware) bean).setBeanFactory(AbstractAutowireCapableBeanFactory.this);
}
}
}
2. applyBeanPostProcessorsBeforeInitialization

循环容器中每一个BeanPostProcessor,执行BeanPostProcessor的postProcessBeforeInitialization方法。

1
2
3
4
5
6
7
8
9
10
11
12
public Object applyBeanPostProcessorsBeforeInitialization(Object existingBean, String beanName)
throws BeansException {
Object result = existingBean;
for (BeanPostProcessor processor : getBeanPostProcessors()) {
Object current = processor.postProcessBeforeInitialization(result, beanName);
if (current == null) {
return result;
}
result = current;
}
return result;
}
3.invokeInitMethods 执行init方法

如果是isInitializingBean则先会执行自己的内置方法afterPropertiesSet。如果制定了initMethod,那么后续会通过反射执行这个方法

1
2
3
4
5
6
7
8
9
10
11
12
13
14
15
16
17
18
19
20
21
22
23
24
25
26
27
protected void invokeInitMethods(String beanName, final Object bean, @Nullable RootBeanDefinition mbd)
throws Throwable {

boolean isInitializingBean = (bean instanceof InitializingBean);
if (isInitializingBean && (mbd == null || !mbd.isExternallyManagedInitMethod("afterPropertiesSet"))) {
if (System.getSecurityManager() != null) {
try {
AccessController.doPrivileged((PrivilegedExceptionAction<Object>) () -> {
((InitializingBean) bean).afterPropertiesSet();
return null;
}, getAccessControlContext());
}
}
else {
((InitializingBean) bean).afterPropertiesSet();
}
}

if (mbd != null && bean.getClass() != NullBean.class) {
String initMethodName = mbd.getInitMethodName();
if (StringUtils.hasLength(initMethodName) &&
!(isInitializingBean && "afterPropertiesSet".equals(initMethodName)) &&
!mbd.isExternallyManagedInitMethod(initMethodName)) {
invokeCustomInitMethod(beanName, bean, mbd);
}
}
}
4.applyBeanPostProcessorsAfterInitialization

循环容器中每一个BeanPostProcessor,执行BeanPostProcessor的 postProcessAfterInitialization 方法。

至此Bean的实例化过程就大致完成了。

Spring的Bean的注册

Posted on 2019-12-20 | In Spring
Words count in article: 2k | Reading time ≈ 8

Bean的注册

在上一篇文章中提到了在使用invokeBeanFactoryPostProcessors(beanFactory) 方法中,
调用了 ConfigurationClassPostProcessor 中的 postProcessBeanDefinitionRegistry 方法,
实现了对configuration配置文件中的内容得到加载和解析。完成对标注为Bean的方法注册「regist」到容器中。

下面就针对这一注册配置文件内的Bean的过程进行源码的分析:

ConfigurationClassPostProcessor

在 invokeBeanFactoryPostProcessor 方法中,
循环调用类中的后置方法 postProcessBeanDefinitionRegistry ,
其中包括了 ConfigurationClassPostProcessor 类。
根据名字也能看出这个类是配置文件类的后置处理类。那么就之间看代码,了解配置文件的后置处理器都做了些什么。

1
2
3
4
5
6
7
8
9
10
11
12
13
public void postProcessBeanDefinitionRegistry(BeanDefinitionRegistry registry) {
int registryId = System.identityHashCode(registry);
if (this.registriesPostProcessed.contains(registryId)) {
throw new IllegalStateException(
"postProcessBeanDefinitionRegistry already called on this post-processor against " + registry);
}
if (this.factoriesPostProcessed.contains(registryId)) {
throw new IllegalStateException(
"postProcessBeanFactory already called on this post-processor against " + registry);
}
this.registriesPostProcessed.add(registryId);
processConfigBeanDefinitions(registry);
}

下面对 processConfigBeanDefinitions 中的方法一步一步看:

使用processConfigBeanDefinitions解析注册Bean

1
2
3
4
5
6
7
8
9
10
11
12
13
14
15
16
17
18
19
20
21
22
23
24
25
26
27
28
29
30
31
32
33
34
35
36
37
38
39
40
41
42
43
44
45
46
47
48
49
50
51
52
53
54
55
56
57
58
59
60
61
62
63
64
65
66
67
68
69
70
71
72
73
74
75
76
77
78
79
80
81
82
83
84
85
86
87
88
89
90
91
92
93
public void processConfigBeanDefinitions(BeanDefinitionRegistry registry) {
List<BeanDefinitionHolder> configCandidates = new ArrayList<>();
// 获得所有的已经注册的Bean,其中包括Spring内置的Processor,
// 当然也包括自己写的@Configuration类
String[] candidateNames = registry.getBeanDefinitionNames();
// 对每个候选的Bean进行筛选
for (String beanName : candidateNames) {
BeanDefinition beanDef = registry.getBeanDefinition(beanName);
if (beanDef.getAttribute(ConfigurationClassUtils.CONFIGURATION_CLASS_ATTRIBUTE) != null) {
if (logger.isDebugEnabled()) {
logger.debug("Bean definition has already been processed as a configuration class: " + beanDef);
}
}
else if (ConfigurationClassUtils.checkConfigurationClassCandidate(beanDef, this.metadataReaderFactory)) {
// 如果是使用AnnotatedBeanDefinition定义(@Configuration),如果是
// 设置一些属性如根据proxyBeanMethods指定用来避免运行时创建CGLIB的子类等等。。
configCandidates.add(new BeanDefinitionHolder(beanDef, beanName));
}
}

// Return immediately if no @Configuration classes were found
if (configCandidates.isEmpty()) {
return;
}

// 对给定的Order(@Order)进行排序
configCandidates.sort((bd1, bd2) -> {
int i1 = ConfigurationClassUtils.getOrder(bd1.getBeanDefinition());
int i2 = ConfigurationClassUtils.getOrder(bd2.getBeanDefinition());
return Integer.compare(i1, i2);
});

//设置Bean的名称的生成策略
SingletonBeanRegistry sbr = null;
if (registry instanceof SingletonBeanRegistry) {
sbr = (SingletonBeanRegistry) registry;
if (!this.localBeanNameGeneratorSet) {
// 如果没有设置默认的名称生成策略
BeanNameGenerator generator = (BeanNameGenerator) sbr.getSingleton(
AnnotationConfigUtils.CONFIGURATION_BEAN_NAME_GENERATOR);
if (generator != null) {
this.componentScanBeanNameGenerator = generator;
this.importBeanNameGenerator = generator;
}
}
}

if (this.environment == null) {
this.environment = new StandardEnvironment();
}

// 解析所有的@Configuration类,首先先声明出一个解析器
ConfigurationClassParser parser = new ConfigurationClassParser(
this.metadataReaderFactory, this.problemReporter, this.environment,
this.resourceLoader, this.componentScanBeanNameGenerator, registry);

Set<BeanDefinitionHolder> candidates = new LinkedHashSet<>(configCandidates);
Set<ConfigurationClass> alreadyParsed = new HashSet<>(configCandidates.size());
do {
// 使用解析器对所有的配置类进行解析,在解析的过程中
// 完成对Bean的注册
parser.parse(candidates);
// 进行验证
parser.validate();
// 通过parser处理得到了配置文件下的Bean
Set<ConfigurationClass> configClasses = new LinkedHashSet<>(parser.getConfigurationClasses());
// 移除所有的已经解析过的Bean'
configClasses.removeAll(alreadyParsed);

// Read the model and create bean definitions based on its content
if (this.reader == null) {
this.reader = new ConfigurationClassBeanDefinitionReader(
registry, this.sourceExtractor, this.resourceLoader, this.environment,
this.importBeanNameGenerator, parser.getImportRegistry());
}
this.reader.loadBeanDefinitions(configClasses);
// 对所有已经解析的Bean进行标记
alreadyParsed.addAll(configClasses);

candidates.clear();
// 如果registry中的Bean定义数量 大于 candidateNames 的数量,说明在Bean注册过程中
// 产生了其他Bean,重复过程注册这个Bean
if (registry.getBeanDefinitionCount() > candidateNames.length) {
// 。。。。。省略
}
}
while (!candidates.isEmpty());

// 将ImportRegistry注册为Bean,以支持ImportAware @Configuration类
if (sbr != null && !sbr.containsSingleton(IMPORT_REGISTRY_BEAN_NAME)) {
sbr.registerSingleton(IMPORT_REGISTRY_BEAN_NAME, parser.getImportRegistry());
}
}

上述代码完成了的过程大致分为这几步

  1. 找出Config配置类,包括使用@Configuration注解标注的配置类
  2. 根据@Order进行进行顺序的调整
  3. 解析所有的@Configuration内的Bean,完成对配置类中所有 Bean的注册。
  4. 验证并进行标记Bean已经被解析注册

其中最重要的就是第3步,需要找出Bean,并进行注册

parse方法解析并完成注册Bean的。

1
2
3
4
5
6
7
8
9
10
11
12
13
14
15
16
17
18
19
public void parse(Set<BeanDefinitionHolder> configCandidates) {
for (BeanDefinitionHolder holder : configCandidates) {
// 获得配置类的定义信息
BeanDefinition bd = holder.getBeanDefinition();
try {
// 如果是使用注解方式配置类
if (bd instanceof AnnotatedBeanDefinition) {
parse(((AnnotatedBeanDefinition) bd).getMetadata(), holder.getBeanName());
}
// else if ... if .... etc
}
// etc ....
}
this.deferredImportSelectorHandler.process();
}

protected final void parse(AnnotationMetadata metadata, String beanName) throws IOException {
processConfigurationClass(new ConfigurationClass(metadata, beanName));
}

如果使用注解方式进行配置类的配置的情况,最后会调用 processConfigurationClass 方法进行处理。

1
2
3
4
5
6
7
8
9
10
11
12
13
14
15
16
17
18
19
20
protected void processConfigurationClass(ConfigurationClass configClass) throws IOException {
// 根据Contional注解来判断是否需要跳过配置类的处理
// 如果需要跳过,则直接进行return
if (this.conditionEvaluator.shouldSkip(configClass.getMetadata(), ConfigurationPhase.PARSE_CONFIGURATION)) {
return;
}

ConfigurationClass existingClass = this.configurationClasses.get(configClass);
if (existingClass != null) {
//如果已经存在的情况
}

// 递归处理配置类及其超类层次结构
SourceClass sourceClass = asSourceClass(configClass);
do {
sourceClass = doProcessConfigurationClass(configClass, sourceClass);
}
while (sourceClass != null);
this.configurationClasses.put(configClass, configClass);
}

最后会递归使用 doProcessConfigurationClass 进行处理配置类和其超类.

1
2
3
4
5
6
7
8
9
10
11
12
13
14
15
16
17
18
19
20
21
22
23
24
25
26
27
28
29
30
31
32
33
34
35
36
37
38
39
40
41
42
43
44
45
46
47
48
49
50
51
52
53
54
55
56
57
58
59
60
61
protected final SourceClass doProcessConfigurationClass(
ConfigurationClass configClass, SourceClass sourceClass)
throws IOException {
//如果在配置文件上有标注Component注解,则会递归处理任何成员类
if (configClass.getMetadata().isAnnotated(Component.class.getName())) {
processMemberClasses(configClass, sourceClass);
}

// 处理 @PropertySource 注解,用于加载指定的配置文件
for (AnnotationAttributes propertySource : AnnotationConfigUtils.attributesForRepeatable(
sourceClass.getMetadata(), PropertySources.class,
org.springframework.context.annotation.PropertySource.class)) {
// ... etc ...
}
// 处理所有的 @ComponentScan 注解
Set<AnnotationAttributes> componentScans = AnnotationConfigUtils.attributesForRepeatable(
sourceClass.getMetadata(), ComponentScans.class, ComponentScan.class);
if (!componentScans.isEmpty() &&
!this.conditionEvaluator.shouldSkip(sourceClass.getMetadata(), ConfigurationPhase.REGISTER_BEAN)) {
// 获取每一个 componentScans 的配置信息
for (AnnotationAttributes componentScan : componentScans) {
// 如果有 scan 类,则立即执行解析、扫描
Set<BeanDefinitionHolder> scannedBeanDefinitions =
this.componentScanParser.parse(componentScan, sourceClass.getMetadata().getClassName());
//检查扫描的定义集是否有其他配置类,并在需要时递归解析
for (BeanDefinitionHolder holder : scannedBeanDefinitions) {
BeanDefinition bdCand = holder.getBeanDefinition().getOriginatingBeanDefinition();
if (bdCand == null) {
bdCand = holder.getBeanDefinition();
}
if (ConfigurationClassUtils.checkConfigurationClassCandidate(bdCand, this.metadataReaderFactory)) {
parse(bdCand.getBeanClassName(), holder.getBeanName());
}
}
}
}

// 处理所有的 @Import 注解
processImports(configClass, sourceClass, getImports(sourceClass), true);

// Process any @ImportResource annotations

// 处理@Bean方法
Set<MethodMetadata> beanMethods = retrieveBeanMethodMetadata(sourceClass);
for (MethodMetadata methodMetadata : beanMethods) {
configClass.addBeanMethod(new BeanMethod(methodMetadata, configClass));
}
//处理接口上的默认方法
processInterfaces(configClass, sourceClass);
// 处理超类
if (sourceClass.getMetadata().hasSuperClass()) {
String superclass = sourceClass.getMetadata().getSuperClassName();
if (superclass != null && !superclass.startsWith("java") &&
!this.knownSuperclasses.containsKey(superclass)) {
this.knownSuperclasses.put(superclass, configClass);
// Superclass found, return its annotation metadata and recurse
return sourceClass.getSuperClass();
}
}
// 如果没有超类,处理完成。
return null;

总结在使用 doProcessConfigurationClass 方法时,大致会有这样几步:

  1. 如果标记有 @Component 注解,则会先去递归处理成员类,那么他是如何进行递归处理的呢,看主要方法的调用就能够理解:
    processMemberClasses -> processConfigurationClass -> doProcessConfigurationClass -> processMemberClasses
    每次都会递归的先处理成员类。
  2. 处理 @PropertySource 注解,作用为加载指定的配置文件
  3. 处理所有的 @ComponentScan 注解,如果配置文件中标记有 @ComponentSacn 或者 @ComponentScans 注解的话,会先去解析对应路径下的Bean,包装成 BeanDefinitionHolder 再次进行parse。
  4. 处理所有的 @Import 注解,处理所有使用Import注解引入的配置文件
  5. 处理所有的 @ImportResource 注解
  6. 处理所有 @Bean 方法,添加为 BeanMethod,解析配置文件中配置为@Bean的方法,添加到configClass中的BeanMethod中
  7. 处理接口的默认方法
  8. 按照以上逻辑进行递归的处理超类。

在方法中,可以找时间画一张图来解析这个方法真正做了写什么。[todo] 。

注册的精简过程

最后的parse方法是关键,经过以上步骤可以,在本章节需要特别注意的是 @ComponentSacn 和 处理所有的 @Bean 这两步:

在处理 @ComponentSacn 中,将直接将根据路径解析出来的Bean使用 componentScanParser.parse 方法,最终在 registerBeanDefinition() 方法中注册进去。

而在处理@Bean方法的时候,是将Bean方法包装成BeanMethod 放到 this.beanMethods 中,等待在 parse() 后 this.reader.loadBeanDefinitions(configClasses); 中进行操作.

而在前面说的loadBeanDefinitions 中会将前面提到的 Import、ImportReource和 BeanMethod 统一进行注册。

1
2
3
4
5
6
7
8
9
if (configClass.isImported()) {
registerBeanDefinitionForImportedConfigurationClass(configClass);
}
for (BeanMethod beanMethod : configClass.getBeanMethods()) {
loadBeanDefinitionsForBeanMethod(beanMethod);
}

loadBeanDefinitionsFromImportedResources(configClass.getImportedResources());
loadBeanDefinitionsFromRegistrars(configClass.getImportBeanDefinitionRegistrars())

在loadBeanDefinitionsForBeanMethod中,进行了对解析出来的使用@Bean标注的方法进行注册。从而完成注册Bean的主线功能。不具体进行梳理这个方法的过程,大致为构建一个BeanDefintion后,通过registerBeanDefinition方法进行注册,放到beanDefinitionMap中。

Spring的核心Refresh

Posted on 2019-12-15 | In Spring
Words count in article: 3k | Reading time ≈ 13

在注册配置文件后的刷新(Refresh)

在上一篇文章中,主要理清了Spring是如何(通过 register(Class<?>... componentClasses) )注册一个或多个要处理的配置类。

但是如果不进行下一步,也就是刷新(refresh)容器,整个类是得不到完全的处理的。下图是对 refresh 方法进行的主要过程总结。会通过对每一条线上的方法进行分析和总结方法的用途。

20191123225557.png

1.prepareRefresh

prepareRefresh 是 refresh 的第一个方法,用来准备上下文环境以用来刷新(refresh)。

  1. 设置startupDate启动时间、设置closed为false,设置active为true.
  2. initPropertySources()方法,留给子类自行实现,用来在上下文环境中初始化任何占位符属性源.
  3. validateRequiredProperties() 用来验证所有的Proprities都是可解析的.
  4. 最后存储预刷新的ApplicationListeners。也就是初始化earlyApplicationEvents;
1
2
3
4
5
6
7
8
9
10
11
12
13
14
15
16
17
18
19
20
21
22
23
protected void prepareRefresh() {
this.startupDate = System.currentTimeMillis();
this.closed.set(false);
this.active.set(**true**);
// ...省略部分代码.
// 在上下文环境中初始化任何占位符属性源,子类继承实现
initPropertySources();

// 验证所有必须的Property都是可解析的
getEnvironment().validateRequiredProperties();

// Store pre-refresh ApplicationListeners...
if (this.earlyApplicationListeners == null) {
this.earlyApplicationListeners = new LinkedHashSet<>(this.applicationListeners);
}
else {
// Reset local application listeners to pre-refresh state.
this.applicationListeners.clear();
this.applicationListeners.addAll(this.earlyApplicationListeners);
}

this.earlyApplicationEvents = new LinkedHashSet<>();
}

2.obtainFreshBeanFactory

用于获取BeanFactory,在 obtainFreshBeanFactory 方法中有两个子方法。

  • refreshBeanFactory方法为BeanFactory设置SerializationId
1
2
3
4
5
6
7
8
protected final void refreshBeanFactory() throws IllegalStateException {
// ...省略部分代码
// 在register的时候,通过registerBeanDefinition时会创建一个beanFactory为DefaultListableBeanFactory
this.beanFactory.setSerializationId(getId());
}
public final ConfigurableListableBeanFactory getBeanFactory() {
return this.beanFactory;
}
  • 使用getBeanFactory获取在register过程中已经产生的beanFactory。
1
2
3
4
@Override
public final ConfigurableListableBeanFactory getBeanFactory() {
return this.beanFactory;
}

在上一篇文章中已经分析得知,在GenericApplicationContext的this.beanFactory 就是创建ApplicationContext时在构造函数中创建的DefaultListableBeanFactory。

3.prepareBeanFactory

在这个方法里面实现类对BeanFactory的内容进行基本的初始化。设置了 classLoador、ExpressionResolver、BeanPostProcessor等等属性。

1
2
3
4
5
6
7
8
9
10
11
12
13
14
15
16
17
18
19
20
21
22
23
24
25
26
27
28
29
30
31
32
33
34
35
36
37
38
39
40
41
protected void prepareBeanFactory(ConfigurableListableBeanFactory beanFactory) {
beanFactory.setBeanClassLoader(getClassLoader());
beanFactory.setBeanExpressionResolver(new StandardBeanExpressionResolver(beanFactory.getBeanClassLoader()));
beanFactory.addPropertyEditorRegistrar(newResourceEditorRegistrar(this,getEnvironment()));

// 设置PostProcessor 回调方法
beanFactory.addBeanPostProcessor(new ApplicationContextAwareProcessor(this));
// 忽略给定的接口类的自动装配(就是不装配给定的接口类)
beanFactory.ignoreDependencyInterface(EnvironmentAware.class);
beanFactory.ignoreDependencyInterface(EmbeddedValueResolverAware.class);
beanFactory.ignoreDependencyInterface(ResourceLoaderAware.class);
beanFactory.ignoreDependencyInterface(ApplicationEventPublisherAware.class);
beanFactory.ignoreDependencyInterface(MessageSourceAware.class);
beanFactory.ignoreDependencyInterface(ApplicationContextAware.class);

// registerResolvableDependency的作用就是将 第一个参数作为依赖注入到第二个参数中
// 这里的this指的就是AbstractApplicationContext
beanFactory.registerResolvableDependency(BeanFactory.class, beanFactory);
beanFactory.registerResolvableDependency(ResourceLoader.class, this);
beanFactory.registerResolvableDependency(ApplicationEventPublisher.class, this);
beanFactory.registerResolvableDependency(ApplicationContext.class, this);

// Register early post-processor for detecting inner beans as ApplicationListeners. 注册一个applicationListeners检测器
beanFactory.addBeanPostProcessor(new ApplicationListenerDetector(this));

if (beanFactory.containsBean(LOAD_TIME_WEAVER_BEAN_NAME)) {
beanFactory.addBeanPostProcessor(new LoadTimeWeaverAwareProcessor(beanFactory));
beanFactory.setTempClassLoader(new ContextTypeMatchClassLoader(beanFactory.getBeanClassLoader()));
}

// 注册环境相关Bean
if (!beanFactory.containsLocalBean(ENVIRONMENT_BEAN_NAME)) {
beanFactory.registerSingleton(ENVIRONMENT_BEAN_NAME, getEnvironment());
}
if (!beanFactory.containsLocalBean(SYSTEM_PROPERTIES_BEAN_NAME)) {
beanFactory.registerSingleton(SYSTEM_PROPERTIES_BEAN_NAME, getEnvironment().getSystemProperties());
}
if (!beanFactory.containsLocalBean(SYSTEM_ENVIRONMENT_BEAN_NAME)) {
beanFactory.registerSingleton(SYSTEM_ENVIRONMENT_BEAN_NAME, getEnvironment().getSystemEnvironment());
}
}

4.postProcessBeanFactory

这个方法的含义为对BeanFactory的后置处理,方法的实现是空的,实际含义就是让子类去实现这个方法,然后调用的时候可以对BeanFactory在标准化的初始后,进行自定义的后置处理。

5.invokeBeanFactoryPostProcessors

方法的作用就是实例化并调用所有已注册的BeanFactoryPostProcessor,也就是在这一步完成对configuration配置类中的Bean的注册过程。主要的执行方法是 PostProcessorRegistrationDelegate 中的 invokeBeanFactoryPostProcessors 方法。

在上一篇文章中提到了在 register 方法中,调用了 this.reader = new AnnotatedBeanDefinitionReader(this) 后,使用 registerAnnotationConfigProcessors 注册一些相关配置类bean,如ConfigurationClassPostProcessor等等。

首先、如果有BeanFactoryPostProcessor,则会先执行类中的 postProcessBeanDefinitionRegistry 方法

1
2
3
4
5
6
7
8
9
10
11
for (BeanFactoryPostProcessor postProcessor : beanFactoryPostProcessors) {
if (postProcessor instanceof BeanDefinitionRegistryPostProcessor) {
BeanDefinitionRegistryPostProcessor registryProcessor =
(BeanDefinitionRegistryPostProcessor) postProcessor;
registryProcessor.postProcessBeanDefinitionRegistry(registry);
registryProcessors.add(registryProcessor);
}
else {
regularPostProcessors.add(postProcessor);
}
}

第二步、会处理在beanFactory中存在的继承BeanDefinitionRegistryPostProcessor 并且实现了PriorityOrdered 接口的类

1
2
3
4
5
6
7
8
9
10
11
12
13
14
15
16
String[] postProcessorNames =
beanFactory.getBeanNamesForType(BeanDefinitionRegistryPostProcessor.class, true, false);
for (String ppName : postProcessorNames) {
if (beanFactory.isTypeMatch(ppName, PriorityOrdered.class)) {
currentRegistryProcessors.add(beanFactory.getBean(ppName, BeanDefinitionRegistryPostProcessor.class));
processedBeans.add(ppName);
}
}
// 对依赖排序
sortPostProcessors(currentRegistryProcessors, beanFactory);
// 添加到registryProcessors中
registryProcessors.addAll(currentRegistryProcessors);
// 执行{ConfigurationClassPostProcessor的}后置方法
invokeBeanDefinitionRegistryPostProcessors(currentRegistryProcessors, registry);
// 清空当前注册处理器
currentRegistryProcessors.clear();

通过Type获取BeanNames

其中使用了方法 getBeanNamesForType 用来类型为BeanDefinitionRegistryPostProcessor的Bean的名称。

1
2
3
4
5
@Override
public String[] getBeanNamesForType(@Nullable Class<?> type, boolean includeNonSingletons, boolean allowEagerInit) {
if (!isConfigurationFrozen() || type == null || !allowEagerInit) {
return doGetBeanNamesForType(ResolvableType.forRawClass(type), includeNonSingletons, allowEagerInit);
}

在 doGetBeanNamesForType 中,会通过循环 this.beanDefinitionNames 内容,获取所有的 RootBeanDefinition。通过debug可以看到在此处所有的 beanDefinitionNames为

图片1

可以发现是在上一篇文章中提到的 new AnnotatedBeanDefinitionReader 的时候默认register的一些配置类。在通过使用isTypeMatch方法对所有获取到name循环比较。符合则将内容返回(只有ConfigurationAnnotationProcessor满足条件)。

执行ConfigurationAnnotationProcessor的后置方法

通过调用ConfigurationClassPostProcessor中的processConfigBeanDefinitions方法进行【构建和验证配置类】,完成对配置文件中Bean的装配,具体步骤如下:

  1. 获得符合条件的配置类
  2. 使用@Order的顺序进行排序
  3. 获取到处理每一个@Configuration处理类
  4. 处理所有@Configuration的类
  5. 验证所有@Coniguration的类

更具体的内容在后续再详细介绍。

第三步、会处理在beanFactory中存在的 继承 BeanDefinitionRegistryPostProcessor 并且实现了Ordered 接口的类中的

1
2
3
4
5
// 只列出差异点
if (!processedBeans.contains(ppName) && beanFactory.isTypeMatch(ppName, Ordered.class)) {
currentRegistryProcessors.add(beanFactory.getBean(ppName, BeanDefinitionRegistryPostProcessor.class));
processedBeans.add(ppName);
}

和第二步几乎一样,同样会对依赖排序、添加到registryProcessors中到、处理后置方法等。

最后、处理剩下的BeanDefinitionRegistryPostProcessor类

和前两步相似的重复的操作。就不展示代码了。

激活所有BeanFactoryPostProcessors

处理完所有的BeanDefinitionRegistryPostProcessors后,进行对Bean工厂的后置处理器处理。

1
2
3
4
5
6
7
8
9
10
11
// 在前面处理过的 registryProcessors 处理器
invokeBeanFactoryPostProcessors(registryProcessors, beanFactory);
invokeBeanFactoryPostProcessors(regularPostProcessors, beanFactory);

private static void invokeBeanFactoryPostProcessors(
Collection<? extends BeanFactoryPostProcessor> postProcessors, ConfigurableListableBeanFactory beanFactory) {
// 执行postProcessBeanFactory回调方法
for (BeanFactoryPostProcessor postProcessor : postProcessors) {
postProcessor.postProcessBeanFactory(beanFactory);
}
}

上面是针对 beanFactory instanceof BeanDefinitionRegistry 的情况,如果返回false,具体内容可能稍有不容。但大致上没什么区别.

5.registerBeanPostProcessors

就像名字一样,registerBeanPostProcessors 的作用就是注册 BeanPostProcessors,注册Bean的后置处理器。

1
2
3
protected void registerBeanPostProcessors(ConfigurableListableBeanFactory beanFactory) {
PostProcessorRegistrationDelegate.registerBeanPostProcessors(beanFactory, this);
}

调用PostProcessorRegistrationDelegate的静态方法 registerBeanPostProcessors

1
2
3
4
5
6
7
8
9
10
11
12
13
14
15
16
17
18
19
20
21
22
23
24
25
26
27
28
29
30
31
32
33
34
35
36
37
38
39
40
41
42
43
44
45
46
47
48
49
50
51
52
53
54
55
56
57
58
59
60
61
62
63
64
65
public static void registerBeanPostProcessors(
ConfigurableListableBeanFactory beanFactory, AbstractApplicationContext applicationContext) {
// 获得所有的BeanPostProcessor
String[] postProcessorNames = beanFactory.getBeanNamesForType(BeanPostProcessor.class, true, false);
int beanProcessorTargetCount = beanFactory.getBeanPostProcessorCount() + 1 + postProcessorNames.length;
// 注册一个BeanPostProcessorChecker用来在BeanPostProcessor实例化Bean时打印信息
beanFactory.addBeanPostProcessor(new BeanPostProcessorChecker(beanFactory, beanProcessorTargetCount));

// Separate between BeanPostProcessors that implement PriorityOrdered,
// Ordered, and the rest.
List<BeanPostProcessor> priorityOrderedPostProcessors = new ArrayList<>();
List<BeanPostProcessor> internalPostProcessors = new ArrayList<>();
List<String> orderedPostProcessorNames = new ArrayList<>();
List<String> nonOrderedPostProcessorNames = new ArrayList<>();
for (String ppName : postProcessorNames) {
if (beanFactory.isTypeMatch(ppName, PriorityOrdered.class)) {
BeanPostProcessor pp = beanFactory.getBean(ppName, BeanPostProcessor.class);
priorityOrderedPostProcessors.add(pp);
if (pp instanceof MergedBeanDefinitionPostProcessor) {
internalPostProcessors.add(pp);
}
}
else if (beanFactory.isTypeMatch(ppName, Ordered.class)) {
orderedPostProcessorNames.add(ppName);
}
else {
nonOrderedPostProcessorNames.add(ppName);
}
}

// First, register the BeanPostProcessors that implement PriorityOrdered.
sortPostProcessors(priorityOrderedPostProcessors, beanFactory);
registerBeanPostProcessors(beanFactory, priorityOrderedPostProcessors);

// Next, register the BeanPostProcessors that implement Ordered.
List<BeanPostProcessor> orderedPostProcessors = new ArrayList<>(orderedPostProcessorNames.size());
for (String ppName : orderedPostProcessorNames) {
BeanPostProcessor pp = beanFactory.getBean(ppName, BeanPostProcessor.class);
orderedPostProcessors.add(pp);
if (pp instanceof MergedBeanDefinitionPostProcessor) {
internalPostProcessors.add(pp);
}
}
sortPostProcessors(orderedPostProcessors, beanFactory);
registerBeanPostProcessors(beanFactory, orderedPostProcessors);

// Now, register all regular BeanPostProcessors.
List<BeanPostProcessor> nonOrderedPostProcessors = new ArrayList<>(nonOrderedPostProcessorNames.size());
for (String ppName : nonOrderedPostProcessorNames) {
BeanPostProcessor pp = beanFactory.getBean(ppName, BeanPostProcessor.class);
nonOrderedPostProcessors.add(pp);
if (pp instanceof MergedBeanDefinitionPostProcessor) {
internalPostProcessors.add(pp);
}
}
registerBeanPostProcessors(beanFactory, nonOrderedPostProcessors);

// Finally, re-register all internal BeanPostProcessors.
sortPostProcessors(internalPostProcessors, beanFactory);
registerBeanPostProcessors(beanFactory, internalPostProcessors);

// Re-register post-processor for detecting inner beans as ApplicationListeners,
// moving it to the end of the processor chain (for picking up proxies etc).
beanFactory.addBeanPostProcessor(new ApplicationListenerDetector(applicationContext));
}

过程类似 invokeBeanFactoryPostProcessors 的过程,实际过程分步可以整理如下:

  1. 获得所有的BeanPostProcessor,并注册一个BeanPostProcessorChecker,用来在BeanPostProcessor中创建Bean时打印信息。
  2. 首先注册继承了PriorityOrdered接口的BeanPostProcessor;
  3. 然后注册继承了Ordered接口的 BeanPostProcessor;然后注册所有的普通的 BeanPostProcessor;
  4. 最后注册所有的内部的BeanPostProcessor;

不管如何最后的结果都是将实现BeanPostProcessor的类注册到BeanFactory中。注册的过程就是一个CopyOnWriteArrayList添加的过程

6.initMessageSource

处理初始化消息来源MessageSource。

1
2
3
4
5
6
7
8
9
10
11
12
13
14
15
16
17
18
19
20
21
22
23
24
25
26
27
28
29
30
protected void initMessageSource() {
// 获得beanFactory
ConfigurableListableBeanFactory beanFactory = getBeanFactory();
// 如果包含name为 messageSource 的bean
if (beanFactory.containsLocalBean(MESSAGE_SOURCE_BEAN_NAME)) {
this.messageSource = beanFactory.getBean(MESSAGE_SOURCE_BEAN_NAME, MessageSource.class);
// 让当前 MessageSource 知道父MessageSource
if (this.parent != null && this.messageSource instanceof HierarchicalMessageSource) {
HierarchicalMessageSource hms = (HierarchicalMessageSource) this.messageSource;
if (hms.getParentMessageSource() == null) {
// Only set parent context as parent MessageSource if no parent MessageSource
// registered already.
hms.setParentMessageSource(getInternalParentMessageSource());
}
}
if (logger.isTraceEnabled()) {
logger.trace("Using MessageSource [" + this.messageSource + "]");
}
}
else {
// 如果不存在MS,则新建一个空的 MessageSource
DelegatingMessageSource dms = new DelegatingMessageSource();
dms.setParentMessageSource(getInternalParentMessageSource());
this.messageSource = dms;
beanFactory.registerSingleton(MESSAGE_SOURCE_BEAN_NAME, this.messageSource);
if (logger.isTraceEnabled()) {
logger.trace("No '" + MESSAGE_SOURCE_BEAN_NAME + "' bean, using [" + this.messageSource + "]");
}
}
}

在 initMessageSource 过程中,做的事情很简单,主要分两步:

  1. 如果包含messageSource的Bean,则设置父MessageSource
  2. 如果不包含 messageSource 的 Bean,则创建一个 DelegatingMessageSource 的单例Bean并注册到 beanFactory 中。

7. initApplicationEventMulticaster

初始化应用事件多播器

1
2
3
4
5
6
7
8
9
10
11
12
13
14
15
16
17
18
protected void initApplicationEventMulticaster() {
ConfigurableListableBeanFactory beanFactory = getBeanFactory();
if (beanFactory.containsLocalBean(APPLICATION_EVENT_MULTICASTER_BEAN_NAME)) {
this.applicationEventMulticaster =
beanFactory.getBean(APPLICATION_EVENT_MULTICASTER_BEAN_NAME, ApplicationEventMulticaster.class);
if (logger.isTraceEnabled()) {
logger.trace("Using ApplicationEventMulticaster [" + this.applicationEventMulticaster + "]");
}
}
else {
this.applicationEventMulticaster = new SimpleApplicationEventMulticaster(beanFactory);
beanFactory.registerSingleton(APPLICATION_EVENT_MULTICASTER_BEAN_NAME, this.applicationEventMulticaster);
if (logger.isTraceEnabled()) {
logger.trace("No '" + APPLICATION_EVENT_MULTICASTER_BEAN_NAME + "' bean, using " +
"[" + this.applicationEventMulticaster.getClass().getSimpleName() + "]");
}
}
}

和初始化MessageSource过程相似,如果包含 applicationEventMulticaster,则设置 this.applicationEventMulticaster 为容器中的多播器。如果没有,则创建,并使用beanFactory进行注册为单例的Bean。

8. onRefresh

方法用于在特定上下文子类中初始化其他特殊bean,点进方法后显示是一个空方法,是留给子类自行去实现的,去处理特殊的bean。

9. registerListeners

注册Listeners

1
2
3
4
5
6
7
8
9
10
11
12
13
14
15
16
17
18
19
protected void registerListeners() {
// 首先注册静态的listener
for (ApplicationListener<?> listener : getApplicationListeners()) {
getApplicationEventMulticaster().addApplicationListener(listener);
}

String[] listenerBeanNames = getBeanNamesForType(ApplicationListener.class, true, false);
for (String listenerBeanName : listenerBeanNames) {
getApplicationEventMulticaster().addApplicationListenerBean(listenerBeanName);
}
// 发布早起的应用事件
Set<ApplicationEvent> earlyEventsToProcess = this.earlyApplicationEvents;
this.earlyApplicationEvents = null;
if (earlyEventsToProcess != null) {
for (ApplicationEvent earlyEvent : earlyEventsToProcess) {
getApplicationEventMulticaster().multicastEvent(earlyEvent);
}
}
}

10.finishBeanFactoryInitialization

用于完成BeanFactory的初始化,在这一步完成了所有的剩余的单实例Bean的初始化过程。

1
2
3
4
5
6
7
8
9
10
11
12
13
14
15
16
17
18
19
20
21
22
23
24
25
26
27
28
29
30
protected void finishBeanFactoryInitialization(ConfigurableListableBeanFactory beanFactory) {
//初始化 conversionService Bean
if (beanFactory.containsBean(CONVERSION_SERVICE_BEAN_NAME) &&
beanFactory.isTypeMatch(CONVERSION_SERVICE_BEAN_NAME, ConversionService.class)) {
beanFactory.setConversionService(
beanFactory.getBean(CONVERSION_SERVICE_BEAN_NAME, ConversionService.class));
}

// Register a default embedded value resolver if no bean post-processor
// (such as a PropertyPlaceholderConfigurer bean) registered any before:
// at this point, primarily for resolution in annotation attribute values.
if (!beanFactory.hasEmbeddedValueResolver()) {
beanFactory.addEmbeddedValueResolver(strVal -> getEnvironment().resolvePlaceholders(strVal));
}

// Initialize LoadTimeWeaverAware beans early to allow for registering their transformers early.
String[] weaverAwareNames = beanFactory.getBeanNamesForType(LoadTimeWeaverAware.class, false, false);
for (String weaverAwareName : weaverAwareNames) {
getBean(weaverAwareName);
}

// Stop using the temporary ClassLoader for type matching.
beanFactory.setTempClassLoader(null);

// Allow for caching all bean definition metadata, not expecting further changes.
beanFactory.freezeConfiguration();

// Instantiate all remaining (non-lazy-init) singletons.
beanFactory.preInstantiateSingletons();
}

主要过程包括:

  1. 初始化 conversionService ;
  2. 如果没有内置的Value解析器,则设置一个StringValueResolver解析器到beanFactory中。
  3. 初始化LoadTimeWeaverAware;
  4. 停止使用临时的ClassLoader进行类型匹配。
  5. 允许缓存所有bean定义元数据,而不期望进一步的更改。
  6. 实例化所有的剩余的、非懒加载的单实例Bean。

这里只针对第6条的实例化剩余的单实例Bean进行源码分析:

1
2
3
4
5
6
7
8
9
10
11
12
13
14
15
16
17
18
19
20
21
22
23
24
25
26
27
28
29
30
31
32
33
34
35
36
37
38
39
40
41
42
43
44
beanFactory.preInstantiateSingletons();

@Override
public void preInstantiateSingletons() throws BeansException {
// Iterate over a copy to allow for init methods which in turn register new bean definitions.
// While this may not be part of the regular factory bootstrap, it does otherwise work fine.
List<String> beanNames = new ArrayList<>(this.beanDefinitionNames);

// Trigger initialization of all non-lazy singleton beans...
for (String beanName : beanNames) {
// 如果对应子Bean的定义,则遍历父Bean定义得到一个合并的RootBeanDefinition
RootBeanDefinition bd = getMergedLocalBeanDefinition(beanName);
//如果这个Bean不是abstract、是单例的、非懒加载的
if (!bd.isAbstract() && bd.isSingleton() && !bd.isLazyInit()) {
// 如果是FactoryBean
if (isFactoryBean(beanName)) {
// 想使用getBean时需要添加 & 前缀
Object bean = getBean(FACTORY_BEAN_PREFIX + beanName);
if (bean instanceof FactoryBean) {
final FactoryBean<?> factory = (FactoryBean<?>) bean;
boolean isEagerInit;
if (System.getSecurityManager() != null && factory instanceof SmartFactoryBean) {
isEagerInit = AccessController.doPrivileged((PrivilegedAction<Boolean>)
((SmartFactoryBean<?>) factory)::isEagerInit,
getAccessControlContext());
}
else {
isEagerInit = (factory instanceof SmartFactoryBean &&
((SmartFactoryBean<?>) factory).isEagerInit());
}
if (isEagerInit) {
// 调用getBean进行初始化
getBean(beanName);
}
}
}
else {
// 调用getBean进行初始化
getBean(beanName);
}
}
}
// Trigger post-initialization callback for all applicable beans...
}

经过上面的分析可以看出:在preInstantiateSingletons方法中,真正去实例化的方式是去调用 getBean方法。

接下来分析配置文件中的Bean的注册和使用 getBean 进行真正的实例化过程进行分析。

Spring的启动和注册

Posted on 2019-12-05 | In Spring
Words count in article: 1.7k | Reading time ≈ 7

启动Spring应用

只需简单的几行代码便可声明、创建一个Spring应用容器。

1
2
3
4
5
6
7
8
9
10
11
AnnotationConfigApplicationContext applicationContext = new AnnotationConfigApplicationContext(BasicConfig.class);

// 前提是需要传入给定的class配置类
@Configuration // 使用Configuration 表明是个配置类
@ComponentScan("com.nanyin")//扫描包
public class BasicConfig {
@Bean("person")
public Person person(){
return new Person("1","2");
}
}

创建容器

在进入到 new AnnotationConfigApplicationContext() 方法后,进行对容器的声明和创建。其中会先对给定的配置文件类进行校验和注册。调用过程草图如下所示(仅参考):

创建容器.png

可以看到基本的调用顺序,下面根据图中所示,针对调用的方法进行源码的分析。

创建 AnnotationConfigApplicationContext

创建对象

20191123153835.png

因为在使用 new AnnotationConfigApplicationContext() 创建对象时会默认调用父类的无参构造函数,也就是默认调用 super() 方法。根据图中的类继承结构,看看在父类中都定义了哪些对象,并且这些对象的作用是什么。

  • 首先在AnnotationConfigApplicationContext继承了GenericApplicationContext,在构造方法内创建了beanFactory
1
2
3
public GenericApplicationContext() {
this.beanFactory = new DefaultListableBeanFactory();
}
  • GenericApplicationContext 继承 AbstractApplicationContext,在构造方法内定义了resourcePatternResolver
1
2
3
4
5
6
public AbstractApplicationContext() {
this.resourcePatternResolver = getResourcePatternResolver();
}
protected ResourcePatternResolver getResourcePatternResolver() {
return new PathMatchingResourcePatternResolver(this);
}
  • AbstractApplicationContext 继承了 DefaultResourceLoader,在构造方法内定义了 classLoader
1
2
3
public DefaultResourceLoader() {
this.classLoader = ClassUtils.getDefaultClassLoader();
}

通过上述代码和分析可以发现调用 new AnnotationConfigApplicationContext() 时会通过调用父类的无参构造函数鬼定义如下内容:

  1. 设置 beanFactory 为 DefaultListableBeanFactory 类型
  2. 设置 resourcePatternResolver 为 PathMatchingResourcePatternResolver 类型
  3. 设置 classLoader 为默认的线程环境的 classLoader
1
2
3
4
5
6
7
8
9
10
public AnnotationConfigApplicationContext(Class<?>... componentClasses) {
this();
register(componentClasses); //注册给定的配置类Bean
refresh(); //刷新方法
}
// this调用空的构造函数,其中制定了 AnnotatedBeanDefinitionReader 和 ClassPathBeanDefinitionScanner
public AnnotationConfigApplicationContext() {
this.reader = new AnnotatedBeanDefinitionReader(this);
this.scanner = new ClassPathBeanDefinitionScanner(this);
}

调用构造函数时可以发现他会先初始化一个 reader 和一个 sacnner。 分别的作用为 :

  1. AnnotatedBeanDefinitionReader 用于以编程方式注册Bean类,这些Bean主要指的时一些PostProcessor
  2. ClassPathBeanDefinitionScanner 一个可在类路径上搜索候选bean的bean定义扫描器。

AnnotatedBeanDefinitionReader

用于以编程方式注册Bean类,这些Bean主要指的是一些PostProcessor。

1
2
3
4
5
6
7
8
9
10
11
12
13
14
15
16
17
18
19
20
21
22
23
24
25
26
27
28
29
30
31
32
33
34
35
36
37
38
39
40
public AnnotatedBeanDefinitionReader(BeanDefinitionRegistry registry, Environment environment) {
Assert.notNull(registry, "BeanDefinitionRegistry must not be null");
Assert.notNull(environment, "Environment must not be null");
this.registry = registry;
//ConditionEvaluator 用于对 @Condition 注解的评估
this.conditionEvaluator = new ConditionEvaluator(registry, environment, null);
AnnotationConfigUtils.registerAnnotationConfigProcessors(this.registry);
}
/**
* 处理相关注解的后置处理器如 ConfigurationClassPostProcessor 等
*/
public static Set<BeanDefinitionHolder> registerAnnotationConfigProcessors(
BeanDefinitionRegistry registry, @Nullable Object source) {
// 获取 BeanFactory,其实这里返回了一个this.beanFactory,也就是 DefaultListableBeanFactory
DefaultListableBeanFactory beanFactory = unwrapDefaultListableBeanFactory(registry);
if (beanFactory != null) {
if (!(beanFactory.getDependencyComparator() instanceof AnnotationAwareOrderComparator)) {
beanFactory.setDependencyComparator(AnnotationAwareOrderComparator.INSTANCE);
}
if (!(beanFactory.getAutowireCandidateResolver() instanceof ContextAnnotationAutowireCandidateResolver)) {
beanFactory.setAutowireCandidateResolver(new ContextAnnotationAutowireCandidateResolver());
}
}

Set<BeanDefinitionHolder> beanDefs = new LinkedHashSet<>(8);
// 注册ConfigurationClassPostProcessor 也就是对应的@Configuration注解postprocessor
if (!registry.containsBeanDefinition(CONFIGURATION_ANNOTATION_PROCESSOR_BEAN_NAME)) {
RootBeanDefinition def = new RootBeanDefinition(ConfigurationClassPostProcessor.class);
def.setSource(source);
beanDefs.add(registerPostProcessor(registry, def, CONFIGURATION_ANNOTATION_PROCESSOR_BEAN_NAME));
}
// 注册AutowiredAnnotationBeanPostProcessor,对应的时@Autowired对应的postProcessor
if (!registry.containsBeanDefinition(AUTOWIRED_ANNOTATION_PROCESSOR_BEAN_NAME)) {
RootBeanDefinition def = new RootBeanDefinition(AutowiredAnnotationBeanPostProcessor.class);
def.setSource(source);
beanDefs.add(registerPostProcessor(registry, def, AUTOWIRED_ANNOTATION_PROCESSOR_BEAN_NAME));
}
// ........
return beanDefs;
}

通过代码总结一下,在new AnnotatedBeanDefinitionReader 的时候,都做了些什么;

  • 将 AnnotationConfigApplicationContext 作为 register 设置到AnnotatedBeanDefinitionReader中
  • 设置 ConditionEvaluator 用作与对 @Condition 的解析
  • 在给定的register也就是AnnotationConfigApplicationContext中注册所有相关的注解后置处理器。
    • 添加BeanFactory的相关属性,DependencyComparator和AutowireCandidateResolver
    • 注册ConfigurationClassPostProcessor 用于解析@Configuration注解标注的类
    • 注册AutowiredAnnotationBeanPostProcessor用于解析@Autowire注解标注的类
    • 注册 CommonAnnotationBeanPostProcessor 用于解析 JSR-250 相关注解,如Resource、EJB、WebServiceRef
    • 注册PersistenceAnnotationBeanPostProcessor用于解析JPA相关注解
    • 注册EventListenerMethodProcessor、DefaultEventListenerFactory用于事件监听

ClassPathBeanDefinitionScanner

一个可在类路径上搜索候选bean的bean定义扫描器。

1
2
3
4
5
6
7
8
9
10
11
12
13
public ClassPathBeanDefinitionScanner(BeanDefinitionRegistry registry, boolean useDefaultFilters,
Environment environment, @Nullable ResourceLoader resourceLoader) {

Assert.notNull(registry, "BeanDefinitionRegistry must not be null");
this.registry = registry;

if (useDefaultFilters) {
registerDefaultFilters();
}
// 这里的environment时在父类中的构造函数中给出的 new StandardEnvironment()
setEnvironment(environment);
setResourceLoader(resourceLoader);
}

其中最重要的是使用ClassPathScanningCandidateComponentProvider类中 registerDefaultFilters 方法注册默认的过滤器,主要包含三部分

  • 为@Component,同时保证了Repository、Service、Controller这四个注解添加过滤器
  • 为 ManagedBean(JSR-250) 添加过滤器
  • 为 Named(JSR-330) 添加过滤器

register 注册给定配置类

1
2
3
4
5
6
7
8
9
10
11
12
@Override
public void register(Class<?>... componentClasses) {
Assert.notEmpty(componentClasses, "At least one component class must be specified");
this.reader.register(componentClasses); //调用 AnnotatedBeanDefinitionReader 的register 方法
}

public void register(Class<?>... componentClasses) {
for (Class<?> componentClass : componentClasses) {
// 对每个给定的class进行 registerBean
registerBean(componentClass);
}
}

registerBean

在上一步的 registerBean 中调用了已经创建好的 AnnotatedBeanDefinitionReader 的 registerBean方法:

1
2
3
4
5
6
7
8
9
10
public void register(Class<?>... componentClasses) {
for (Class<?> componentClass : componentClasses) {
// 对每个给定的class进行 registerBean
registerBean(componentClass);
}
}

public void registerBean(Class<?> beanClass) {
doRegisterBean(beanClass, null, null, null, null);
}

对每一个 class 循环调用 doRegisterBean 方法进行 对 BeanClass 的注册操作。

doRegisterBean

在doRegisterBean中分为如下几步进行操作:

  1. 声明 BeanDefinition 为 AnnotatedGenericBeanDefinition 。
  2. 通过 conditionEvaluator.shouldSkip() 方法通过对 @Conditional 注解来判断是否跳过注册
  3. 通过 scopeMetadataResolver.resolveScopeMetadata 来获取作用域,然后再放到 BeanDefinition 中。
  4. 通过 beanNameGenerator.generateBeanName 来设置Bean在容器中的名称。
  5. 通过 processCommonDefinitionAnnotations 设置Bean的基本属性
  6. 最后通过 调用registerBeanDefinition 对包装好的 BeanDefinitionHolder 进行最后的注册操作。
1
2
3
4
5
6
7
8
9
10
11
12
13
14
15
16
17
18
19
20
21
22
23
24
25
26
27
28
29
30
31
32
33
34
35
36
37
38
39
40
41
private <T> void doRegisterBean(Class<T> beanClass, @Nullable String name,
@Nullable Class<? extends Annotation>[] qualifiers, @Nullable Supplier<T> supplier,
@Nullable BeanDefinitionCustomizer[] customizers) {

AnnotatedGenericBeanDefinition abd = new AnnotatedGenericBeanDefinition(beanClass);
if (this.conditionEvaluator.shouldSkip(abd.getMetadata())) {
// 通过判断Conditional注解,来判断是否跳过
return;
}
//处理创建的回调
abd.setInstanceSupplier(supplier);
ScopeMetadata scopeMetadata = this.scopeMetadataResolver.resolveScopeMetadata(abd);
// 处理作用域 放到scopeMetadata里面
abd.setScope(scopeMetadata.getScopeName());//再放到 BeanDefinition 里
String beanName = (name != null ? name : this.beanNameGenerator.generateBeanName(abd, this.registry)); //设置BeanName

AnnotationConfigUtils.processCommonDefinitionAnnotations(abd);
// 设置一些基本属性 如 Lazy,Primary 。。。
if (qualifiers != null) {
for (Class<? extends Annotation> qualifier : qualifiers) {
if (Primary.class == qualifier) {
abd.setPrimary(true);
}
else if (Lazy.class == qualifier) {
abd.setLazyInit(true);
}
else {
abd.addQualifier(new AutowireCandidateQualifier(qualifier));
}
}
}
if (customizers != null) {
for (BeanDefinitionCustomizer customizer : customizers) {
customizer.customize(abd);
}
}

BeanDefinitionHolder definitionHolder = new BeanDefinitionHolder(abd, beanName); // 创建一个definitionHolder,作用是 具有名称和别名的BeanDefinition的持有人
definitionHolder = AnnotationConfigUtils.applyScopedProxyMode(scopeMetadata, definitionHolder, this.registry); //设置作用域
BeanDefinitionReaderUtils.registerBeanDefinition(definitionHolder, this.registry);
}

registerBeanDefinition

1
2
3
4
5
6
7
8
9
10
11
12
13
14
15
public static void registerBeanDefinition(
BeanDefinitionHolder definitionHolder, BeanDefinitionRegistry registry)
throws BeanDefinitionStoreException {

String beanName = definitionHolder.getBeanName();
registry.registerBeanDefinition(beanName, definitionHolder.getBeanDefinition());

// 注册别名
String[] aliases = definitionHolder.getAliases();
if (aliases != null) {
for (String alias : aliases) {
registry.registerAlias(beanName, alias);
}
}
}

之后会调用 DefaultListableBeanFactory 中的 registBeanDefinition 方法对Bean进行注册。

实际的注册过程就是将Bean的名称作为key,Bean的BeanDefinition作为value存储在一个全局的beanDefinitionMap中。

1
2
3
4
5
6
7
8
synchronized (this.beanDefinitionMap) {
this.beanDefinitionMap.put(beanName, beanDefinition); //实际上就是一个ConcurrentHashMap 存储 beanDefinition 使用BeanName作为Key
List<String> updatedDefinitions = new ArrayList<>(this.beanDefinitionNames.size() + 1); // 添加到updatedDefinitions里面
updatedDefinitions.addAll(this.beanDefinitionNames);
updatedDefinitions.add(beanName);
this.beanDefinitionNames = updatedDefinitions;
removeManualSingletonName(beanName);
}

至此,Spring容器的创建,和对配置文件的注册就完成了。

将类添加至容器中的四种方法

Posted on 2019-12-01 | In Spring
Words count in article: 1.3k | Reading time ≈ 5

将类添加至容器中的四种方法

在Spring中,有四种方法可以将现有的类的实例添加到容器中.在了解之前需要了解以下两种作用域.

Spring在创建对象的时候共有四种作用域可选.分别为常用的singleton、prototype.和在web应用开发中的request和session.

下面针对常用的singleton、prototype来了解bean的作用域(SCOPE)

Spring的作用域

1. Singleton 单例

Singleton为Spring对象的默认的创建方式,也就是说Spring在创建Bean的时候默认是单例的.

1
2
3
4
5
6
7
8
9
10
11
12
13
14
15
16
/准备对象Person
@Configurable
public class TestConfig {
@Bean
public Person person() {
System.out.println("创建Bean实例!");
return new Person("li", "lei");
}
}
//测试
ApplicationContext applicationContext = new AnnotationConfigApplicationContext(TestConfig.class);
// 获取两次对象,并且在这是就会打印 「创建Bean实例」
Person person = (Person) applicationContext.getBean("person");
Person person_copy = (Person) applicationContext.getBean("person");
// 这里返回true,说明两个对象是相同的对象
System.out.println(person == person_copy);

运行结果:

1
2
3
创建Bean实例!
容器创建成功。。接下来创建对象!
true

并且需要注意的时,在Spring创建Singleton对象的时候,是在容器创建后立即创建的.

2. prototype 原型

同样上述的代码,在@Bean下面增加@Scope("prototype")后,会注意到结果的不同.运行时在进行结果的观察:

1
2
3
4
容器创建成功。。接下来创建对象!
创建Bean实例!
创建Bean实例!
false
类型 是否单例 创建时间 是否销毁
Singleton 单例 默认在容器启动时创建 容器关闭后销毁
prototype 多实例 在获取对象时创建 不会调用销毁方法

一、Configuration注解和Bean注解

代替了原来的Spring配置文件,在类上标注Configuration注解说明这个类是Spring的配置类.

在方法上使用Bean注解,则会将返回值作为实例添加到容器中,方法名称作为Bean的ID.

一般使用这种方法将第三方的包中的类加入到容器中,如Shiro的配置类.

1
2
3
4
5
6
7
8
9
10
11
12
13
/*
使用@Confiuration注解声明配置类
*/
@Configurable
@ComponentScan("com.nanyin")
public class TestConfig {
@Bean
@Scope("prototype") //声明多实例
public Person person() {
System.out.println("创建Bean实例!");
return new Person("li", "lei");
}
}

二、componentScan包扫描注解

在面对自己写的@Component,@Service,@Controller,@Repository则不需要使用第一个中的使用@Bean注解一个一个的添加到配置类中,只需要配置@ComponentSacn就行了.它会自动扫描路径下的所有这些注解的类加入到容器中.

1
2
3
4
5
@Configurable
@ComponentScan("com.nanyin")
public class TestConfig {

}

三、import注解

1. 直接导入@Configuration配置类

能够使用@Import(value=xxx.class) 其中value是数组,可以一次性导入多个配置类.批量的导入配置文件中的所有声明的bean.

1
2
3
4
5
6
7
8
9
10
11
12
13
14
15
16
17
18
19
20
21
22
23
24
25
26
27
28
29
30
31
32
33
34
35
36
37
38
39
40
41
42
// 新的实体
public class Dog {
}

@Configurable
// 需要导入TestConfig中配置的所有bean
@Import(value=TestConfig.class)
public class ImportConfig {
@Bean
public Dog dog() {
System.out.println("创建Bean实例!");
return new Dog();
}
}

@Configurable
public class TestConfig {
// 这里配置了一个person
@Bean
public Person person() {
System.out.println("创建Bean实例!");
return new Person("li", "lei");
}
}

// 测试
@Test
public void importTest(){
ApplicationContext applicationContext = new AnnotationConfigApplicationContext(ImportConfig.class);
String[] names = applicationContext.getBeanDefinitionNames();
// 打印出所有添加到容器中的名称
for (String temp :
names) {
System.out.println(temp);
}
}

结果:
importConfig
person
com.nanyin.config.TestConfig
dog

导入了TestConfig配置类和其中的person实例

2. 使用importSelector自定义导入

除了使用 @import 直接导入指定的类外,还可以导入 继承importSelector接口的类,并且在实现类中进行自定义操作.

1
2
3
4
5
6
7
8
9
10
11
12
13
14
15
16
17
18
19
20
21
22
23
24
25
26
27
28
29
30
public class MyImportSelector implements ImportSelector {

public String[] selectImports(AnnotationMetadata importingClassMetadata) {
// 可以通过importingClassMetadata获取类注解上的所有信息
return new String[]{Dog.class.getName()};
}
}

@Configurable
// @Import 可以导入数组(多个) class,如上面提到的 TestConfig配置类,这里把MyImportSelector也添加进去
@Import(value={TestConfig.class,MyImportSelector.class})
public class ImportConfig {

}

public void importTest(){
ApplicationContext applicationContext = new AnnotationConfigApplicationContext(ImportConfig.class);
String[] names = applicationContext.getBeanDefinitionNames();
for (String temp :
names) {
System.out.println(temp);
}
((AnnotationConfigApplicationContext) applicationContext).close();;
}

//执行测试后
// importConfig
// person
// com.nanyin.config.TestConfig
// com.nanyin.entity.Dog

3. 使用 importBeanDefinitionRegister

可以使用 importBeanDefinitionRegister 自定义注册bean,因为在接口中有BeanRegiest作为参数,通过参数调用Registe相关方法.

1
2
3
4
5
6
7
8
9
10
11
12
13
14
15
16
17
18
19
20
public class MyimportBeanDefinitionRegistrar implements ImportBeanDefinitionRegistrar {
public void registerBeanDefinitions(AnnotationMetadata importingClassMetadata, BeanDefinitionRegistry registry) {
AnnotatedGenericBeanDefinition beanDefinition = new AnnotatedGenericBeanDefinition(Dog.class);
// 前面字符串是ID,后面是BeanDefinition
registry.registerBeanDefinition("dogx",beanDefinition);
}
}

@Import(MyimportBeanDefinitionRegistrar.class)
public class ImportConfig {
@Bean
public Dog dog() {
System.out.println("创建Bean实例!");
return new Dog();
}
}
// 结果通过 registry 注册了 dogx
// importConfig
// dog
// dogx

后面的两种方法在SpringBoot源码中会经常看到,所以还是挺重要的.


四、使用FactoryBean注册bean

用于创建复杂的bean时,会用到FactoryBean.

如果继承 FactoryBean 接口实现,则这个就不能当作一个普通的bean使用了,他暴露出来的获取的对象是 getObject()方法获取的工厂中的对象,而不是他自身.默认创建的时FactoryBean的对象实例,而不是工厂实例,如果想获取工厂的实例,在getBean的时候在对象ID前加上&符号。

具体实例:

1
2
3
4
5
6
7
8
9
10
11
12
13
14
15
16
public class MyFactoryBean implements FactoryBean<Dog> {

// 返回的实例对象
public Dog getObject() throws Exception {
return new Dog();
}
// 返回的类型
public Class<?> getObjectType() {
return Dog.class;
}

// 默认为true,如果时false则为多实例
public boolean isSingleton() {
return true;
}
}

Spring的缓存

Posted on 2019-08-15 | In SpringBoot
Words count in article: 1.8k | Reading time ≈ 7

Spring的缓存

Java在使用Cache的时候,为了统一缓存的使用,J2EE发布了JSR107缓存规范。包括了主要的5个核心接口,包括cachingProvider、cacheManager等。具体可以查看JSR107缓存规。

Spring的缓存抽象

Spring为了统一缓存的操作,使用org.springframework.cache包下的的cacheManager接口进行开发。并支持上面所说的JSR107缓存规范,用来简化开发。

Spring支持透明的向应用中的方法添加缓存。将查询出的信息放到缓存里,减少应用与实际数据库的查询次数。提高系统相应速度。

SpringBoot开启缓存注解

SpringBoot是默认支持Cache相关基础组件的。需要在启动器类上标注@EnableCaching注解。如:

1
2
3
4
5
6
7
@SpringBootApplication
@EnableCaching //开启SpringBoot的cache支持
public class WebProjectApplication {
public static void main(String[] args) {
SpringApplication.run(WebProjectApplication.class);
}
}

添加缓存,只需要在方法上添加注解,Spring cache 就能够帮助创建缓存。如:

1
2
3
4
5
@Cacheable(value="user-status") //使用Cacheable注解标志这需要对方法进行缓存
@Override
public List<Status> findNotDeletedUserStatus() throws Exception {
return statusRepository.findAllByIsDeletedOrderByOrd(DeletedStatusEnum.IS_NOT_DELETED.isJudge());
}

SpringBoot支持了多种的缓存实现,如EhCache 2.x、Redis、Caffeine等等。但是接口方法是相同的,就如同使用jdbc一样。虽然实现不同,但是使用上并无差异。

SpringBoot 使用缓存注解

缓存抽象的核心是将缓存应用于Java方法上。这样,如果方法被调用,那么应用于方法上的缓存就开始检查是否按照给定规则进行缓存。

基于注解的缓存

对于缓存声明,Spring的缓存抽象提供了一组Java注解

一、@Cacheable 触发进行缓存

使用@Cacheable注解在方法上,标志着这个方法是可缓存的。使用这个注解,可将方法的返回结构存储在缓存中,再次查询是,就可以从缓存中取结果而不是再次执行查询操作。如下面的例子:

1
2
@Cacheable("books")
public Book findBook(ISBN isbn) {...}

因为缓存是key-value形式的,每次调用缓存时,都需要先找到正确的key。缓存抽象支持简单的KeyGenerator几种生成的策略:作为参考上面的方法findBook的Cacheable的参数是books。

  • 如果没有参数 ,则使用SimpleKey.EMPTY.
  • 如果有一个参数,则使用这个参数作为key。
  • 如果有多个参数,则返回 SimpleKey 中包含这多个参数。

这三种方式包含了大多数的使用场景。如果需要自定义key ,@Cacheable 允许使用key关键字进行key的生成,key关键字的值可以使用SPEL表达式进行表示。如Spring Doc中所举出的例子一样。根据实际的情况进行斟酌。

1
2
3
4
5
6
7
8
@Cacheable(cacheNames="books", key="#isbn")
public Book findBook(ISBN isbn, boolean checkWarehouse, boolean includeUsed)

@Cacheable(cacheNames="books", key="#isbn.rawNumber")
public Book findBook(ISBN isbn, boolean checkWarehouse, boolean includeUsed)

@Cacheable(cacheNames="books", key="T(someType).hash(#isbn)")
public Book findBook(ISBN isbn, boolean checkWarehouse, boolean includeUsed)

自定义的缓存条件 : 可以通过condition关键字在@Cacheable注解中进行条件的定制。如:

1
2
3
4
5
@Cacheable(cacheNames="book", condition="#name.length() < 32") 
public Book findBook(String name)
//如果想排除某些条件 使用unless
@Cacheable(cacheNames="book", condition="#name.length() < 32", unless="#result.hardback")
public Book findBook(String name)

具体的更多的spel注解属性可以查看Spring文档中的内容 地址

二、@CacheEvict 触发清空缓存

在Spring cache中不仅允许放置缓存,而且允许移除缓存。使用与Cacheable相对的CacheEvict注解来清空对应 key的缓存数据。

1
2
3
// 使用allEntries用来表示删除所有这个cache中的缓存
@CacheEvict(cacheNames="books", allEntries=true)
public void loadBooks(InputStream batch)

三、@CachePut 触发更新缓存

当需要更新缓存而不干扰方法执行时,就是说每次调用方法时,都会更新缓存。

1
2
@CachePut(cacheNames="book", key="#isbn")
public Book updateBook(ISBN isbn, BookDescriptor descriptor)

四、@Caching 组合使用多个cache注解方法

如果想使用多个cache动作来标注在方法上,就需要使用Caching注解如下面的例子中所表示的一样,想要清空多个key的缓存

1
2
@Caching(evict = { @CacheEvict("primary"), @CacheEvict(cacheNames="secondary", key="#p0") })
public Book importBooks(String deposit, Date date)

五、@CacheConfig 类上注解用来注解公共配置

上面的注解都是在方法级别上的对方法的返回值进行设置,而CacheConfig是对类级别上的公共设置,如下面的例子中所展示的一样,设置公共的cache name.

1
2
3
4
5
6
@CacheConfig("books") 
public class BookRepositoryImpl implements BookRepository {

@Cacheable
public Book findBook(ISBN isbn) {...}
}

SpringBoot使用redis进行缓存

一、添加Pom依赖

1
2
3
4
<dependency>
<groupId>org.springframework.boot</groupId>
<artifactId>spring-boot-starter-data-redis</artifactId>
</dependency>

二、配置redis相关属性

在引入spring-boot-starter-data-redis后,启动主程序后会自动的开启redis缓存。如果想配置redis,则可以在org.springframework.boot.autoconfigure.data.redis.RedisProperties这个属性类中查找,然后添加到application.yml中。如:

1
2
3
4
5
6
7
8
9
10
11
12
13
14
15
16
private int database = 0;
/**
* Connection URL. Overrides host, port, and password. User is ignored. Example:
* redis://user:password@example.com:6379
*/
private String url;

private String host = "localhost";

private String password;

private int port = 6379;

private boolean ssl;

private Duration timeout;

三、自定义redisTemplate和TtlCacheManager

根据SpringBoot自动配置源码,redisTemplate只有在环境中没有以redisTemplate名称命名的bean时候,才进行自动配置。

1
2
3
4
5
6
7
8
@Bean
@ConditionalOnMissingBean(name = "redisTemplate")
public RedisTemplate<Object, Object> redisTemplate(RedisConnectionFactory redisConnectionFactory)
throws UnknownHostException {
RedisTemplate<Object, Object> template = new RedisTemplate<>();
template.setConnectionFactory(redisConnectionFactory);
return template;
}

所以,如果想自行配置redisTemplate则可直接装载bean,命名为redisTemplate。如下:

1
2
3
4
5
6
7
8
9
10
11
12
13
14
15
16
17
18
19
20
21
22
23
24
25
26
27
28
29
30
31
32
33
34
35
36
37
@Bean
public RedisTemplate redisTemplate(RedisConnectionFactory redisConnectionFactory) {
RedisTemplate<Object, Object> template = new RedisTemplate<>();
template.setConnectionFactory(redisConnectionFactory);
//Jackson2JsonRedisSerializer serializer = new Jackson2JsonRedisSerializer(Object.class);
//使用Fastjson2JsonRedisSerializer来序列化和反序列化redis的value值
FastJson2JsonRedisSerializer serializer = new FastJson2JsonRedisSerializer(Object.class);

ObjectMapper mapper = new ObjectMapper();
mapper.setVisibility(PropertyAccessor.ALL, JsonAutoDetect.Visibility.ANY);
mapper.enableDefaultTyping(ObjectMapper.DefaultTyping.NON_FINAL);
serializer.setObjectMapper(mapper);

template.setHashKeySerializer(serializer);
template.setHashValueSerializer(serializer);
template.setDefaultSerializer(serializer);
//使用StringRedisSerializer来序列化和反序列化redis的key值,防止乱码
template.setKeySerializer(new StringRedisSerializer());
template.setValueSerializer(new StringRedisSerializer());
template.afterPropertiesSet();
return template;
}
// 使用 @Cacheable(cacheManager="TtlCacheManager") 激活cacheManager
@Bean(name = "TtlCacheManager")
public CacheManager cacheManager(RedisConnectionFactory connectionFactory) {

//初始化一个RedisCacheWriter
RedisCacheWriter redisCacheWriter = RedisCacheWriter.nonLockingRedisCacheWriter(connectionFactory);

RedisCacheConfiguration defaultCacheConfig = RedisCacheConfiguration.defaultCacheConfig();
//设置默认超过期时间是30秒
defaultCacheConfig.entryTtl(Duration.ofSeconds(30));

//初始化RedisCacheManager
RedisCacheManager cacheManager = new RedisCacheManager(redisCacheWriter, defaultCacheConfig);
return cacheManager;
}

这里是用来FastJson2JsonRedisSerializer来代替默认的Jackson2JsonRedisSerializer序列化策略。是在网上查找到的方法。

1
2
3
4
5
6
7
8
9
10
11
12
13
14
15
16
17
18
19
20
21
22
23
24
25
26
27
28
29
30
31
32
33
34
35
36
37
38
39
public class FastJson2JsonRedisSerializer<T> implements RedisSerializer<T> {
private ObjectMapper objectMapper = new ObjectMapper();
public static final Charset DEFAULT_CHARSET = Charset.forName("UTF-8");
private Class<T> clazz;
static {
ParserConfig.getGlobalInstance().setAutoTypeSupport(true);
//如果遇到反序列化autoType is not support错误,请添加并修改一下包名到bean文件路径
// ParserConfig.getGlobalInstance().addAccept("com.xxxxx.xxx");
}
public FastJson2JsonRedisSerializer(Class<T> clazz) {
super();
this.clazz = clazz;
}
// 序列化
@Override
public byte[] serialize(T t) throws SerializationException {
if (t == null) {
return new byte[0];
}
return JSON.toJSONString(t, SerializerFeature.WriteClassName).getBytes(DEFAULT_CHARSET);
}
// 反序列化
@Override
public T deserialize(byte[] bytes) throws SerializationException {
if (bytes == null || bytes.length <= 0) {
return null;
}
String str = new String(bytes, DEFAULT_CHARSET);
return JSON.parseObject(str, clazz);
}
public void setObjectMapper(ObjectMapper objectMapper) {
Assert.notNull(objectMapper, "'objectMapper' must not be null");
this.objectMapper = objectMapper;
}

protected JavaType getJavaType(Class<?> clazz) {
return TypeFactory.defaultInstance().constructType(clazz);
}
}

SpringBoot的自定义starter开发

Posted on 2019-08-13 | In SpringBoot
Words count in article: 1.2k | Reading time ≈ 5

SpringBoot的自定义starter开发

SpringBoot官方默认提供了很多的starter。参考官方的reference。starter作为在SpringBoot中重要的特性,使用时能够在POM文件中直接引用这些starter,可以一站式的获取与Spring结合的相关服务和功能。如果想引入redis等功能。则直接添加使用spring-boot-starter-data-redis。只需在配置文件中配置少量属性,就可以在应用中使用。

SpringBoot的自动配置原理

SpringBoot通过starter,引用相关服务,然后通过autoConfigure来自动配置相关服务。更多具体的实现可以参考这篇文章,在这篇文章中,简要的分析来如何实现自定义starter和基本的自动配置实现。

starter的基本结构

  • 包名称以 spring-boot-starter-xxx 命名,如引用spring-boot-starter-data-jpa.其中的内容只包括pom文件,用来引用相关服务的jar包。
  • 包名称以xxx-spring-boot-autoconfigure命名。包含:
    • xxxAutoConfiguration 自动配置类,使用Configuration注解标志为配置类。使用Conditionalxxxx相关注解表示条件,使用EnableConfigurationProperties注解,来指定配置属性类。
    • xxxProperties 配置属性类。使用ConfigurationProperties注解来标志为配置属性类,并且需要指定prefix,以便在配置文件中,使用prefix+属性名来设置相关属性。
    • spring.factories 文件中添加相关信息,用来指定需要进行自动配置的类的全限定名称。如:
1
2
org.springframework.boot.autoconfigure.EnableAutoConfiguration=\
org.springframework.boot.autoconfigure.admin.SpringApplicationAdminJmxAutoConfiguration,

开始自定义starter

在正式进行之前,需要先创建一个空的Project,用来放spring-boot-starter-xxx和xxx-spring-boot-autoconfigure。

创建spring-boot-starter-xxx和xxx-spring-boot-autoconfigure

在创建完空项目后,会要求创建module。选择maven或者Spring Initializer进行spring-boot-starter-xxx的创建。

配置starter

在实际操作配置starter之前,先来分析SpringBoot官方提供的starter的基本的依赖结构,为接下来的构建起到模版的作用。

在左边的为spring-boot-starter-web的的简单的依赖关系,它依赖spring-boot-starter。而spring-boot-starter进一步依赖于spring-boot-autoconfigure用来进行自动配置。

配置autoconfiguration包

pom配置

在pom.xml中添加如下内容:

1
2
3
4
5
6
7
8
9
10
11
12
13
<dependencies>
<dependency>
<groupId>org.springframework.boot</groupId>
<artifactId>spring-boot</artifactId>
<version>2.1.6.RELEASE</version>
<scope>compile</scope>
</dependency>
<dependency>
<groupId>org.springframework.boot</groupId>
<artifactId>spring-boot-configuration-processor</artifactId>
<optional>true</optional>
</dependency>
</dependencies>

主要需要依赖spring-boot。如果在自动配置类需要进行其他特殊的Conditional设置时,还需要引入spring-boot-autoconfigure。

添加xxxAutoConfiuration和xxxProperties类

这两个类是自动配置中必须的类。内容可以参考WebMvcAutoConfiguration和WebMvcProperties这两个类。下面是我的具体实现类。

1
2
3
4
5
6
7
8
9
10
11
12
13
14
15
16
17
18
19
20
21
22
23
24
25
26
27
28
29
30
31
32
33
34
35
36
37
38
39
40
41
42
43
44
45
46
47
48
49
50
51
52
53
// HelloAutoConfiguration 自定义的AutoConfiguration类
@Configuration
@EnableConfigurationProperties({HelloProperties.class})
public class HelloAutoConfiguration {

private final HelloProperties helloProperties;

public HelloAutoConfiguration(HelloProperties helloProperties) {
this.helloProperties = helloProperties;
}

@Bean
public HelloService sayHello(){
HelloService helloService = new HelloService();
// 设置配置属性
helloService.setHelloProperties(helloProperties);
return helloService;
}

}

//使用service类来测试是否配置成功,方法调用
public class HelloService {

HelloProperties helloProperties;

public HelloProperties getHelloProperties() {
return helloProperties;
}

public void setHelloProperties(HelloProperties helloProperties) {
this.helloProperties = helloProperties;
}

// 方法调用验证属性是否其作用。也就是自动配置是否生效
public String sayHello(){
return helloProperties.getPrefix() + " hello world !";
}
}

// 自定义的Properties类
@ConfigurationProperties(prefix = "spring.hello")
public class HelloProperties {
private String prefix ;

public String getPrefix() {
return prefix;
}

public void setPrefix(String prefix) {
this.prefix = prefix;
}
}

spring.factories

如果想要使用自动配置,必须添加spring.factories这个文件。添加如下内容:

1
2
3
# Auto Configure
org.springframework.boot.autoconfigure.EnableAutoConfiguration=\
com.nanyin.hello.HelloAutoConfiguration

配置 starter-xxx 包

pom配置

1
2
3
4
5
6
7
8
9
10
11
12
13
14
<dependencies>
<!--构建的starter依赖>spring-boot-starter 和其他需要的starter-->
<dependency>
<groupId>org.springframework.boot</groupId>
<artifactId>spring-boot-starter</artifactId>
</dependency>

<!--依赖自动配置包-->
<dependency>
<groupId>com.nanyin</groupId>
<artifactId>hello-spring-boot-autoconfigure</artifactId>
<version>0.0.1-SNAPSHOT</version>
</dependency>
</dependencies>

项目结构

需要删除不需要的类或目录,如SpringBoot启动类、Resource目录、test目录。

打成jar包

使用idea中的maven工具,对上个module进行分别打包,安装到本地。打包的顺序是先安装 autoconfiuration ,然后再安装 starter-xxx。

使用starter

新建一个web的SpringBoot项目,新建一个Controller,里面添加如下内容:

1
2
3
4
@RequestMapping("/sayHello")
public @ResponseBody String sayHello(){
return helloService.sayHello();
}

并在配置文件中添加:

1
2
3
spring:
hello:
prefix: PREFIX

在pom.xml中添加自定义的starter:

1
2
3
4
5
6
<!-- 添加自定义starter -->
<dependency>
<groupId>com.nanyin</groupId>
<artifactId>spring-boot-starter-hello</artifactId>
<version>0.0.1-SNAPSHOT</version>
</dependency>

运行程序,在地址栏上输入http://localhost:8081/sayHello

SpringBoot启动之refreshContext

Posted on 2019-08-05 | In SpringBoot
Words count in article: 933 | Reading time ≈ 3

SpringBoot启动之refreshContext

这篇主要要通过refreshContext方法来将SpringBoot是如何初始化ioc容器的。

refreshContext

在SpringBoot中的run方法中,调用refreshContext()方法,进而调用 AbstractApplicationContext类中的refresh()方法。然后分析每个方法的代码,来看这些方法的作用。

1
2
3
4
5
6
7
8
9
10
11
12
13
14
15
16
17
18
19
20
21
22
23
24
25
26
27
28
29
30
31
32
33
34
@Override
public void refresh() throws BeansException, IllegalStateException {
synchronized (this.startupShutdownMonitor) {
// 准备此上下文以进行刷新,设置其启动日期
// 并且设置 active 标志以及执行属性源(系统属性、环境变量)的任何初始化。
prepareRefresh();
// 告诉子类刷新 bean factory.
ConfigurableListableBeanFactory beanFactory = obtainFreshBeanFactory();
// 为上下文准备 bean factory.
prepareBeanFactory(beanFactory);

// 接下来的方法就是装载组件的方法
try {
// Allows post-processing of the bean factory in context subclasses.
postProcessBeanFactory(beanFactory);
// 使用beanFactory在上下文中注册bean
invokeBeanFactoryPostProcessors(beanFactory);
// 注册bean的拦截器
registerBeanPostProcessors(beanFactory);
// 加载国际化
initMessageSource();
// 初始化上下文的事件广播
initApplicationEventMulticaster();
// 加载特殊的bean
onRefresh();
// 加载所有的listeners并启动
registerListeners();
// 完成对所有的剩下的非懒加载的单例的创建
finishBeanFactoryInitialization(beanFactory);
// 最后发布对应的事件。
finishRefresh();
}
}
}

prepareRefresh 准备刷新方法

这个方法的作用就是为了接下来的refresh进行的准备。主要的有两个过程

  1. 调用initPropertySources()方法进行propertySource的初始化。
  2. 验证有没有缺失的必要的Property属性。

initPropertySources 初始化propertySource

调用实现类的initPropertySources,根据debug的结果,进入到了子类GenericWebApplication类中,对servletContex进行属性设置。如下图中所展示的。

图1

obtainFreshBeanFactory 获得beanFactory

该方法依靠refreshBeanFactory()来只是bean工厂的实际刷新。因为SpringBoot在ApplicationContext已经持有一个类型为DefaultListableBeanFactory类型的beanFactory。所以可以直接返回。

prepareBeanFactory准备BeanFactory

配置BeanFactory的标准上下文特征。主要体现在一下几个方面:

  1. 设置classLoader和bean名称的解析策略等。
  2. 设置以Aware结尾的callback接口函数。通过对这些接口的实现。来达到对环境设置的目的。如可继承ResourceLoaderAware接口,来设置资源加载器,来实现自定义的资源加载。
  3. 使用特定的自动装配值注册特殊依赖关系类型。如beanFactory.registerResolvableDependency(ApplicationContext.class, this);
  4. 设置环境相关的bean.如beanFactory.registerSingleton(ENVIRONMENT_BEAN_NAME, getEnvironment());

postProcessBeanFactory

允许在上下文子类中对bean进行后处理。调用相关方法完成对beanFactory的后置处理其的加载。
在之后的invokeBeanFactoryPostProcessors实例化并调用所有已注册的BeanFactoryPostProcessor bean。在方法registerBeanPostProcessors中实例化并注册所有BeanPostProcessor bean。

initMessageSource 初始化MessageSource

1
2
3
4
5
6
7
8
9
10
11
12
13
14
15
16
17
18
19
20
protected void initMessageSource() {
// 先获得bean工厂
ConfigurableListableBeanFactory beanFactory = getBeanFactory();
// 如果存在bean名称为messageSource的bean
// 也就是国际化的Message
if (beanFactory.containsLocalBean(MESSAGE_SOURCE_BEAN_NAME)) {
// 获得messageSource
this.messageSource = beanFactory.getBean(MESSAGE_SOURCE_BEAN_NAME, MessageSource.class);
// Make MessageSource aware of parent MessageSource.
if (this.parent != null && this.messageSource instanceof HierarchicalMessageSource) {
HierarchicalMessageSource hms = (HierarchicalMessageSource) this.messageSource;
if (hms.getParentMessageSource() == null) {
// Only set parent context as parent MessageSource if no parent MessageSource
// registered already.
hms.setParentMessageSource(getInternalParentMessageSource());
}
}
//。。。这里省略
}
}

在debug时的结果,因为SpringBoot默认实现类Message,所以容器会加载SpringBoot配置好的国际化配置文件。如图中的basenameSet;
图2

onRefresh

在这一步,SpringBoot会根据应用类型来判断,如果是web应用,则会启动默认的web容器,如tomcat。
它回去找所有的类型为ServletWebServerFactory的类。然后获取第一个getBeanFactory().getBean(beanNames[0], ServletWebServerFactory.class);进行bean注入。这样通过注入的bean就能够启动web容器了。

图3

SpringBoot中默认实现有以上几种。

registerListeners 注册listeners

在这一步,注册类型为ApplicationListener的所有listeners;

finishBeanFactoryInitialization 完成所有非懒加载的bean的初始化

finishRefresh 完成刷新

这步有以下几个操作。

  1. clearResourceCaches方法。 清空context-level的缓存。
  2. initLifecycleProcessor方法,用来设置生命周期processer
  3. 发布最后的事件(ContextRefreshedEvent)

以上就完成了refresh方法中的所有操作。

SpringBoot启动原理

Posted on 2019-08-05 | In SpringBoot
Words count in article: 2.2k | Reading time ≈ 9

SpringBoot的启动原理

创建启动器

SpringBoot通过调用主程序启动应用环境。下面代码为应用启动器的基本代码。

启动器

1
2
3
4
5
6
7
8
9
10
11
12
// 标注这是SpringBoot应用
@SpringBootApplication
// 开启cache
@EnableCaching
public class WebProjectApplication {
public static void main(String[] args) {
// fastJson不使用循环引用 ($ref)
JSON.DEFAULT_GENERATE_FEATURE |= SerializerFeature.DisableCircularReferenceDetect.getMask();
// 使用SpringApplication启动应用
SpringApplication.run(WebProjectApplication.class);
}
}

进入SpringApplication.run方法之后,发现程序会调用new SpringApplication 来创建应用。

1
2
3
public static ConfigurableApplicationContext run(Class<?>[] primarySources, String[] args){
return new SpringApplication(primarySources).run(args);
}

在new SpringApplication创建实例的过程中,应用容器会从加载一些主类。比如代码中所写的:

初始化SpringApplication

1
2
3
4
5
6
7
8
9
10
11
12
13
14
15
public SpringApplication(ResourceLoader resourceLoader, Class<?>... primarySources) {
// 这里的 primarySources 就是 上面的 WebProjectApplication
this.resourceLoader = resourceLoader;
Assert.notNull(primarySources, "PrimarySources must not be null");
this.primarySources = new LinkedHashSet<>(Arrays.asList(primarySources));
// 根据classpath 来判断应当启动什么样的应用程序? 1. 非web 2.web并使用内容selvlet容器
// 3. web 但不实用内置web容器
this.webApplicationType = WebApplicationType.deduceFromClasspath();
// 设置 Initializer
setInitializers((Collection) getSpringFactoriesInstances(ApplicationContextInitializer.class));
// 设置 Listener
setListeners((Collection) getSpringFactoriesInstances(ApplicationListener.class));
//判断主运行程序是哪个,比如有多个主程序,到底使用哪个。
this.mainApplicationClass = deduceMainApplicationClass();
}

在创建的过程中,在setInitializers和setListeners的过程是类似的。主要方法就是从META-INF/spring.factories中加载特定的key值下的value。

1
2
3
4
5
6
7
8
9
10
private <T> Collection<T> getSpringFactoriesInstances(Class<T> type, Class<?>[] parameterTypes, Object... args) {
ClassLoader classLoader = getClassLoader();
// 使用set加载所有的全类名
Set<String> names = new LinkedHashSet<>(SpringFactoriesLoader.loadFactoryNames(type, classLoader));
// 根据类名通过反射创建实例
List<T> instances = createSpringFactoriesInstances(type, parameterTypes, classLoader, args, names);
AnnotationAwareOrderComparator.sort(instances);
// 返回实例
return instances;
}

上面分析了getSpringFactoriesInstances这个方法是如何获取实例的,其中获取的途径就是使用SpringFactoriesLoader.loadFactoryNames获取全类名,然后通过反射进行创建实例。

1
2
3
4
5
6
7
8
9
10
11
12
13
14
15
16
public static List<String> loadFactoryNames(Class<?> factoryClass, @Nullable ClassLoader classLoader) {
// 获取传递进来的 类名
String factoryClassName = factoryClass.getName();
// 如果不存在就返回一个空的list,如果不为空则返回一个全类名的一个list
// 这个list是从下面是方法中的result中直接获取value
return loadSpringFactories(classLoader).getOrDefault(factoryClassName, Collections.emptyList());
}
// 节选一段代码来看loadSpringFactories 方法是如何实现的
private static Map<String, List<String>> loadSpringFactories(@Nullable ClassLoader classLoader) {
// 从路径上获取resource 这个路径正是 META-INF/spring.factories 加载所有的
// 这个路径下的url 组成一个result
Enumeration<URL> urls = (classLoader != null ?
classLoader.getResources(FACTORIES_RESOURCE_LOCATION) :
ClassLoader.getSystemResources(FACTORIES_RESOURCE_LOCATION));
result = new LinkedMultiValueMap<>();
while (urls.hasMoreElements()) { // 循环

上面的一系列方法只是为给SpringApplication进行初始化的相关操作,下一步,调用SpringApplication.run正式运行容器.

启动器启动

在新建完SpringApplication后,使用run方法正式启动容器

1
2
3
4
5
6
7
8
9
10
11
12
13
14
15
16
17
18
19
20
21
22
23
24
25
26
27
28
29
30
31
32
33
34
35
36
37
38
39
40
41
42
43
44
45
46
47
48
49
50
new SpringApplication(primarySources).run(args);
// 这个run方法直接调用的是以下代码

public ConfigurableApplicationContext run(String... args) {
// 创建一个跑表
StopWatch stopWatch = new StopWatch();
stopWatch.start();
ConfigurableApplicationContext context = null;
// arrayList类型的Exception Reporters
Collection<SpringBootExceptionReporter> exceptionReporters = new ArrayList<>();
// 配置headless
configureHeadlessProperty();
// 获取所有的listeners
SpringApplicationRunListeners listeners = getRunListeners(args);
// 启动listeners
listeners.starting();
try {
// 封装命令行args
ApplicationArguments applicationArguments = new DefaultApplicationArguments(args);
//准备环境
ConfigurableEnvironment environment = prepareEnvironment(listeners, applicationArguments);
//通过设置spring.beaninfo.ignore来忽略bean设置
configureIgnoreBeanInfo(environment);
// 打印Spring标记
Banner printedBanner = printBanner(environment);
// 策略创建指定的applicationContext
context = createApplicationContext();
exceptionReporters = getSpringFactoriesInstances(SpringBootExceptionReporter.class,
new Class[] { ConfigurableApplicationContext.class }, context);
prepareContext(context, environment, listeners, applicationArguments, printedBanner);
// 刷新上下文,创建ioc
refreshContext(context);
// 在上下文刷新之后调用
afterRefresh(context, applicationArguments);
stopWatch.stop();
if (this.logStartupInfo) {
new StartupInfoLogger(this.mainApplicationClass).logStarted(getApplicationLog(), stopWatch);
}
// 完成监听器的启动
listeners.started(context);
// 调用callRunners
callRunners(context, applicationArguments);
}
catch (Throwable ex) {
handleRunFailure(context, ex, exceptionReporters, listeners);
throw new IllegalStateException(ex);
}

try {
listeners.running(context);

getRunListeners方法与启动Listeners

获得所有的listeners,然后调用 listeners.starting();运行监听器。

在这个方法中,使用到了getSpringFactoriesInstances方法,上面说到,这个方法实际上就是从spring.factory中获取所有的key为特定值的类。在getRunListeners方法里就是获取所有的key为SpringApplicationRunListener的所有value。参考下图中内容:

图1

1
2
3
4
5
private SpringApplicationRunListeners getRunListeners(String[] args) {
Class<?>[] types = new Class<?>[] { SpringApplication.class, String[].class };
return new SpringApplicationRunListeners(logger,
getSpringFactoriesInstances(SpringApplicationRunListener.class, types, this, args));
}

经过上面的步骤,就可以获取到所有的RunListeners。使用starting方法来批量的开启listener。其内部实现如下面的代码。是使用for循环将所有加载到的listeners启动。

1
2
3
4
5
public void starting() {
for (SpringApplicationRunListener listener : this.listeners) {
listener.starting();
}
}

prepareEnvironment 准备环境

1
2
3
4
5
6
7
8
9
10
11
12
13
14
15
16
17
18
19
private ConfigurableEnvironment prepareEnvironment(SpringApplicationRunListeners listeners,
ApplicationArguments applicationArguments) {
// 获得配置环境
ConfigurableEnvironment environment = getOrCreateEnvironment();
// 配置环境
configureEnvironment(environment, applicationArguments.getSourceArgs());
// 在环境准备好后立即调用监听器的environmentPrepared方法
// 需要在SpringApplication创建之前执行
listeners.environmentPrepared(environment);
// 绑定到SpringApplication
bindToSpringApplication(environment);
if (!this.isCustomEnvironment) {
environment = new EnvironmentConverter(getClassLoader()).convertEnvironmentIfNecessary(environment,
deduceEnvironmentClass());
}
//将ConfigurationPropertySources支持指定的环境。
ConfigurationPropertySources.attach(environment);
return environment;
}

在配置环境的过程中,需要配置properties属性和profile。

1
2
3
4
5
6
7
8
9
10
protected void configureEnvironment(ConfigurableEnvironment environment, String[] args) {
// 如果需要进行在properties属性上的类型转换
if (this.addConversionService) {
ConversionService conversionService = ApplicationConversionService.getSharedInstance();
environment.setConversionService((ConfigurableConversionService) conversionService);
}
configurePropertySources(environment, args);
// 配置profile,包括激活的配置文件等。
configureProfiles(environment, args);
}

configureProfiles 配置profile

1
2
3
4
5
6
7
8
protected void configureProfiles(ConfigurableEnvironment environment, String[] args) {
//设置激活的profile,可以通过属性 spring.profiles.active来设置
environment.getActiveProfiles();
Set<String> profiles = new LinkedHashSet<>(this.additionalProfiles);
profiles.addAll(Arrays.asList(environment.getActiveProfiles()));
// 在环境中设置激活的profiles
environment.setActiveProfiles(StringUtils.toStringArray(profiles));
}

printBanner 打印标志

printBanner方法用来打印运行程序时的标志,见下图

图2

这个方法最后通过print方法来输出

1
2
3
4
5
6
7
8
9
10
11
12
13
14
public Banner print(Environment environment, Class<?> sourceClass, PrintStream out) {
// 获取banner
Banner banner = getBanner(environment);
banner.printBanner(environment, sourceClass, out);
return new PrintedBanner(banner, sourceClass);
}

// 默认是 DEFAULT_BANNER
private static final String[] BANNER = { "", " . ____ _ __ _ _",
" /\\\\ / ___'_ __ _ _(_)_ __ __ _ \\ \\ \\ \\", "( ( )\\___ | '_ | '_| | '_ \\/ _` | \\ \\ \\ \\",
" \\\\/ ___)| |_)| | | | | || (_| | ) ) ) )", " ' |____| .__|_| |_|_| |_\\__, | / / / /",
" =========|_|==============|___/=/_/_/_/" };

private static final String SPRING_BOOT = " :: Spring Boot :: ";

createApplicationContext 创建应用上下文环境

createApplicationContext方法用来策略创建指定的applicationContext;

1
2
3
4
5
6
7
8
9
10
11
12
13
14
15
16
17
18
19
20
21
22
23
24
25
26
27
28
29
protected ConfigurableApplicationContext createApplicationContext() {
Class<?> contextClass = this.applicationContextClass;
if (contextClass == null) {
try {
switch (this.webApplicationType) {
// 如果是servlet环境
case SERVLET:
// 创建AnnotationConfigServletWebServerApplicationContext
// 适用于默认的web环境
contextClass = Class.forName(DEFAULT_SERVLET_WEB_CONTEXT_CLASS);
break;
case REACTIVE:
// 创建AnnotationConfigReactiveWebServerApplicationContext
// 适用于reactive web环境
contextClass = Class.forName(DEFAULT_REACTIVE_WEB_CONTEXT_CLASS);
break;
default:
// 创建AnnotationConfigApplicationContext,非web环境
contextClass = Class.forName(DEFAULT_CONTEXT_CLASS);
}
}
catch (ClassNotFoundException ex) {
throw new IllegalStateException(
"Unable create a default ApplicationContext, " + "please specify an ApplicationContextClass",
ex);
}
}
return (ConfigurableApplicationContext) BeanUtils.instantiateClass(contextClass);
}

prepareContext 准备上下文

1
2
3
4
5
6
7
8
9
10
11
12
13
14
15
16
17
18
19
20
21
22
private void prepareContext(ConfigurableApplicationContext context, ConfigurableEnvironment environment,
SpringApplicationRunListeners listeners, ApplicationArguments applicationArguments, Banner printedBanner) {
context.setEnvironment(environment);
/**
* 后置处理context
* 1. 创建一个单例的beanNameGenerator
* 2. 如果resourceLoader不为空,则设置resourceLoader和classLoader\
* 3. 设置用于属性值转换的ConversionService
*/
postProcessApplicationContext(context);
// 通过在 初始化SpringApplication 这里设置的Initializers来对环境进行设置
applyInitializers(context);
// 告诉监听器上下文准备好了
listeners.contextPrepared(context);
if (this.logStartupInfo) {
logStartupInfo(context.getParent() == null);
logStartupProfileInfo(context);
}
// ... 中间省略
// 再次调用监听器的事件,通知监听器上下文已经加载完成
listeners.contextLoaded(context);
}

refreshContext 刷新上下文

用于刷新上下文,刷新上下文的过程其实就是IOC容器初始化的过程(扫描、加载、创建所有的组件)。如果是web应用,还会自动启动嵌入式的tomcat.具体方法会单拿出来一篇来分析refresh的过程。

1
2
3
4
5
6
7
8
9
10
11
12
13
14
15
16
17
18
19
20
21
22
23
24
25
26
27
28
29
30
31
32
33
34
@Override
public void refresh() throws BeansException, IllegalStateException {
synchronized (this.startupShutdownMonitor) {
// 准备此上下文以进行刷新,设置其启动日期
// 并且设置 active 标志以及执行属性源(系统属性、环境变量)的任何初始化。
prepareRefresh();
// 告诉子类刷新 bean factory.
ConfigurableListableBeanFactory beanFactory = obtainFreshBeanFactory();
// 为上下文准备 bean factory.
prepareBeanFactory(beanFactory);

// 接下来的方法就是装载组件的方法
try {
// Allows post-processing of the bean factory in context subclasses.
postProcessBeanFactory(beanFactory);
// 使用beanFactory在上下文中注册bean
invokeBeanFactoryPostProcessors(beanFactory);
// 注册bean的拦截器
registerBeanPostProcessors(beanFactory);
// 加载国际化
initMessageSource();
// 初始化上下文的事件广播
initApplicationEventMulticaster();
// 加载特殊的bean
onRefresh();
// 加载所有的listeners并启动
registerListeners();
// 完成对所有的剩下的非懒加载的单例的创建
finishBeanFactoryInitialization(beanFactory);
// 最后发布对应的事件。
finishRefresh();
}
}
}

调用callRunners

启动过程图解

使用一张简单的流程图将上面所有的主要方法串联起来,来查看SpringBoot的启动流程。

图3

在整个启动流程的过程中又一个重要的组件就是listeners.它来监听应用运行的过程。在程序中的体现就是特定的节点调用listeners的回调方法。具体的调用listeners过程如下图所展示的:

图4

结束

这篇文章根据代码来分析SpringBoot的启动过程。分析的比较潦草,有些地方分析的不清晰或者分析出错的地方,欢迎指正,共同进步!。

SpringBoot的错误处理机制

Posted on 2019-07-17 | In SpringBoot
Words count in article: 2k | Reading time ≈ 8

在web开发中的异常错误处理

SpringBoot默认有一套对web开发错误处理的机制,在autoConfiguration包下面找到了ErrorMvcAutoConfiguration。

1
2
3
4
5
6
7
8
@Configuration
// 只有基于servlet的web程序
@ConditionalOnWebApplication(type = Type.SERVLET)
@ConditionalOnClass({ Servlet.class, DispatcherServlet.class })
// 需要先加载WebMvcAutoConfiguration
@AutoConfigureBefore(WebMvcAutoConfiguration.class)
@EnableConfigurationProperties({ ServerProperties.class, ResourceProperties.class, WebMvcProperties.class })
public class ErrorMvcAutoConfiguration {

处理机制

在这个自动配置类中,由三个最基本的bean组件组成,下面挨个看这些注入到容器中的bean的含义

errorPageCustomizer 定义错误页面

1
2
3
4
5
6
7
8
9
10
11
12
13
14
15
16
@Bean
public ErrorPageCustomizer errorPageCustomizer() {
return new ErrorPageCustomizer(this.serverProperties, this.dispatcherServletPath);
}

// 在ErrorPageCustomizer有一个registerErrorPages 注册页面的方法
public void registerErrorPages(ErrorPageRegistry errorPageRegistry) {
ErrorPage errorPage = new ErrorPage(
// 用于获取error页面的地址
this.dispatcherServletPath.getRelativePath(this.properties.getError().getPath()));
errorPageRegistry.addErrorPages(errorPage);
}
// 地址在 this.properties.getError().getPath()变量中具体的值:
@Value("${error.path:/error}")
// 配置文件中error.path下的/error或者根目录下的/error文件夹
private String path = "/error";

所以errorPageCustomizer的主要功能就是找到地址,拼装成ErrorPage;

WhitelabelErrorViewConfiguration 空白页的配置

1
2
3
4
5
6
7
8
9
protected static class WhitelabelErrorViewConfiguration {
// 在StaticView中定义了默认的Whitelabel页面格式,
private final StaticView defaultErrorView = new StaticView();

@Bean(name = "error")
@ConditionalOnMissingBean(name = "error")
public View defaultErrorView() {
return this.defaultErrorView;
}

basicErrorController 控制器

basicErrorController就是简单的控制器

1
2
3
4
5
@Controller //controller实现 注册到容器中
// 错误映射地址 error.path 或
// server.error.path 下 /error
@RequestMapping("${server.error.path:${error.path:/error}}")
public class BasicErrorController extends AbstractErrorController

在这个Controller中映射到了/error地址上,有具有两个RequestMapping进行映射。

请求的媒体类型为text/html时

1
2
3
4
5
6
7
8
9
10
11
12
13
@RequestMapping(produces = MediaType.TEXT_HTML_VALUE)
// 媒体类型为 text/html 时候使用这个对/error的接收
public ModelAndView errorHtml(HttpServletRequest request, HttpServletResponse response) {
// 获得request中的状态码
// Integer statusCode =
// (Integer) request.getAttribute("javax.servlet.error.status_code");
HttpStatus status = getStatus(request);
Map<String, Object> model = Collections
.unmodifiableMap(getErrorAttributes(request, isIncludeStackTrace(request, MediaType.TEXT_HTML)));
response.setStatus(status.value());
ModelAndView modelAndView = resolveErrorView(request, response, status, model);
return (modelAndView != null) ? modelAndView : new ModelAndView("error", model);
}

其中使用夫类中的getErrorAttributes方法来获取基本属性数据,通过return this.errorAttributes.getErrorAttributes(webRequest, includeStackTrace)直接调用已经注入到容器中的ErrorAttributes类及其子类。如默认的DefaultErrorAttributes。

1
2
3
4
5
6
7
8
9
10
11
12
13
14
@Override
public Map<String, Object> getErrorAttributes(WebRequest webRequest, boolean includeStackTrace) {
Map<String, Object> errorAttributes = new LinkedHashMap<>();
// 返回到页面的当前系统时间
errorAttributes.put("timestamp", new Date());
// 下面的 javax.xxxx 都是从requeset中得到的
// 返回状态码 javax.servlet.error.status_code
addStatus(errorAttributes, webRequest);
//错误信息 avax.servlet.error.message
addErrorDetails(errorAttributes, webRequest, includeStackTrace);
// 请求路径 javax.servlet.error.request_uri
addPath(errorAttributes, webRequest);
return errorAttributes;
}

在获取完需要返回的数据之后,返回一个modelAndView对象,也就是一个带有显示的界面。

默认使用DefaultErrorViewResolver来进行对ErrorView的解析。

1
2
3
4
5
6
7
8
9
10
@Override
public ModelAndView resolveErrorView(HttpServletRequest request, HttpStatus status, Map<String, Object> model) {
// 获取modelandview对象
ModelAndView modelAndView = resolve(String.valueOf(status.value()), model);
if (modelAndView == null && SERIES_VIEWS.containsKey(status.series())) {
// 如果没有modelandview
modelAndView = resolve(SERIES_VIEWS.get(status.series()), model);
}
return modelAndView;
}

如果没有通过resolve方法找到一个modelAndView。则会有类似通过 5xx.html 页面来展示5开头的那些错误的页面。可选值有下面两种:

1
2
3
views.put(Series.CLIENT_ERROR, "4xx");
views.put(Series.SERVER_ERROR, "5xx");
SERIES_VIEWS = Collections.unmodifiableMap(views);
1
2
3
4
5
6
7
8
9
10
11
12
13
14
15
16
// 使用resolve方法来获取ModelAndView
private ModelAndView resolve(String viewName, Map<String, Object> model) {
//这里的viewName为状态编码,视图为 error/「状态码值」

String errorViewName = "error/" + viewName;
TemplateAvailabilityProvider provider = this.templateAvailabilityProviders.getProvider(errorViewName,
this.applicationContext);
if (provider != null) {
// 如403错误,那么就会返回 error/403.html 前提是有模版引擎
return new ModelAndView(errorViewName, model);
}
// 没有就去 { "classpath:/META-INF/resources/",
// "classpath:/resources/", "classpath:/static/", "classpath:/public/" };
// 这几个路径上找 路径下的error/xxx.html,这些路径就是默认的资源文件路径
return resolveResource(errorViewName, model);
}

如果到上一步仍不存在view则说明,模版引擎/基本资源文件夹下均不存在error文件夹下的xxx.html文件,则会返回一个默认的view 。(modelAndView != null) ? modelAndView : new ModelAndView("error", model);,就是在标题【WhitelabelErrorViewConfiguration】中提及到的StaticView。

请求为其他媒体类型

1
2
3
4
5
6
7
@RequestMapping
public ResponseEntity<Map<String, Object>> error(HttpServletRequest request) {
Map<String, Object> body = getErrorAttributes(request, isIncludeStackTrace(request, MediaType.ALL));
HttpStatus status = getStatus(request);
// 直接返回map
return new ResponseEntity<>(body, status);
}

errorAttributes 错误页面属性信息

1
2
3
4
5
@Bean
@ConditionalOnMissingBean(value = ErrorAttributes.class, search = SearchStrategy.CURRENT)
public DefaultErrorAttributes errorAttributes() {
return new DefaultErrorAttributes(this.serverProperties.getError().isIncludeException());
}

这个bean主要是使用getErrorAttributes提供ErrorController返回值的信息,如果状态码等。。如果想更改错误信息的返回值内容,可以继承DefaultErrorAttributes,然后在getErrorAttributes方法里添加想要添加的内容即可。

添加错误页面和修改返回信息

下面具体来根据SpringBoot特性来添加错误页面,如404,500等。

​ 因为在处理机制这章里说明了SpringBoot如何处理错误,他会默认的访问/error/地址,并且如果是text/html的媒体类型,也就是网页访问的话,如果有模版引擎,他会去找在/error文件中对应编码的xxx.html页面进而去渲染这个页面。

​ 比如访问404,他会去找classpath:/error/404.html页面去渲染,如果没有,他会去找classpath:/error/4xx.html,如果还没有,他会返回一个页面。

添加error页面

​ 为了演示,创建404.html和4xx.html,来达到这样的目的:如果发生404错误,则访问404.html页面,如果发生402或者以4开头的错误,则访问4xx.html页面。

目录结构和示例内容参考如下:

定义异常和对应的异常处理

1
2
3
4
5
6
7
8
9
10
11
12
13
14
15
16
17
18
19
20
21
22
23
24
25
26
27
28
29
30
31
32
33
34
35
36
37
38
39
40
41
42
43
44
45
46
47
48
49
50
51
52
53
54
public class NoAuthException extends RuntimeException {
public NoAuthException() {
super("无权限异常");
}
}

public class NoUserExcetion extends RuntimeException {
public NoUserExcetion() {
super("无用户异常");
}
}

// 异常处理类
@ControllerAdvice
public class MyExecptionHandler {

// 处理NoAuthException 异常
@ExceptionHandler(value = NoAuthException.class)
public String handlerNoAuthException(HttpServletRequest request){
// 这是必须的;定义返回的code值,返回指定的错误页面
request.setAttribute("javax.servlet.error.status_code",402);
Map<String,Object> map = new HashMap<>();
map.put("code",402);
map.put("message","this is my no auth message");
// 将自定义信息放入 request中
request.setAttribute("errData",map);
return "forward:/error";
}
//处理NoUserExcetion 异常
@ExceptionHandler(value = NoUserExcetion.class)
public String handlerNoUserException(HttpServletRequest request){
request.setAttribute("javax.servlet.error.status_code",400);
Map<String,Object> map = new HashMap<>();
map.put("code",404);
map.put("message","this is my no auth message");
request.setAttribute("errData",map);
return "forward:/error";
}
}

// controller类
@RequestMapping("/hello")
@ResponseBody
public String hello(String name){
if("abc".equals(name)){
// 如果是 /hello?name=abc的时候抛出NoAuthException异常 跳转到4xx页面
throw new NoAuthException();
}
if("123".equals(name)){
// 如果是 /hello?name=123的时候抛出NoUserExcetion的异常 跳转到404页面
throw new NoUserExcetion();
}
return "hello world";
}

定义自定义属性类

1
2
3
4
5
6
7
8
9
10
11
12
13
@Component
// 放到容器中,默认会替换到springboot的默认的DefaultErrorAttributes
public class MyErrorAttributes extends DefaultErrorAttributes {
@Override
public Map<String, Object> getErrorAttributes(WebRequest webRequest, boolean includeStackTrace) {
// 获取DefaultErrorAttributes的基本属性
Map<String,Object> map = super.getErrorAttributes(webRequest,includeStackTrace);
Map<String,Object> errData = (Map<String, Object>) webRequest.getAttribute("errData", 0);
// 从request中获取自定义的data,添加到返回的信息中。
map.put("errData",errData);
return map;
}
}

通过以上的设置,可以得到如下结果:

  • 如果是 /hello?name=abc的时候抛出NoAuthException异常 跳转到4xx页面
  • 如果是 /hello?name=123的时候抛出NoUserExcetion的异常 跳转到404页面
  • 如果没有访问地址也会到404页面

测试结果

  • 访问/hello?name=abc 跳转到4xx页面

4xx

  • 访问/hello?name=123 跳转到404页面

400

结论

在考虑对web错误页面处理的角度,无非就是两个方面:

一、 页面样式

​ 在有模版引擎的情况下,通过DefaultErrorController在/error上的访问处理,来自动渲染在template/error/目录下的对应的错误code.html的的展示,如404.html。并且支持模糊匹配,如创建4xx.html页面,那么如果没有发现特定的错误代码页面,则自动的使用4xx页面。

二、 页面内容

页面内容可以通过继承DefaultErrorAttributes类来进行简单的实现,如果想全部替换掉SpringBoot的默认全部的返回内容,则需要实现ErrorAttributes进行实现,需要注意的是必须放到容器中才能生效。

<i class="fa fa-angle-left"></i>1234…12<i class="fa fa-angle-right"></i>
NanYin

NanYin

Was mich nicht umbringt, macht mich starker.

111 posts
16 categories
21 tags
RSS
GitHub E-Mail
近期文章
  • ThreadLocal
  • Java的四种引用类型
  • Markdown语法入门
  • IDEA设置代码注释模板和JavaDoc文档生成
  • 基于Java的WebService实践
0%
© 2023 NanYin
|
本站访客数:
|
博客全站共140.1k字
|