SpringBoot启动原理

SpringBoot的启动原理

创建启动器

SpringBoot通过调用主程序启动应用环境。下面代码为应用启动器的基本代码。

启动器

1
2
3
4
5
6
7
8
9
10
11
12
// 标注这是SpringBoot应用
@SpringBootApplication
// 开启cache
@EnableCaching
public class WebProjectApplication {
public static void main(String[] args) {
// fastJson不使用循环引用 ($ref)
JSON.DEFAULT_GENERATE_FEATURE |= SerializerFeature.DisableCircularReferenceDetect.getMask();
// 使用SpringApplication启动应用
SpringApplication.run(WebProjectApplication.class);
}
}

进入SpringApplication.run方法之后,发现程序会调用new SpringApplication 来创建应用。

1
2
3
public static ConfigurableApplicationContext run(Class<?>[] primarySources, String[] args){
return new SpringApplication(primarySources).run(args);
}

new SpringApplication创建实例的过程中,应用容器会从加载一些主类。比如代码中所写的:

初始化SpringApplication

1
2
3
4
5
6
7
8
9
10
11
12
13
14
15
public SpringApplication(ResourceLoader resourceLoader, Class<?>... primarySources) {
// 这里的 primarySources 就是 上面的 WebProjectApplication
this.resourceLoader = resourceLoader;
Assert.notNull(primarySources, "PrimarySources must not be null");
this.primarySources = new LinkedHashSet<>(Arrays.asList(primarySources));
// 根据classpath 来判断应当启动什么样的应用程序? 1. 非web 2.web并使用内容selvlet容器
// 3. web 但不实用内置web容器
this.webApplicationType = WebApplicationType.deduceFromClasspath();
// 设置 Initializer
setInitializers((Collection) getSpringFactoriesInstances(ApplicationContextInitializer.class));
// 设置 Listener
setListeners((Collection) getSpringFactoriesInstances(ApplicationListener.class));
//判断主运行程序是哪个,比如有多个主程序,到底使用哪个。
this.mainApplicationClass = deduceMainApplicationClass();
}

在创建的过程中,在setInitializerssetListeners的过程是类似的。主要方法就是从META-INF/spring.factories中加载特定的key值下的value。

1
2
3
4
5
6
7
8
9
10
private <T> Collection<T> getSpringFactoriesInstances(Class<T> type, Class<?>[] parameterTypes, Object... args) {
ClassLoader classLoader = getClassLoader();
// 使用set加载所有的全类名
Set<String> names = new LinkedHashSet<>(SpringFactoriesLoader.loadFactoryNames(type, classLoader));
// 根据类名通过反射创建实例
List<T> instances = createSpringFactoriesInstances(type, parameterTypes, classLoader, args, names);
AnnotationAwareOrderComparator.sort(instances);
// 返回实例
return instances;
}

上面分析了getSpringFactoriesInstances这个方法是如何获取实例的,其中获取的途径就是使用SpringFactoriesLoader.loadFactoryNames获取全类名,然后通过反射进行创建实例。

1
2
3
4
5
6
7
8
9
10
11
12
13
14
15
16
public static List<String> loadFactoryNames(Class<?> factoryClass, @Nullable ClassLoader classLoader) {
// 获取传递进来的 类名
String factoryClassName = factoryClass.getName();
// 如果不存在就返回一个空的list,如果不为空则返回一个全类名的一个list
// 这个list是从下面是方法中的result中直接获取value
return loadSpringFactories(classLoader).getOrDefault(factoryClassName, Collections.emptyList());
}
// 节选一段代码来看loadSpringFactories 方法是如何实现的
private static Map<String, List<String>> loadSpringFactories(@Nullable ClassLoader classLoader) {
// 从路径上获取resource 这个路径正是 META-INF/spring.factories 加载所有的
// 这个路径下的url 组成一个result
Enumeration<URL> urls = (classLoader != null ?
classLoader.getResources(FACTORIES_RESOURCE_LOCATION) :
ClassLoader.getSystemResources(FACTORIES_RESOURCE_LOCATION));
result = new LinkedMultiValueMap<>();
while (urls.hasMoreElements()) { // 循环

上面的一系列方法只是为给SpringApplication进行初始化的相关操作,下一步,调用SpringApplication.run正式运行容器.

启动器启动

在新建完SpringApplication后,使用run方法正式启动容器

1
2
3
4
5
6
7
8
9
10
11
12
13
14
15
16
17
18
19
20
21
22
23
24
25
26
27
28
29
30
31
32
33
34
35
36
37
38
39
40
41
42
43
44
45
46
47
48
49
50
new SpringApplication(primarySources).run(args);
// 这个run方法直接调用的是以下代码

public ConfigurableApplicationContext run(String... args) {
// 创建一个跑表
StopWatch stopWatch = new StopWatch();
stopWatch.start();
ConfigurableApplicationContext context = null;
// arrayList类型的Exception Reporters
Collection<SpringBootExceptionReporter> exceptionReporters = new ArrayList<>();
// 配置headless
configureHeadlessProperty();
// 获取所有的listeners
SpringApplicationRunListeners listeners = getRunListeners(args);
// 启动listeners
listeners.starting();
try {
// 封装命令行args
ApplicationArguments applicationArguments = new DefaultApplicationArguments(args);
//准备环境
ConfigurableEnvironment environment = prepareEnvironment(listeners, applicationArguments);
//通过设置spring.beaninfo.ignore来忽略bean设置
configureIgnoreBeanInfo(environment);
// 打印Spring标记
Banner printedBanner = printBanner(environment);
// 策略创建指定的applicationContext
context = createApplicationContext();
exceptionReporters = getSpringFactoriesInstances(SpringBootExceptionReporter.class,
new Class[] { ConfigurableApplicationContext.class }, context);
prepareContext(context, environment, listeners, applicationArguments, printedBanner);
// 刷新上下文,创建ioc
refreshContext(context);
// 在上下文刷新之后调用
afterRefresh(context, applicationArguments);
stopWatch.stop();
if (this.logStartupInfo) {
new StartupInfoLogger(this.mainApplicationClass).logStarted(getApplicationLog(), stopWatch);
}
// 完成监听器的启动
listeners.started(context);
// 调用callRunners
callRunners(context, applicationArguments);
}
catch (Throwable ex) {
handleRunFailure(context, ex, exceptionReporters, listeners);
throw new IllegalStateException(ex);
}

try {
listeners.running(context);

getRunListeners方法与启动Listeners

获得所有的listeners,然后调用 listeners.starting();运行监听器。

在这个方法中,使用到了getSpringFactoriesInstances方法,上面说到,这个方法实际上就是从spring.factory中获取所有的key为特定值的类。在getRunListeners方法里就是获取所有的key为SpringApplicationRunListener的所有value。参考下图中内容:
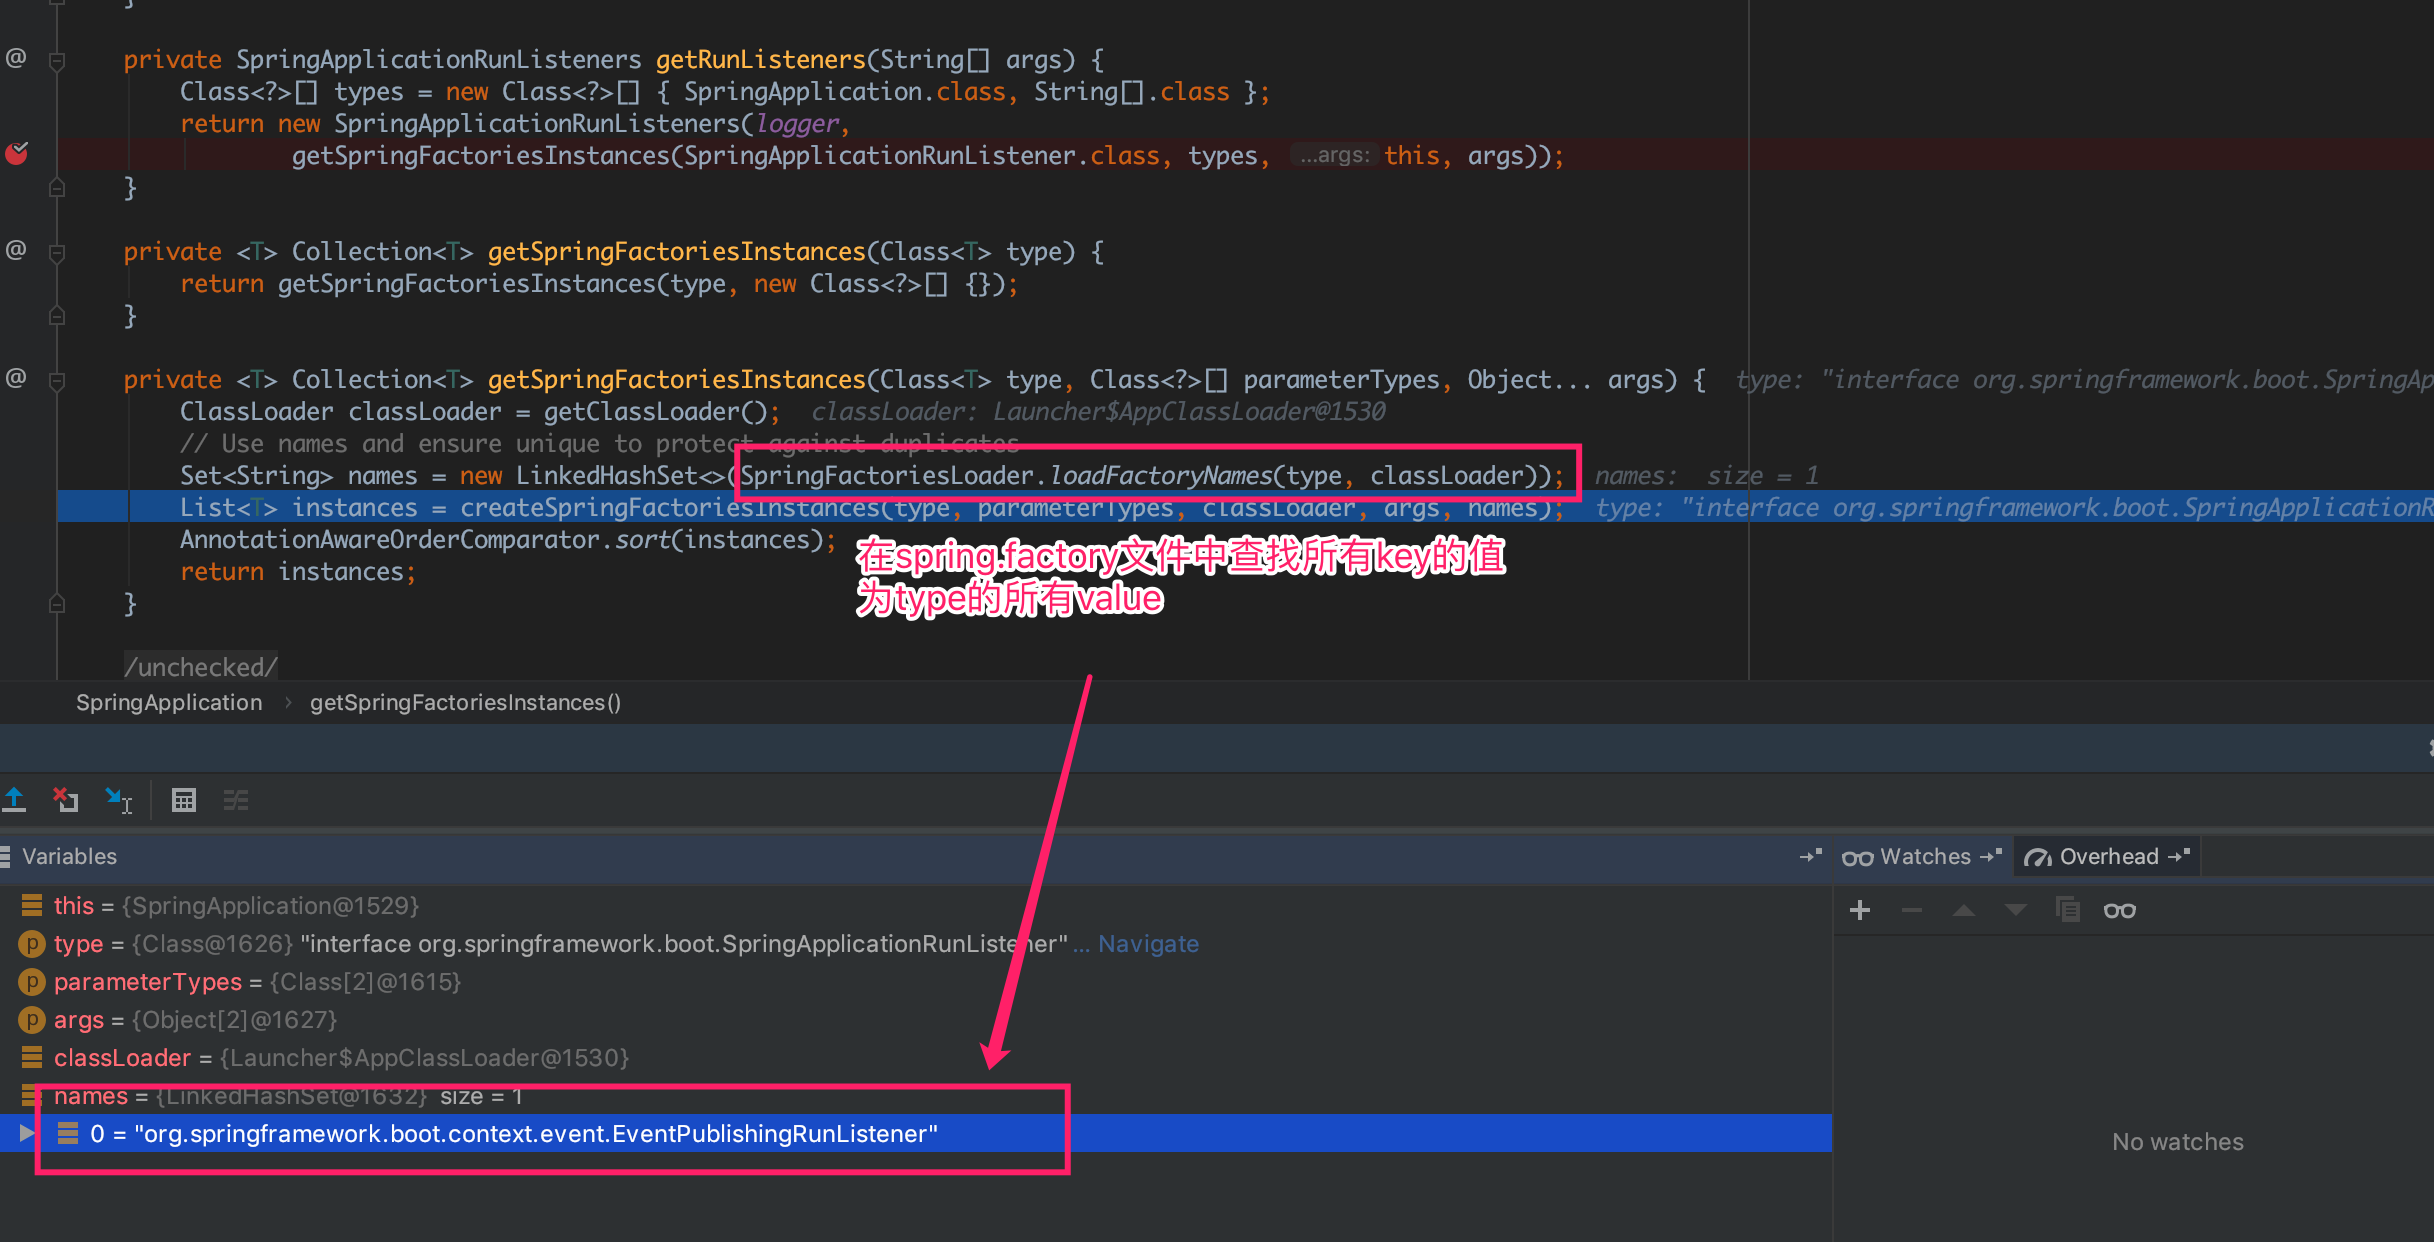
图1

1
2
3
4
5
private SpringApplicationRunListeners getRunListeners(String[] args) {
Class<?>[] types = new Class<?>[] { SpringApplication.class, String[].class };
return new SpringApplicationRunListeners(logger,
getSpringFactoriesInstances(SpringApplicationRunListener.class, types, this, args));
}

经过上面的步骤,就可以获取到所有的RunListeners。使用starting方法来批量的开启listener。其内部实现如下面的代码。是使用for循环将所有加载到的listeners启动。

1
2
3
4
5
public void starting() {
for (SpringApplicationRunListener listener : this.listeners) {
listener.starting();
}
}

prepareEnvironment 准备环境

1
2
3
4
5
6
7
8
9
10
11
12
13
14
15
16
17
18
19
private ConfigurableEnvironment prepareEnvironment(SpringApplicationRunListeners listeners,
ApplicationArguments applicationArguments) {
// 获得配置环境
ConfigurableEnvironment environment = getOrCreateEnvironment();
// 配置环境
configureEnvironment(environment, applicationArguments.getSourceArgs());
// 在环境准备好后立即调用监听器的environmentPrepared方法
// 需要在SpringApplication创建之前执行
listeners.environmentPrepared(environment);
// 绑定到SpringApplication
bindToSpringApplication(environment);
if (!this.isCustomEnvironment) {
environment = new EnvironmentConverter(getClassLoader()).convertEnvironmentIfNecessary(environment,
deduceEnvironmentClass());
}
//将ConfigurationPropertySources支持指定的环境。
ConfigurationPropertySources.attach(environment);
return environment;
}

在配置环境的过程中,需要配置properties属性和profile

1
2
3
4
5
6
7
8
9
10
protected void configureEnvironment(ConfigurableEnvironment environment, String[] args) {
// 如果需要进行在properties属性上的类型转换
if (this.addConversionService) {
ConversionService conversionService = ApplicationConversionService.getSharedInstance();
environment.setConversionService((ConfigurableConversionService) conversionService);
}
configurePropertySources(environment, args);
// 配置profile,包括激活的配置文件等。
configureProfiles(environment, args);
}

configureProfiles 配置profile

1
2
3
4
5
6
7
8
protected void configureProfiles(ConfigurableEnvironment environment, String[] args) {
//设置激活的profile,可以通过属性 spring.profiles.active来设置
environment.getActiveProfiles();
Set<String> profiles = new LinkedHashSet<>(this.additionalProfiles);
profiles.addAll(Arrays.asList(environment.getActiveProfiles()));
// 在环境中设置激活的profiles
environment.setActiveProfiles(StringUtils.toStringArray(profiles));
}

printBanner 打印标志

printBanner方法用来打印运行程序时的标志,见下图

图2

这个方法最后通过print方法来输出

1
2
3
4
5
6
7
8
9
10
11
12
13
14
public Banner print(Environment environment, Class<?> sourceClass, PrintStream out) {
// 获取banner
Banner banner = getBanner(environment);
banner.printBanner(environment, sourceClass, out);
return new PrintedBanner(banner, sourceClass);
}

// 默认是 DEFAULT_BANNER
private static final String[] BANNER = { "", " . ____ _ __ _ _",
" /\\\\ / ___'_ __ _ _(_)_ __ __ _ \\ \\ \\ \\", "( ( )\\___ | '_ | '_| | '_ \\/ _` | \\ \\ \\ \\",
" \\\\/ ___)| |_)| | | | | || (_| | ) ) ) )", " ' |____| .__|_| |_|_| |_\\__, | / / / /",
" =========|_|==============|___/=/_/_/_/" };

private static final String SPRING_BOOT = " :: Spring Boot :: ";

createApplicationContext 创建应用上下文环境

createApplicationContext方法用来策略创建指定的applicationContext;

1
2
3
4
5
6
7
8
9
10
11
12
13
14
15
16
17
18
19
20
21
22
23
24
25
26
27
28
29
protected ConfigurableApplicationContext createApplicationContext() {
Class<?> contextClass = this.applicationContextClass;
if (contextClass == null) {
try {
switch (this.webApplicationType) {
// 如果是servlet环境
case SERVLET:
// 创建AnnotationConfigServletWebServerApplicationContext
// 适用于默认的web环境
contextClass = Class.forName(DEFAULT_SERVLET_WEB_CONTEXT_CLASS);
break;
case REACTIVE:
// 创建AnnotationConfigReactiveWebServerApplicationContext
// 适用于reactive web环境
contextClass = Class.forName(DEFAULT_REACTIVE_WEB_CONTEXT_CLASS);
break;
default:
// 创建AnnotationConfigApplicationContext,非web环境
contextClass = Class.forName(DEFAULT_CONTEXT_CLASS);
}
}
catch (ClassNotFoundException ex) {
throw new IllegalStateException(
"Unable create a default ApplicationContext, " + "please specify an ApplicationContextClass",
ex);
}
}
return (ConfigurableApplicationContext) BeanUtils.instantiateClass(contextClass);
}

prepareContext 准备上下文

1
2
3
4
5
6
7
8
9
10
11
12
13
14
15
16
17
18
19
20
21
22
private void prepareContext(ConfigurableApplicationContext context, ConfigurableEnvironment environment,
SpringApplicationRunListeners listeners, ApplicationArguments applicationArguments, Banner printedBanner) {
context.setEnvironment(environment);
/**
* 后置处理context
* 1. 创建一个单例的beanNameGenerator
* 2. 如果resourceLoader不为空,则设置resourceLoader和classLoader\
* 3. 设置用于属性值转换的ConversionService
*/
postProcessApplicationContext(context);
// 通过在 初始化SpringApplication 这里设置的Initializers来对环境进行设置
applyInitializers(context);
// 告诉监听器上下文准备好了
listeners.contextPrepared(context);
if (this.logStartupInfo) {
logStartupInfo(context.getParent() == null);
logStartupProfileInfo(context);
}
// ... 中间省略
// 再次调用监听器的事件,通知监听器上下文已经加载完成
listeners.contextLoaded(context);
}

refreshContext 刷新上下文

用于刷新上下文,刷新上下文的过程其实就是IOC容器初始化的过程(扫描、加载、创建所有的组件)。如果是web应用,还会自动启动嵌入式的tomcat.具体方法会单拿出来一篇来分析refresh的过程。

1
2
3
4
5
6
7
8
9
10
11
12
13
14
15
16
17
18
19
20
21
22
23
24
25
26
27
28
29
30
31
32
33
34
@Override
public void refresh() throws BeansException, IllegalStateException {
synchronized (this.startupShutdownMonitor) {
// 准备此上下文以进行刷新,设置其启动日期
// 并且设置 active 标志以及执行属性源(系统属性、环境变量)的任何初始化。
prepareRefresh();
// 告诉子类刷新 bean factory.
ConfigurableListableBeanFactory beanFactory = obtainFreshBeanFactory();
// 为上下文准备 bean factory.
prepareBeanFactory(beanFactory);

// 接下来的方法就是装载组件的方法
try {
// Allows post-processing of the bean factory in context subclasses.
postProcessBeanFactory(beanFactory);
// 使用beanFactory在上下文中注册bean
invokeBeanFactoryPostProcessors(beanFactory);
// 注册bean的拦截器
registerBeanPostProcessors(beanFactory);
// 加载国际化
initMessageSource();
// 初始化上下文的事件广播
initApplicationEventMulticaster();
// 加载特殊的bean
onRefresh();
// 加载所有的listeners并启动
registerListeners();
// 完成对所有的剩下的非懒加载的单例的创建
finishBeanFactoryInitialization(beanFactory);
// 最后发布对应的事件。
finishRefresh();
}
}
}

调用callRunners

启动过程图解

使用一张简单的流程图将上面所有的主要方法串联起来,来查看SpringBoot的启动流程。
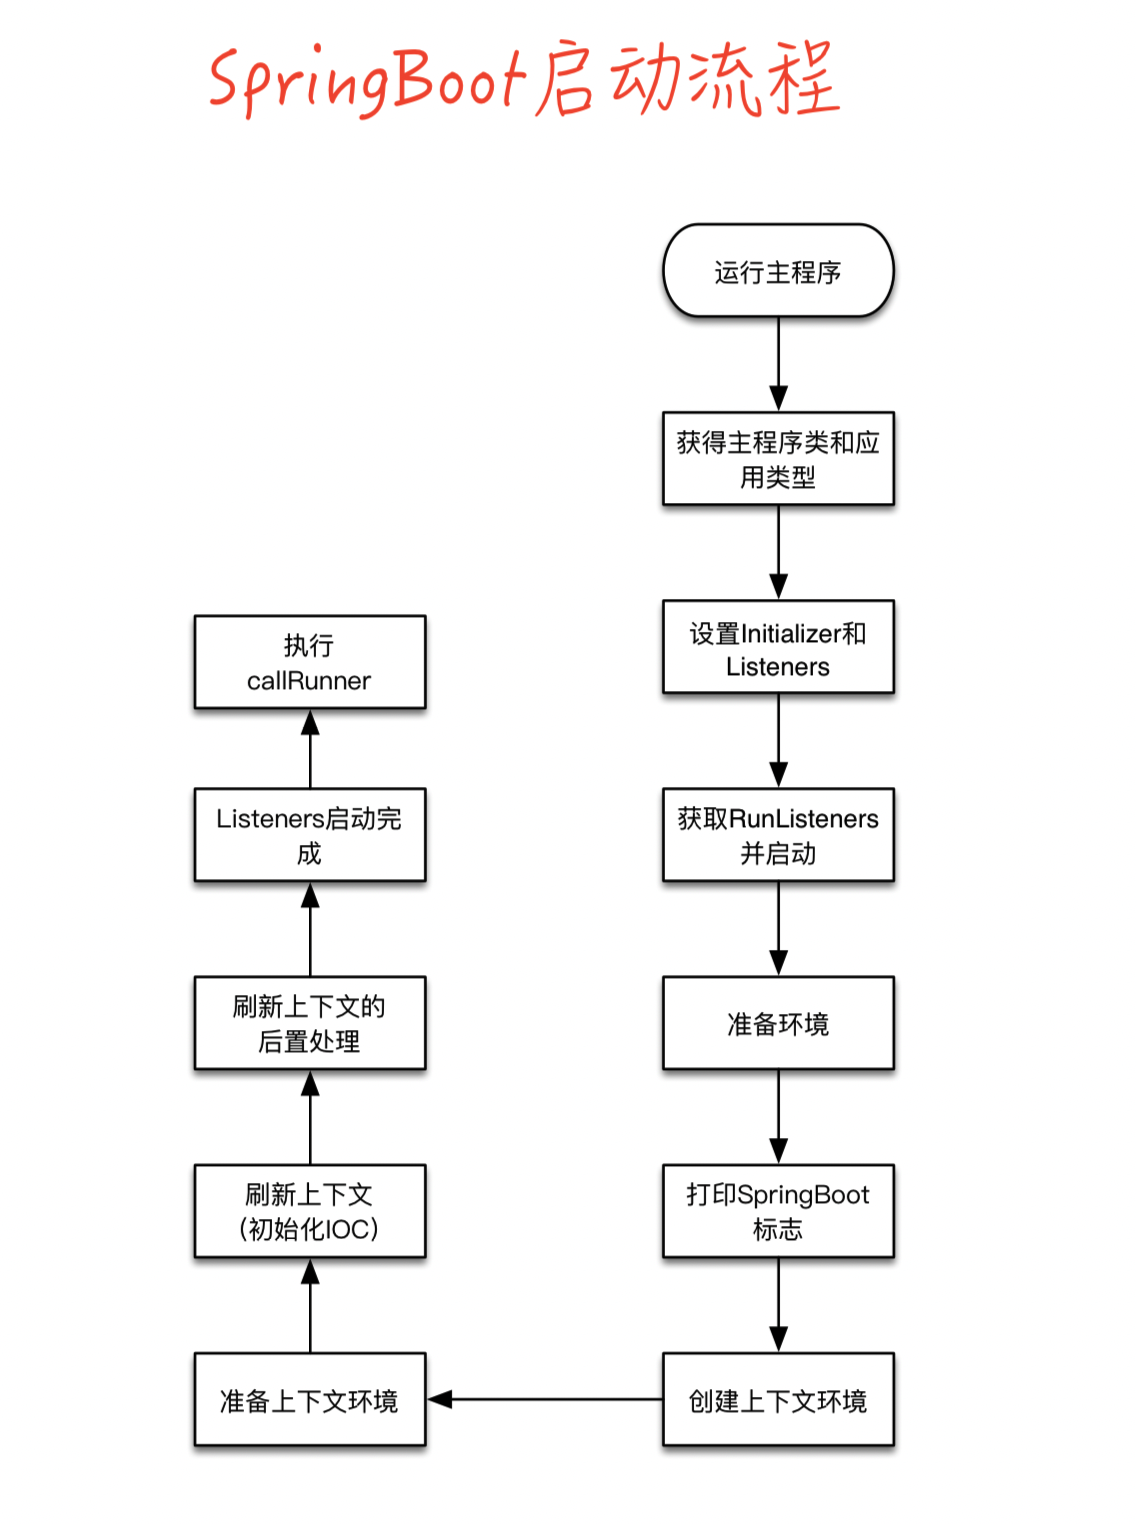
图3

在整个启动流程的过程中又一个重要的组件就是listeners.它来监听应用运行的过程。在程序中的体现就是特定的节点调用listeners的回调方法。具体的调用listeners过程如下图所展示的:
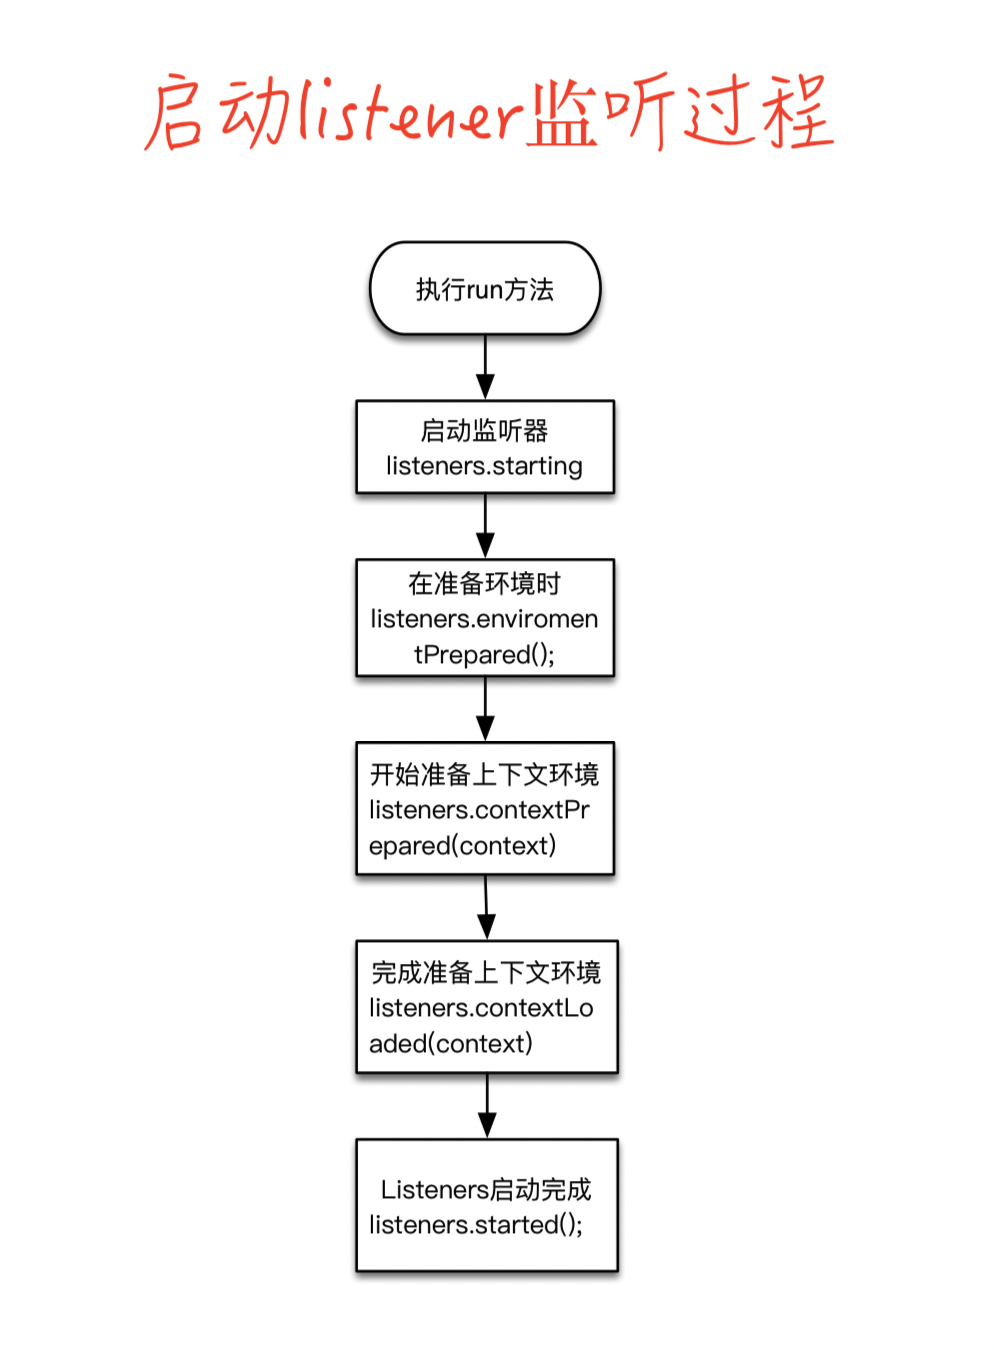
图4

结束

这篇文章根据代码来分析SpringBoot的启动过程。分析的比较潦草,有些地方分析的不清晰或者分析出错的地方,欢迎指正,共同进步!。

-------------本文结束感谢您的阅读-------------

本文标题:SpringBoot启动原理

文章作者:NanYin

发布时间:2019年08月05日 - 12:08

最后更新:2019年08月12日 - 23:08

原始链接:https://nanyiniu.github.io/2019/08/05/SpringBoot%E5%90%AF%E5%8A%A8%E5%8E%9F%E7%90%86/

许可协议: 署名-非商业性使用-禁止演绎 4.0 国际 转载请保留原文链接及作者。