SpringBoot的WEB开发之国际化

准备工作

SpringBoot默认是支持Thymeleaf模版引擎的。相应的如果使用Thymeleaf就可以使用thymeleaf的语法在页面显示返回给页面的数据。

使用thymeleaf

导入starter

autoConfig

如图,SpringBoot自动配置是导入有Thymeleaf相关自动配置文件的,但是,红色部分是缺少的部分,也就是说少包。自然SpringBoot会提供这些相关的包的starters.

那么在官网上的starters中可以找到spring-boot-starter-thymeleaf,说明SpringBoot提供Thymeleaf的starter需要导入,才能使用Thymeleaf

在SpringBoot中Thymeleaf的自动配置

1
2
3
4
5
6
7
8
9
10
11
12
13
@ConfigurationProperties(prefix = "spring.thymeleaf")
public class ThymeleafProperties {

// charset
private static final Charset DEFAULT_ENCODING = StandardCharsets.UTF_8;
// 默认加载模版的路径
public static final String DEFAULT_PREFIX = "classpath:/templates/";
// 默认加载的文件类型 是html
public static final String DEFAULT_SUFFIX = ".html";
// 可自己修改配置文件中的 前缀和后缀,如果 spring.thymeleaf.suffix=.htmlx
private String prefix = DEFAULT_PREFIX;

private String suffix = DEFAULT_SUFFIX;

使用Thymeleaf进行页面渲染

所以在SpringBoot中在Controller中使用如下:

1
2
3
4
5
6
7
8
@Controller
public class HelloController {
@RequestMapping("/home")
public String home(Map<String,String> map){
map.put("hello","Hello World~~~");
return "home";
}
}

这样映射器就会自动映射到classpath:/templates/home.html文件上。

在templates下建立home.html文件

1
2
3
4
5
6
7
8
9
10
11
<!DOCTYPE html>
<!--引入 xmlns:th 用于thymeleaf语法提示-->
<html lang="en" xmlns:th="http://www.thymeleaf.org">
<head>
<meta charset="UTF-8">
<title>Title</title>
</head>
<body>
<h1 th:text="${hello}">hello world</h1>
</body>
</html>

重启后查看http://localhost:8080/home发现已经可以让 /home 映射到 home.html 文件上了。并且根据我们传过来的值 Hello World~~~ 显示在页面上了。

Thymeleaf语法可直接参考官方的文档;

使用SpringMVC

SpringMvc框架是一种丰富model view controller 的web框架。SpringMVC通过使用 @Controller@RestController 完成对 HTTP 请求的处理。通过使用 @RequestMapping 完成对请求对controller的映射。

自动配置

SpringBootSpringMVC 在自动配置的时候,进行了很多默认的设置。包括前一篇文章中的关于静态资源加载的两种方式( Webjars 和本地加载位置),也是通过 SpringBoot 进行自动配置的。更多的 SpringBootSpringMVC 在哪些地方进行了自动配置,可以参考文档中的SpringMVC 特性

自动配置代码参考

ContentNegotiatingViewResolver这个bean来说,SpringMVC的自动配置类是如何对拓展的支持。

1
2
3
4
5
6
7
8
9
10
11
12
13
14
15
16
17
18
19
20
21
22
23
24
25
26
27
28
29
30
31
32
33
34
35
36
37
38
39
40
41
42
43
44
45
@Bean
@ConditionalOnBean(ViewResolver.class)
// 如果类路径中不存在ContentNegotiatingViewResolver这个类的时候
@ConditionalOnMissingBean(name = "viewResolver", value = ContentNegotiatingViewResolver.class)
public ContentNegotiatingViewResolver viewResolver(BeanFactory beanFactory) {
// 返回这个Resolver
ContentNegotiatingViewResolver resolver = new ContentNegotiatingViewResolver();
resolver.setContentNegotiationManager(beanFactory.getBean(ContentNegotiationManager.class));
// ContentNegotiatingViewResolver uses all the other view resolvers to locate
// a view so it should have a high precedence
resolver.setOrder(Ordered.HIGHEST_PRECEDENCE);
return resolver;
}

// ContentNegotiatingViewResolver 类中的初始化servlet容器方法
protected void initServletContext(ServletContext servletContext) {
// 找出所有的容器中的ViewResolver
Collection<ViewResolver> matchingBeans =
BeanFactoryUtils.beansOfTypeIncludingAncestors(obtainApplicationContext(), ViewResolver.class).values();
if (this.viewResolvers == null) {
this.viewResolvers = new ArrayList<>(matchingBeans.size());
// 循环添加到viewResolver中
for (ViewResolver viewResolver : matchingBeans) {
if (this != viewResolver) {
this.viewResolvers.add(viewResolver);
}
}
}

@Override
@Nullable
//实现ViewResolver的实现方法
public View resolveViewName(String viewName, Locale locale) throws Exception {
RequestAttributes attrs = RequestContextHolder.getRequestAttributes();
Assert.state(attrs instanceof ServletRequestAttributes, "No current ServletRequestAttributes");
List<MediaType> requestedMediaTypes = getMediaTypes(((ServletRequestAttributes) attrs).getRequest());
if (requestedMediaTypes != null) {
// 获取候选的view
// 在getCandidateViews这个方法里就是把全局的viewResolver循环一遍
List<View> candidateViews = getCandidateViews(viewName, locale, requestedMediaTypes);
// 寻找最好的/最合适的view
View bestView = getBestView(candidateViews, requestedMediaTypes, attrs);
if (bestView != null) {
return bestView;
}

通过上述代码的描述,可以发现如果自己实现ViewResolver,只需要实现ViewResolver后加入到容器中即可。SpringBoot会自动获取容器中的ViewResover。

定制开发

如果想保留 SpringBoot 的MVC特性,并且想去添加MVC配置如拦截器,视图控制器等,你可以添加自己的配置类,并且继承WebMvcConfigurer,但是需要注意的是不能使用 @EnableWebMvc 注解。如果使用 @EnableWebMvc 注解,则表示要你全面接管SpringMvc配置功能,不使用SpringBoot自动配置的功能。

  1. 使用bean的方式,让 InnerViewResolver 自动发现容器中的ViewResolver
1
2
3
4
5
6
7
8
9
10
11
12
13
14
15
16
@Configuration
//@EnableWebMvc // 使用这个注解表示完全不实用SpringBoot对SpringMVC的自动配置功能。
public class MvcConfig implements WebMvcConfigurer {

@Bean
public MyViewResolver myViewResolver(){
return new MyViewResolver();
}

class InnerViewResolver implements ViewResolver {

@Override
public View resolveViewName(String viewName, Locale locale) throws Exception {
return null;
}
}

这样将一个ViewResolver放到容器中,那么前面说到的 InnerViewResolver 会自动的发现这个bean来使用。

  1. 使用 WebMvcConfigurer 实现
1
2
3
4
5
6
7
8
9
10
11
12
13
14
15
16
17
18
19
20
21
22
23
24
@Configuration
//@EnableWebMvc
public class MvcConfig implements WebMvcConfigurer {

@Override
public void configureViewResolvers(ViewResolverRegistry registry)
{
registry.viewResolver(new InnerViewResolver());
}

@Override
public void addViewControllers(ViewControllerRegistry registry) {
registry.addRedirectViewController("/index","/home");
}

// ViewResolverRegistry 类中的viewResolver方法,直接添加到全局变量 viewResolvers中,代替前面的遍历
public void viewResolver(ViewResolver viewResolver) {
if (viewResolver instanceof ContentNegotiatingViewResolver) {
throw new BeanInitializationException(
"addViewResolver cannot be used to configure a ContentNegotiatingViewResolver. " +
"Please use the method enableContentNegotiation instead.");
}
this.viewResolvers.add(viewResolver);
}

继承WebMvcConfigurer使用继承方法,将类放到容器中。

国际化开发

下面从自动配置入手,来看SpringBoot是怎么配置国际化的。

让SpringBoot配置指定国际化文件

1
2
3
4
5
6
7
8
9
10
11
12
13
14
15
16
17
public class MessageSourceAutoConfiguration {

private static final Resource[] NO_RESOURCES = {};
// 在配置文件中可以进行配置的内容 以spring.message开头
@Bean
@ConfigurationProperties(prefix = "spring.messages")
public MessageSourceProperties messageSourceProperties() {
return new MessageSourceProperties();
}
/***********************MessageSourceProperties**********************/
public class MessageSourceProperties {

/**
* 以逗号分隔的基本名称列表 每一个都是在完整的路径下加载,比如 i18n.home,i18n.hello这样
* 如果在类路径上,就去掉i18n.
*/
private String basename = "messages";

如果对basename的值的设置仍有疑惑,那来直接看解析basename的代码。

1
2
3
4
5
6
7
8
9
10
11
12
13
14
15
16
17
18
19
20
21
22
23
24
25
26
27
28
29
public ConditionOutcome getMatchOutcome(ConditionContext context, AnnotatedTypeMetadata metadata) {
// 获得propertiesf中的spring.messages.basename属性,如果没有默认是messages
String basename = context.getEnvironment().getProperty("spring.messages.basename", "messages");
ConditionOutcome outcome = cache.get(basename);
if (outcome == null) {
// 调用方法解析basename
outcome = getMatchOutcomeForBasename(context, basename);
cache.put(basename, outcome);
}
return outcome;
}

private ConditionOutcome getMatchOutcomeForBasename(ConditionContext context, String basename) {
ConditionMessage.Builder message = ConditionMessage.forCondition("ResourceBundle");
for (String name : StringUtils.commaDelimitedListToStringArray(StringUtils.trimAllWhitespace(basename))) {
// 将basename以逗号分隔,循环这个数组
for (Resource resource : getResources(context.getClassLoader(), name)) {
// 这里的getResource方法 是加载classpath + name + .properties中的内容
// 所以国际化文件只支持 properties文件,其他文件不支持
// return new PathMatchingResourcePatternResolver(classLoader)
// .getResources("classpath*:" + target + ".properties");
if (resource.exists()) {
// 对每一个获取Resource 新建一个match实例对象
return ConditionOutcome.match(message.found("bundle").items(resource));
}
}
}
return ConditionOutcome.noMatch(message.didNotFind("bundle with basename " + basename).atAll());
}

国际化步骤

上面通过对SpringBoot对国际化的配置的分析,知道了在properties文件中怎么更改国际化文件的配置信息。下面来具体操作,进行国际化。

默认的国际化

创建国际化的properties

在resources文件夹下创建文件夹i18n ,在文件夹下右键创建Resource Bundle 文件。
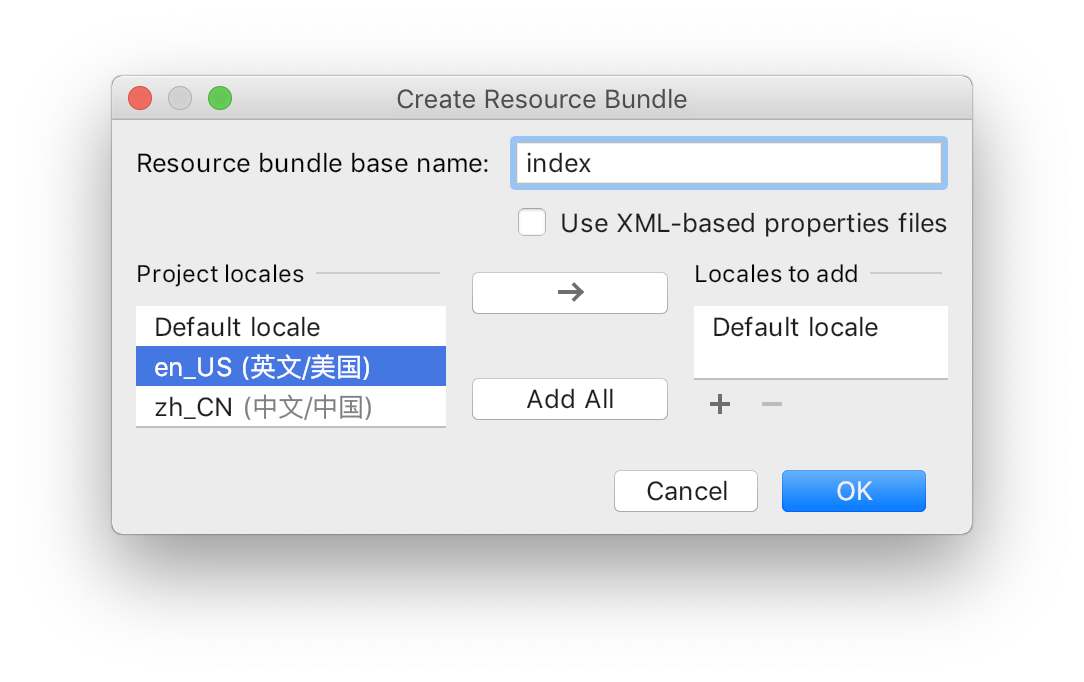
resource

左边project locale中有三个选项,default和自己添加的zh_CNen_US分别表示中文和英文。点击add All后确认,创建文件。如下图:

双击其中的一个配置文件比如index.properties,使用idea可以发现编辑区的左下角有一个Resource Bundle tab页,点击之后,来到如下图的界面,新建一个选项,输入各配置文件中的值。

创建controller和html页面

  1. 创建controller

    1
    2
    3
    4
    @RequestMapping("/index")
    public String index(){
    return "index";
    }
  2. 创建html页面

    1
    2
    3
    4
    5
    6
    7
    8
    9
    10
    <html lang="en" xmlns:th="http://www.thymeleaf.org">
    <head>
    <meta charset="UTF-8">
    <title>Title</title>
    </head>
    <body>
    <-- 使用th:text会替换标签内的文本内容 使用#{}来表示国际化内容-->
    <h1 th:text="#{index}">这里是主页</h1>
    </body>
    </html>

重启程序,发现index页面上显示的是主页,这个内容,正好是在index_zh_CN.properties中定义的index的值。SpringBoot会根据请求头中的语言来判断使用哪个配置文件中的内容。

如何切换页面的中英文?

dispatcherServlet中在渲染视图的时候,会通过locale的属性来改变渲染后的语言。

1
2
3
4
5
protected void render(ModelAndView mv, HttpServletRequest request, HttpServletResponse response) throws Exception {
// 可以通过请求的locale来定义返回的locale
Locale locale =
(this.localeResolver != null ? this.localeResolver.resolveLocale(request) : request.getLocale());
response.setLocale(locale);

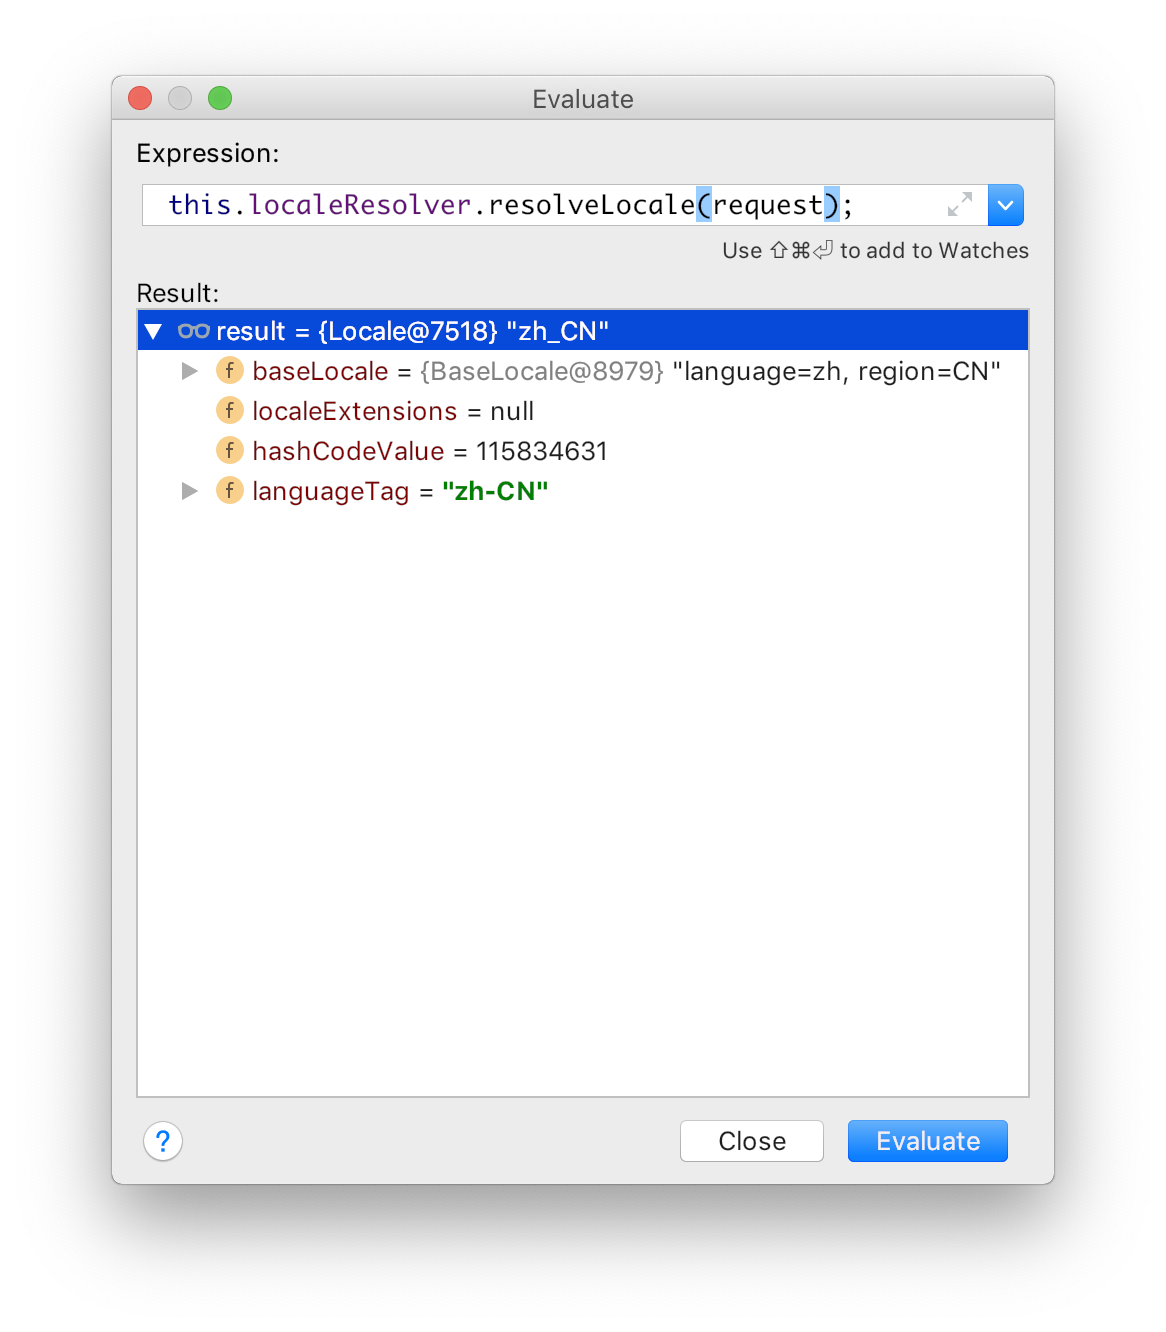
通过debug发现this.localeResolver中是有值的,说明Spring容器中有localeResolver,进而可以得出结论:SpringBoot中自动配置来默认的localeResover

计算

WebMvcAutoConfiguration中的确配置了关于locale的信息。

1
2
3
4
5
6
7
8
9
10
11
12
@Bean
@ConditionalOnMissingBean
@ConditionalOnProperty(prefix = "spring.mvc", name = "locale")
public LocaleResolver localeResolver() {
if (this.mvcProperties.getLocaleResolver() == WebMvcProperties.LocaleResolver.FIXED) {
return new FixedLocaleResolver(this.mvcProperties.getLocale());
}
// 设置了 容器中的localeResolver 为 AcceptHeaderLocaleResolver
AcceptHeaderLocaleResolver localeResolver = new AcceptHeaderLocaleResolver();
localeResolver.setDefaultLocale(this.mvcProperties.getLocale());
return localeResolver;
}

因为配置了默认的localeResolver ,所以在使用this.localeResolver.resolveLocale(request)处理这个请求的时候,就会使用AcceptHeaderLocaleResolver类中的方法,而这个方法正是拿的request中的Accept-Language

1
2
3
4
5
6
7
8
9
10
11
12
@Override
public Locale resolveLocale(HttpServletRequest request) {
Locale defaultLocale = getDefaultLocale();
if (defaultLocale != null && request.getHeader("Accept-Language") == null) {
return defaultLocale;
}
// 从request中拿Accept-Language这个值。
Locale requestLocale = request.getLocale();
List<Locale> supportedLocales = getSupportedLocales();
if (supportedLocales.isEmpty() || supportedLocales.contains(requestLocale)) {
return requestLocale;
}

这样的话疑惑就解开了,默认的SpringBoot构件web应用会使用当前浏览器的地区语言来进行国际化。

改变国际化语言标准的判断方式

上面说了默认的SpringBoot会从request中获取地区语言信息,来判断加载哪个配置。

在自动配置的方法上标注着这样一段@ConditionalOnMissingBean,说明如果有localeResolver这个类那么这个方法是不会生效的。所以改变的方法就是自己实现localeResolver.

1
2
3
4
5
6
7
8
9
10
11
12
13
14
15
16
17
18
19
20
21
22
23
24
25
26
27
28
29
30
31
32
33
34
35
36
37
38
39
40
41
42
43
public class MyLocalResolver implements LocaleResolver {

private Locale defaultLocale;

@Override
public Locale resolveLocale(HttpServletRequest request) {
Locale defaultLocale = getDefaultLocale();
String language = request.getParameter("language");
// 获取请求中的 ?language=「xxx」
String[] s = new String[2];
if(language != null && !"".equals(language)){
s = getS(language);
}else{
//如果是空则找浏览器中的属性
String header = getFirstLangInRequest(request);
if(header!=null && !"".equals(header)){
s = getS(header);
}else{
//否则给个默认的local
s = getS("zh-CN");
}
}
defaultLocale = new Locale(s[0],s[1]);
return defaultLocale;
}

private String getFirstLangInRequest(HttpServletRequest request) {
return request.getHeader("Accept-Language").split(",")[0];
}

private String[] getS(String language) {
return language.split("-");
}

public Locale getDefaultLocale() {
return this.defaultLocale;
}
}
//添加到bean中 方法名称必须是localeResolver 或者指定bean的名称为localeResolver
@Bean
public LocaleResolver localeResolver(){
return new MyLocalResolver();
}

稍微修改一下index.html中的内容

1
2
3
4
5
6
<body>
<h1 th:text="#{index}">这里是主页</h1>
<-- 点击按钮时变换中英文 -->
<a th:href="@{/index(language='zh-CN')}"><button th:text="#{but1}" >这是切换中文的按钮</button></a>
<a th:href="@{/index(language='en-US')}"><button th:text="#{but2}" >这是切换英文的按钮</button> </a>
</body>

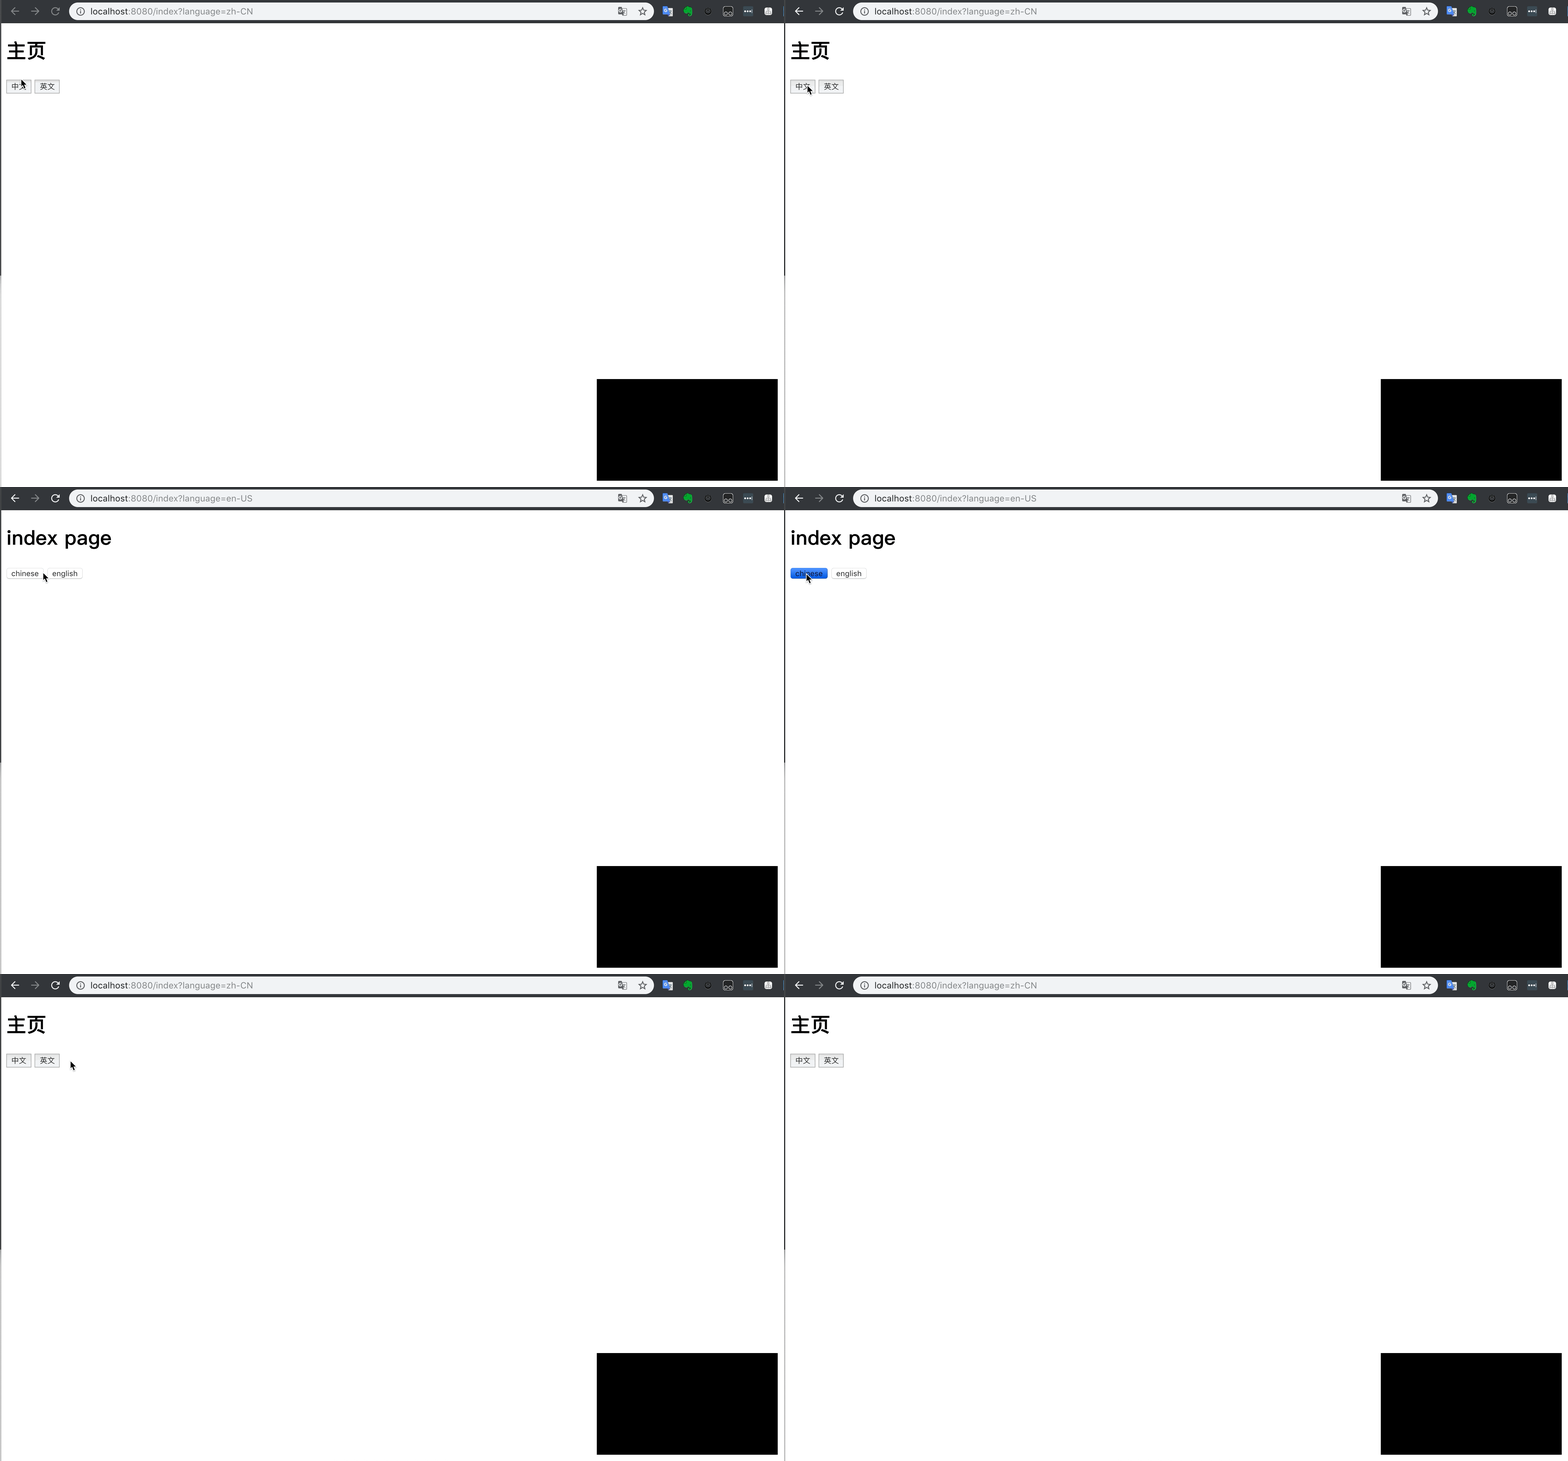
重启程序,进行测试:

测试成果

总结

如何在SpringBoot中使用国际化

  1. 编写国际化相关的 ResourceBundle文件,也就是对应的语言配置文件如:index_en_US.properties,index_zh_CN.properties,注意这个文件格式是固定的xxx_语言代码_大写的国家代码,并且必须是properties文件
  2. 编写html接收国际化变量,使用Thymeleaf引擎可以使用语法#{}来使用国际化变量。

如何改造

因为SpringBoot默认实现了LocaleResolver,并且标注了ConditionalOnMissingBean注解,所以,只需要自己实现LocaleResolver类,重写相关方法,就可以达到改造的目的。需要注意的是,在注册bean的时候,方法名必须localeResolver,或者指定bean的名称为localeResolver

-------------本文结束感谢您的阅读-------------

本文标题:SpringBoot的WEB开发之国际化

文章作者:NanYin

发布时间:2019年07月15日 - 12:07

最后更新:2019年08月12日 - 13:08

原始链接:https://nanyiniu.github.io/2019/07/15/SpringBoot%E7%9A%84WEB%E5%BC%80%E5%8F%91%E4%B9%8B%E5%9B%BD%E9%99%85%E5%8C%96/

许可协议: 署名-非商业性使用-禁止演绎 4.0 国际 转载请保留原文链接及作者。