SpringBoot中的配置文件(拓展)

SpringBoot中的配置文件(拓展)

如果有多个环境,配置文件需要根据环境来变化,只有一个配置文件就显的鸡肋了,每次变更环境的时候都需要修改一遍配置文件,两个还好,多了就相当麻烦了。

SpringBoot提供了多配置文件的用法,让环境的变化尽可能少的影响到配置文件的更改。

多配置文件

加载顺序

Spring会按以下顺序查找地址,如果有则优先使用前面的配置文件的属性,如果后面的文件有前面文件没有的属性,则会添加,否则忽略。

  1. file:./config/
  2. file:./
  3. classpath:/config/
  4. classpath:/

指定/添加默认加载地址

使用spring.config.location来指定默认的加载地址。

如果spring.config.location 指定的值为: classpath:/custom-config/,file:./custom-config/,则系统会优先找这个文件。

如果使用spring.config.additional-location来添加配置文件的加载地址。

命名格式

可以使用 application-{profile}.properties来定义一个特殊的配置文件。特殊的这个配置文件如果调用,那么他总会覆盖掉默认的application.properties文件中的内容。

比如使用application-dev.properties作为开发环境的配置文件,在其中指定了服务端口8081.而在默认的application.properties中指定的端口号为8080.那么,系统会使用哪个端口呢?

下面我使用yml文件作为例子(同properties文件)

1
2
3
4
5
6
7
8
9
10
11
12
# application.yml文件中的内容
server:
port: 8080

# yaml文件格式指定使用哪个配置
spring:
profiles:
active: dev

# application-dev.properties文件中的内容
server:
port: 8081

通过spring.profiles.active=dev(这时properties格式)。来特殊指定启用哪些配置文件。这里启用的是application-dev.properties文件。

运行结果

由控制台的输出结果可以看出,springBoot激活了名为dev的配置文件及application-dev.properties文件,并且更改端口为dev中指定的8081端口。

使用yaml文档块

yaml文件提供一种特性叫做文档块。使用三个-来隔离配置信息

1
2
3
4
5
6
7
8
9
10
11
12
13
14
15
16
17
18
19
20
21
22
23
# 默认的
server:
port: 8080

spring:
profiles:
active: dev

# 文档块1
---
spring:
profiles: dev

server:
port: 8081

# 文档块2
---
spring:
profiles: prod

server:
port: 8082

使用文档块能够减少多个配置文件。与多个配置文件效果是等同的。

自动配置

其实在前面的文章中已经大概了解了SpringBoot如何进行自动配置,但是仅仅停留在了EnableAutoConfiguration注解的使用和浅层的解析上,这次需要更加深入的了解如何调用到自动配置类、我们如果想自己在配置文件中配置属性,该怎么去配置。

如何进行的自动配置

首先还是进入到SpringBootApplication注解中

1
2
3
4
5
@SpringBootConfiguration
@EnableAutoConfiguration
@ComponentScan(excludeFilters = { @Filter(type = FilterType.CUSTOM, classes = TypeExcludeFilter.class),
@Filter(type = FilterType.CUSTOM, classes = AutoConfigurationExcludeFilter.class) })
public @interface SpringBootApplication {

发现这里调用了EnableAutoConfiguration注解。再点进这个注解中。

1
2
3
4
@AutoConfigurationPackage
// 引用了AutoConfigurationImportSelector这个类
@Import(AutoConfigurationImportSelector.class)
public @interface EnableAutoConfiguration {

这里通过import注解使用了AutoConfigurationImportSelector类,这个类直接翻译过来叫做自动配置导入选择器。进入这个类中看。

1
2
public class AutoConfigurationImportSelector implements DeferredImportSelector, BeanClassLoaderAware,
ResourceLoaderAware, BeanFactoryAware, EnvironmentAware, Ordered {

这里我们可以看到AutoConfigurationImportSelector继承了DeferredImportSelector这个类。这个类中需要实现的方法是void process(AnnotationMetadata metadata, DeferredImportSelector selector);方法。

所以需要看AutoConfigurationImportSelector中是如何实现父类中定义的process方法。

1
2
3
4
5
6
7
8
9
10
11
12
13
14
public void process(AnnotationMetadata annotationMetadata, DeferredImportSelector deferredImportSelector) {
Assert.state(deferredImportSelector instanceof AutoConfigurationImportSelector,
() -> String.format("Only %s implementations are supported, got %s",
AutoConfigurationImportSelector.class.getSimpleName(),
deferredImportSelector.getClass().getName()));
// 获得自动配置的entry,点进这个方法看如何获取自动配置的配置信息的
AutoConfigurationEntry autoConfigurationEntry = ((AutoConfigurationImportSelector) deferredImportSelector)
.getAutoConfigurationEntry(getAutoConfigurationMetadata(), annotationMetadata);
this.autoConfigurationEntries.add(autoConfigurationEntry);
// 循环所有configuration然后放到entries中添加到容器中。
for (String importClassName : autoConfigurationEntry.getConfigurations()) {
this.entries.putIfAbsent(importClassName, annotationMetadata);
}
}

通过getAutoConfigurationEntry这个方法获取到所有的自动配置的信息。点进这个方法看是如何获取到的

1
2
3
4
5
6
7
8
9
10
protected AutoConfigurationEntry getAutoConfigurationEntry(AutoConfigurationMetadata autoConfigurationMetadata,
AnnotationMetadata annotationMetadata) {
if (!isEnabled(annotationMetadata)) {
return EMPTY_ENTRY;
}
AnnotationAttributes attributes = getAttributes(annotationMetadata);
// 返回自动配置类的全类名
List<String> configurations = getCandidateConfigurations(annotationMetadata, attributes);
// 去掉重复的
configurations = removeDuplicates(configurations);

通过getCandidateConfigurations来获取自动配置的全类名。

1
2
3
4
protected List<String> getCandidateConfigurations(AnnotationMetadata metadata, AnnotationAttributes attributes) {
// 第一个参数返回的是 EnableAutoConfiguration.class
List<String> configurations = SpringFactoriesLoader.loadFactoryNames(getSpringFactoriesLoaderFactoryClass(),
getBeanClassLoader());

接着调用loadFactoryNames获取自动配置类的List

1
2
3
4
5
6
7
public static List<String> loadFactoryNames(Class<?> factoryClass, @Nullable ClassLoader classLoader) {

// 这里的factoryClassName是EnableAutoConfiguration
String factoryClassName = factoryClass.getName();
// 下面这句话的意思是需要在loadSpringFactories这个map中获取key为EnableAutoConfiguration的value
return loadSpringFactories(classLoader).getOrDefault(factoryClassName, Collections.emptyList());
}

那么这个map的值是怎么形成的呢?

1
2
3
4
5
6
7
8
9
10
11
12
13
14
15
16
17
18
19
20
21
22
// 在FACTORIES_RESOURCE_LOCATION中获取资源
Enumeration<URL> urls = (classLoader != null ?
classLoader.getResources(FACTORIES_RESOURCE_LOCATION) :
ClassLoader.getSystemResources(FACTORIES_RESOURCE_LOCATION));
//定义一个MAP,将结果都存到这个map中
result = new LinkedMultiValueMap<>();
//对每个资源循环
while (urls.hasMoreElements()) {
URL url = urls.nextElement();
UrlResource resource = new UrlResource(url);
// 转化为properties
Properties properties = PropertiesLoaderUtils.loadProperties(resource);
for (Map.Entry<?, ?> entry : properties.entrySet()) {
String factoryClassName = ((String) entry.getKey()).trim();
for (String factoryName : StringUtils.commaDelimitedListToStringArray((String) entry.getValue())) {
// 最后添加到result中
result.add(factoryClassName, factoryName.trim());
}
}
}
cache.put(classLoader, result);
return result;

下图是对result的debug结果,框中是所有的结果,但横线处是我们自动配置需要的。
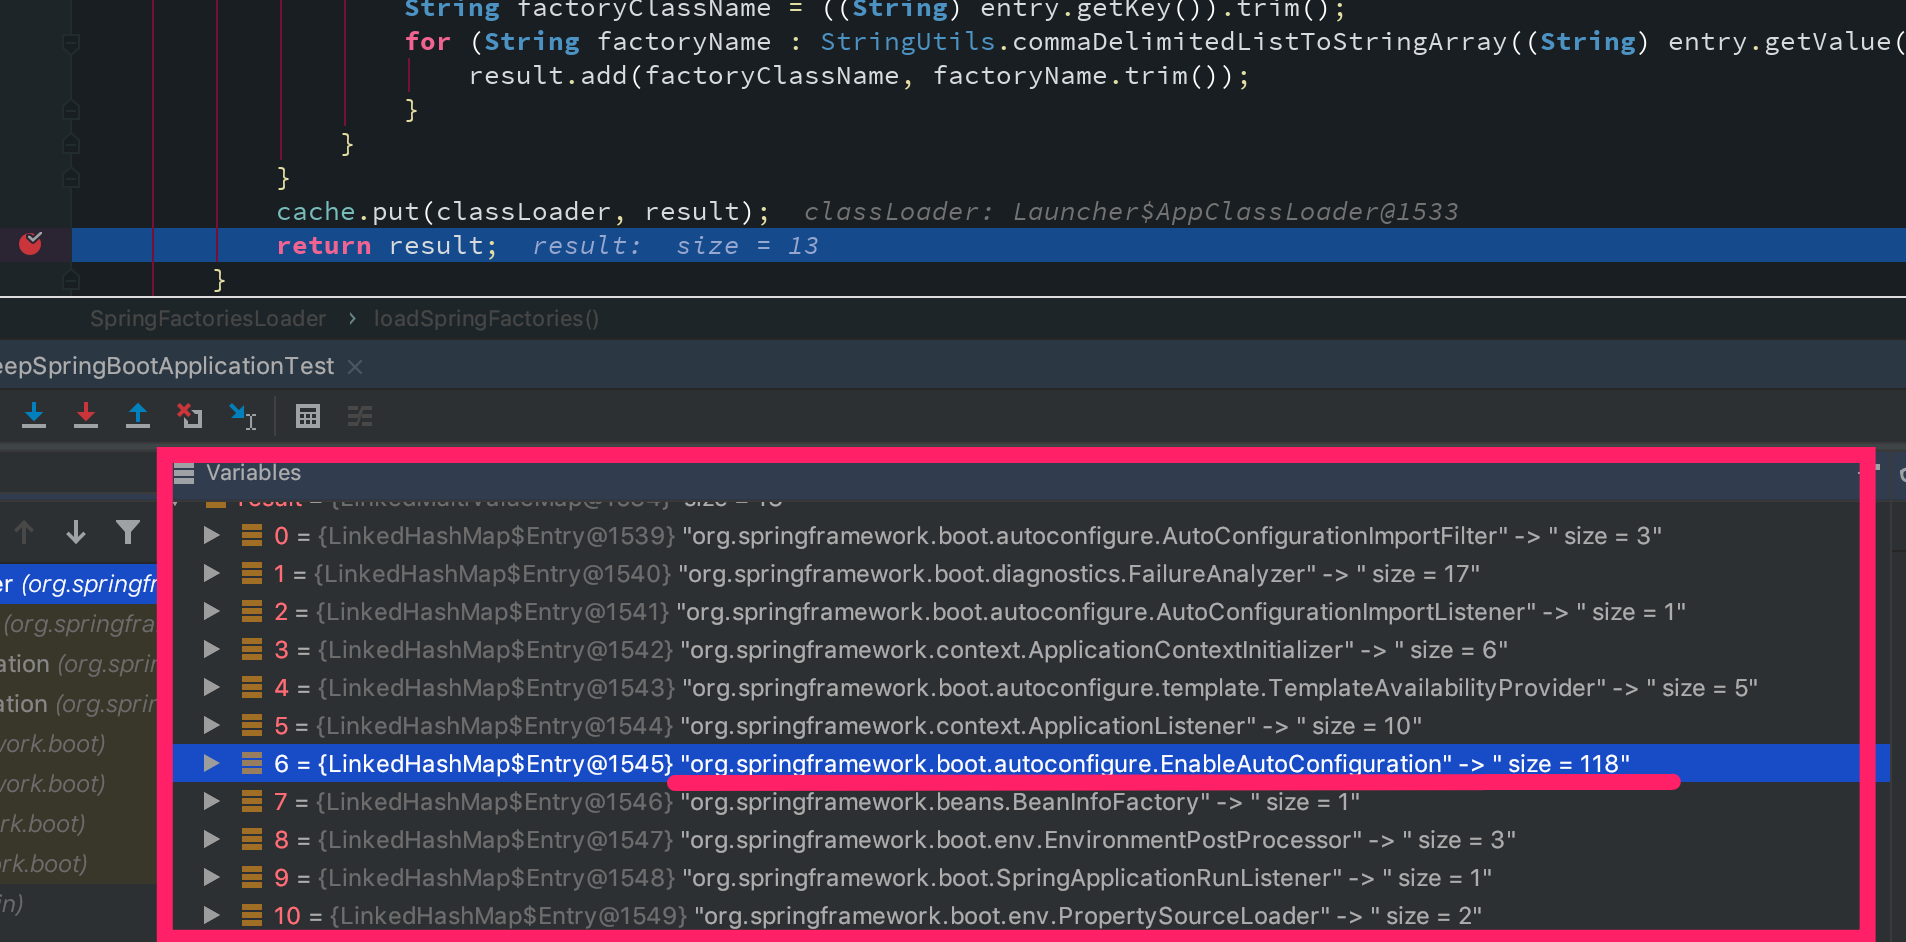
Debugx

结果在FACTORIES_RESOURCE_LOCATIONMETA-INF/spring.factories)中可以找到.

factory

这里的所有类都是可以自动配置到Spring的容器中。

如何根据自动配置类配置属性

进入到spring.factories中进行查看所有autoConfigure类,用CacheAutoConfiguration举例,来分析以后想要配置关于cache的属性,怎么查找到这个配置属性,怎么配置到properties文件中。

直接点进类中发现有很多注解,一个个看

1
2
3
4
5
6
7
8
9
10
11
12
13
14
15
//表示一个配置文件
@Configuration
// 仅当classpath中存在特定的CacheManager类时匹配
@ConditionalOnClass(CacheManager.class)
// 如果Spring 容器中存在CacheAspectSupport
@ConditionalOnBean(CacheAspectSupport.class)
//如果Spring容器不满足bean的name为cacheResolver,value为CacheMaager
@ConditionalOnMissingBean(value = CacheManager.class, name = "cacheResolver")
// 开启自动配置属性,指向 CacheProperties类
@EnableConfigurationProperties(CacheProperties.class)
@AutoConfigureAfter({ CouchbaseAutoConfiguration.class, HazelcastAutoConfiguration.class,
HibernateJpaAutoConfiguration.class, RedisAutoConfiguration.class })
// 缓存配置的选择器
@Import(CacheConfigurationImportSelector.class)
public class CacheAutoConfiguration {

其中EnableConfigtionProperties注解用来开启配置属性。

1
2
3
4
5
6
7
8
9
10
// spring.cache就是在配置文件中使用的前缀
@ConfigurationProperties(prefix = "spring.cache")
public class CacheProperties {
// 以下就是各属性值
private CacheType type;
private List<String> cacheNames = new ArrayList<>();
private final Caffeine caffeine = new Caffeine();
private final Couchbase couchbase = new Couchbase();
private final EhCache ehcache = new EhCache();
private final Redis redis = new Redis();

用cache中的redis对象为例子,如何去配置redis缓存。

其中指定了前缀,和中间的redis对象,所以redis的配置中的属性就应该是spring.cache.redis.xxx.

1
2
3
4
5
public static class Redis {
private Duration timeToLive;
private boolean cacheNullValues = true;
private String keyPrefix;
private boolean useKeyPrefix = true;

比如需要配置不允许redis缓存空值,就需要配置cacheNullValues属性,所以可以在配置文件中写

1
spring.cache.redis.chcheNullValues=false

其他类型的自动配置类同理,每个自动配置类都配备一个xxxProperties.class类进行属性的匹配,所以如果需要某个属性,则直接向对应的类中查找,找出前缀和属性名,则可直接找出完成的配置名称。

经过上面的分析,在也不用担心该如何配置配置文件了。

自定义SpringBoot Starter实现自动配置

如果自行进行自动配置。主要实现的文件是:

  • xxxxAutoConfiguration
  • xxxxProperties
  • resources/META-INF/ 下的 spring.factories 文件中添加:org.springframework.boot.autoconfigure.EnableAutoConfiguration=com.example.autocinfigure.xxxxAutoConfigure

在创建自动配置包前需要在pom文件中添加自动配置的包依赖。

1
2
3
4
5
6
7
<dependencies>
<dependency>
<groupId>org.springframework.boot</groupId>
<artifactId>spring-boot-autoconfigure</artifactId>
<version>1.5.9.RELEASE</version>
</dependency>
</dependencies>

加载的基本过程:

  1. Spring Boot在启动时扫描项目所依赖的JAR包,寻找包含spring.factories文件的JAR包
  2. 根据spring.factories配置加载AutoConfigure类
  3. 根据 @Conditional注解的条件,进行自动配置并将Bean注入Spring Context
-------------本文结束感谢您的阅读-------------

本文标题:SpringBoot中的配置文件(拓展)

文章作者:NanYin

发布时间:2019年07月08日 - 12:07

最后更新:2019年08月12日 - 13:08

原始链接:https://nanyiniu.github.io/2019/07/08/2019-07-08-SpringBoot%E7%9A%84%E9%85%8D%E7%BD%AE%E6%96%87%E4%BB%B6%EF%BC%88%E6%8B%93%E5%B1%95%EF%BC%89/

许可协议: 署名-非商业性使用-禁止演绎 4.0 国际 转载请保留原文链接及作者。